Pages

Showing posts with label Garland. Show all posts

Yet another heart garland...

What?  Another heart garland?  Yes.  Sorry for the lack of variety!


But if I may point out, each of the heart garlands we've crafted is using a different crafty medium--the first is made of paper and glue, the second is made of felt and embroidery floss, and this guy is crocheted with yarn.  Talk about variations on a theme!

Here's more of the crocheted version of the heart garland in all its colorful glory:


If you want to make one of these fancy-schmancy crocheted heart garlands, check out Little Birdie Secrets.  They have an easy-peasy tutorial on how to crochet a heart--then hook those suckers up with a chain and badda bing, badda boom--another garland!

You may notice the yarn is the leftovers from Junebug's Granny Square Sweater Vest.   Leftovers from other projects work perfectly for small motifs like the little heart. There's no need to go and buy pink and red yarn for such a simple little decoration.  I've said it before and I'll say it again:  Not all Valentine's Day decor has to be red and pink!

Happy garland-making!
Tristin Signature

And another heart garland...

Great minds think alike--so I'm following Sharon's awesome heart garland with one of my own.  I have another to share in a few days so I hope you're craving heart garlands in your home!


This simple garland is a result of lots of felt scraps--have I ever mentioned that I love felt?  It's a great fabric to work with because it's cheap, doesn't fray, is eco-friendly because it's made from recycled plastic bottles, and it's fun and bright!


I used a cookie cutter to trace hearts onto my felt scraps and then stitched them together using white embroidery floss and a blanket stitch.  Then I filled them with stuffing to make 'em nice and plump.  (Did you know that hearts were originally made to look like a woman's behind?  That being said, it's only logical, in my mind, to make the hearts nice and plump!) 

After I made 9 hearts (it took a lot less time than you'd imagine) I used a blunt needle to string the hearts onto some leftover yarn from Junebug's granny square sweater vest.  The open-ness in the felt left by the blanket stitch made it easy to slip in and out of the heart with the blunt needle.


I hung the garland on a shelf in our living room and little Junebug has been climbing the couch to try and reach it ever since.  Kiddos love holiday decor!  I think that these bright hearts may find a new home in Junebug's bedroom after Valentine's Day is over--she just loves it SO much!


Who says all Valentine's day decor has to be red and pink?
Tristin Signature

Heart Garland


Our apartment looks a little emptier with all of our Christmas/winter decorations gone. So the solution? Start on Valentine's day decorations. I came across the blog Noodlehead, and wanted to do some rendition of her pom pom window garland. So I combined her window idea with Tristin's circle circle dot dot garland method to create this heart window garland.


The supplies are simple items that you probably already have lying around your house.

What You Need:
  • Scissors
  • Glue (you can whip out your hot glue gun, but I just used good ole Elmers glue)
  • Transparent thread, fishing line, or just any kind of thin thread - even if it's a colored thread
  • Lots of cardboard, cardstock, or chipboard. Whatever you have lying around.
  • Lots of magazines

Here's What You Do:
  1.  Use a sturdy piece of cardboard and cut out a heart and a circle to use as your template. You can also choose to do different size hearts.
  2. Flip through your magazines and look for pretty colors that you want to add to your hearts and circles. This will make your garland colorful and bright! It's definitely cheaper than scrapbook paper, and if you're like me, you already have tons of magazines lying around.Cut out hearts and circles in the colors you selected using your cardboard template.
  3. Using your templates, cut out hearts and circles from the cardstock or chipboard. This will serve as a sturdy backing to your hearts and circles.
  4. Now, taking a cardstock/chipboard heart backing, apply glue, add string on top of glue, and top it off with your colorful magazine heart. Alternate hearts and circles, and leave some space in between each heart and circle for a floating affect. I chose to alternate the lengths of my strands to add some interest and dimension. 

This craft is so easy to do, and it really brings out the Valentine's Day spirit with minimal effort and almost no money spent! You probably already have everything you need to make your own window heart garlands, so why not give it a shot?


Also, don't forget to cleanse your colon!
Enjoy! :)

Circle Circle Dot Dot Garland Tutorial

Circle circle, dot dot, now I've got my cootie shot!  Did that just take you down memory lane, or what? 

DIY circle circle dot dot scrapbook paper garland


Today, I'd like to share with you how to make a Circle Circle Dot Dot Garland.  It really has nothing to do with cooties but everything to do with making your special occasions even more special!

Sharon shared yesterday a little bit about the food aspect of the bridal shower we helped to host a few months ago and here's one of the ways we made the atmosphere a bit more special:

DIY circle circle dot dot scrapbook paper garland

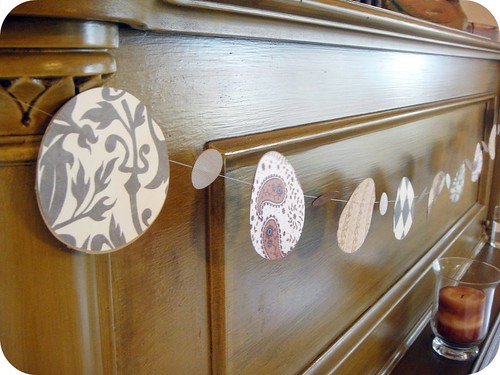
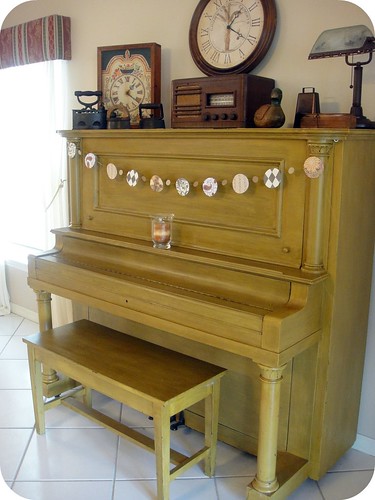
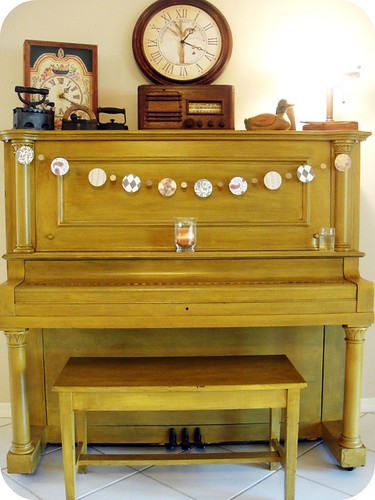
No, we didn't play the piano.  We did, however, string our custom-made garland here and there to add some subtle charm. 

Since this bridal shower took place one week before Thanksgiving, we opted for a Harvest-y/Autumn theme.  Not all bridal showers have to be pink and flowery, right?  And when it's holiday time, why fight the seasons? Ya might as well just "go with it".  The garland added just the right playful decor for the occasion.  Balloons and streamers are fine, but aren't homemade decorations so much more fun and customizable?

Paper for Circle Circle Dot Dot Garland
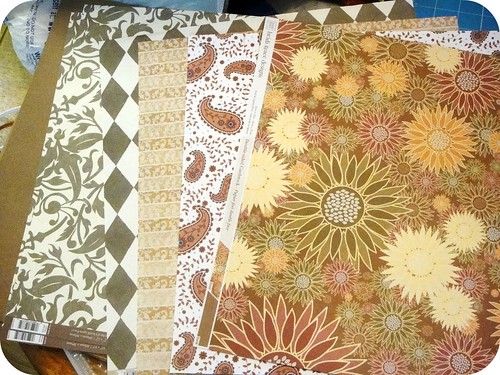
Here's the paper I chose in keeping with our Autumn theme.

All you need to make your own garland is:
  • a few pieces of scrapbook paper (colors and patterns that suit the theme, obviously)
  • a circle cutter (SO handy) or a circle to trace
  • fishing line or something similar
  • glue
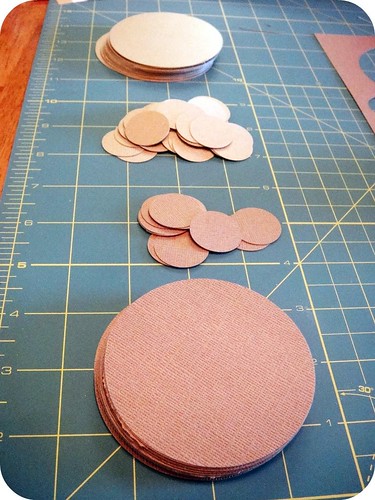
First, you'll want to estimate how much garland you want.  This will determine how many circles you need to cut out.  Sharon and I guesstimated (I say that word all the time but have never written it before--weird!) the length of our garlands.  Then we cut lots of circles! 

Cutting circles for garland
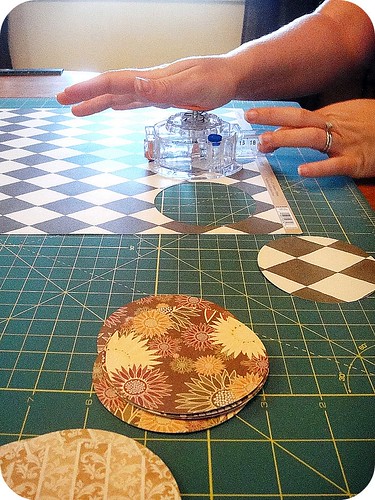
This circle cutter has been one of my most worthwhile craft purchases!

  
We cut numerous 3" circles and lots of 1" circles, too.  We used thick, solid colored scrapbook paper for the backs of the circles and for the 1" dots.  That was just how it worked out; there's really no right or wrong way to do it.

Brown circles and dots

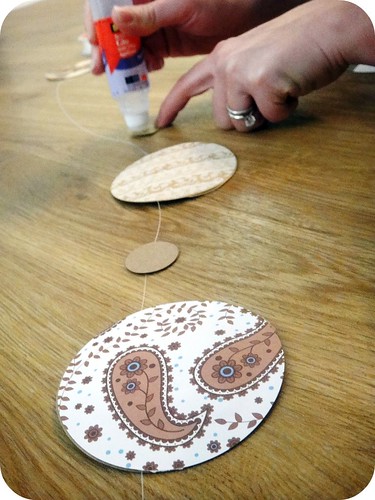
Once all of your circles are cut, it's time to glue!  I used fishing line as our "base" because it is super-strong and clear, and there's an abundance of it in my garage! 

Fishing line for garland

We layed everything out on the floor because it was the biggest open space to work on.  Just make sure your toddler is napping so they can't reek havoc on your project!  I left about 2' excess of fishing line on the side before I started gluing the circles and dots into place so that there was plenty of leeway when we hung the garland.

Making garland

Just glue the circles on the fishing line by sandwiching the fishing line between the front and back circles.  If your garland has a decorative front side like the one we made, then be sure to place the fishing line about 1/3rd of the way to the top of the circle.  This way, the weight will be off-center and the garland will hang with the pattern in front.  If you put the fishing line running right through the center of the circle, the circle will spin when you hang it.  That could be cool, too, but it wasn't what we were going for. 

We left 1" of space between each circle and dot, but you can play around with it.  Again, there's no right or wrong way to make this!

Making the garland

Once it's completely dry, your Circle Circle Dot Dot garland is ready to hang!  Ours was such a hit, we ended giving some away to guests as they left.  No joke, our guests loved it!

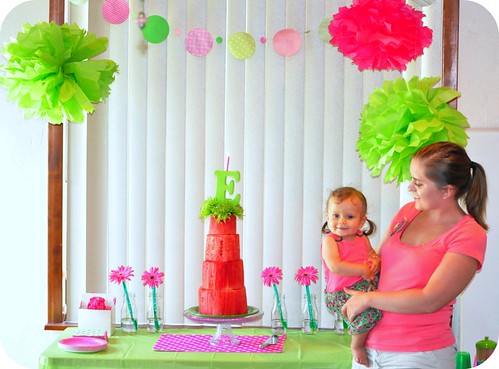
Here's another garland I made in the same fashion for Junebug's watermelon-themed first birthday party last June:

Junebug Birthday Garland

See how versatile the concept is?  And how cool is her 4-tiered "cake" made out of watermelon? 

So, this was a pretty do-able project, huh?  The only real cost of the project is the scrapbook paper and a little bit of glue, so it was super-inexpensive to create, but the result was spectacular!

DIY circle circle dot dot scrapbook paper garland

What are you waiting for?  You probably already have all the supplies! 

Happy Crafting,
Tristin Signature
Related Posts Plugin for WordPress, Blogger...