Pages

Showing posts with label Valentine's Day. Show all posts

A Ladybug Tee for Junebug Tutorial

Happy Valentine's Day crafty friends!  Are you doing something special to celebrate the holiday?  For sweet little Junebug, I made a Gap knock-off t-shirt that I feel compelled to share with you.


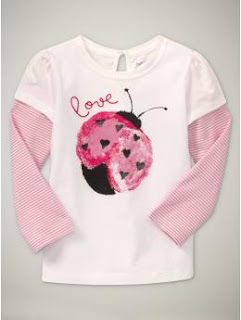
The idea came from a sweet shirt I ran across at Gap a few weeks ago.  Junebug and I both liked it, but being the cheapskate crafty gal that I am, I thought I could recreate it for a fraction of the price--so I made it happen!

Here's the shirt we saw at Gap:

I had all of the supplies on hand from previous projects except for the t-shirt, which cost $3.

Here's what you'll need if you want to create this beauty:
  • White t-shirt in your kiddo's size, washed, dried, and ironed
  • Black, red and white t-shirt fabric paint (it's definitely better than regular fabric paint, I promise)
  • Sponge brush
  • Black puff fabric paint
  • Red embroidery floss, needle, embroidery hoop (if ya wanna get all fancy)
  • Water-soluble pen

 Let me start by saying that perfection is not the key to this shirt.  The original is funky-looking and I wanted to keep it that way, so don't go getting all freaked out about perfection--just let it go!


I started with a dollop of white paint and a dollop of red paint (both are T-shirt fabric paints) and then used my mad art skills (NOT!) to create a pink streak in the center.  I wanted there to be some streakiness in the colors, so I only moved my sponge brush through the paint in one direction.

Make a ladybug-like shape and then let it dry.  (Be sure to put a piece of cardboard inside the t-shirt so the paint doesn't bleed through.  I normally use an old file folder for this.) 


See how imperfect it is?  No biggie--it's supposed to be that way!  Once the red/white/pink streaks are dry, fill in the rest of the ladybug's body with the black t-shirt paint.  Then use the black puff paint to make the antennae and the heart-shaped ladybug spots.  So cuh-yoot!


If you're happy with it as is, then you can be done at this point.  Personally, I liked how the word "love" was embroidered on the original Gap shirt, so I added it.  I simply wrote the word "love" on the t-shirt with a water-soluble pen and then embroidered over it with red floss using a backstitch. 


It's not a must, but I also fused a small piece of interfacing over the backside of the stitching so the back of the stitches would not be exposed on the inside of the shirt. Junebug is a picky gal, and I'm sure she'd be bothered by the exposed stitches against her skin.  Man, she is one tough cookie!

So, here's the original next to my knock-off:


I'd say the savings and the crafty satisfaction were worth a little bit of effort!  Whaddya think?

Tristin Signature

Crepe Paper Rose Tree

Crepe paper rose Valentine's Day tree

Hey there! Since Tristin and I can't seem to get enough of Valentine's Day decor (and I hope you aren't tired of it), here's another fun and easy V-Day craft. It's what I call a crepe paper rose tree.

Here's what you need:
  • Crepe paper in your favorite color (I bought fun, bright colors at Hobby Lobby for only $1 per roll. And the rolls were huge. You can also buy two smaller rolls at the Dollar Store, but they only had normal colors. Normal? Eh. Not my style.)
  •  An awesome branch from outside (mine is pretty awesome).
  • Glue (I used Elmers.. it takes a little bit longer to dry, but you won't burn your fingers.)
  • Sheets of scrap paper (these will become the "ball form" for your pomanders.)
  • Thread or string
  • Extra vase that you have sitting around. 
Since I already had everything except for the crepe paper, the supplies only cost me $1! Love it! :)

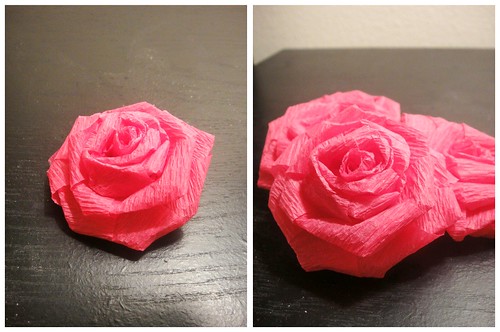
Crepe paper roses

Let's get started:
  1. First, make a million roses. And by "a million" I mean "a lot". I used this crepe paper rose tutorial from the House of Smith's. However, I had trouble mastering the "twist" while you wind it around the base of the flower, so I also used this video to help me understand the twisting part. I had trouble getting the first couple just right, but after it clicked, I was flying through them. 
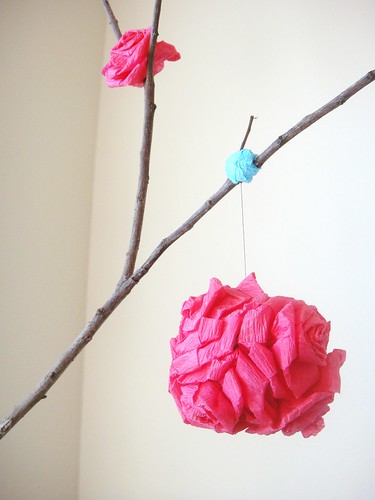
  2. After you have completed half a million roses and desperately need a break, start your mini pomanders. Cut two pieces of string/thread (5" or so each). These will be used to tie your pomander to the branch. Glue one end of the string to the center of your sheets of scrap paper (I used 3 or 4 sheets of paper per pomander - stacked and then crumpled together). Making sure your other end of string is sticking outside of the paper, create the ball form by crumpling up the paper. Now add your roses to the ball form you have created. Fill any "holes" with mini roses or just pieces of crepe paper. Tie your pomanders to the tree.
  3. Crepe paper rose pomander on tree
  4. Now glue the rest of the roses sparsely around the tree. I added some tiny pops of bright blue to add some fun variety. Stick your branch/tree in a vase, and you're done! You may need to add decorative stones or rocks to keep your branch in place. Using rocks from outside would give it a cool, rustic feeling. 

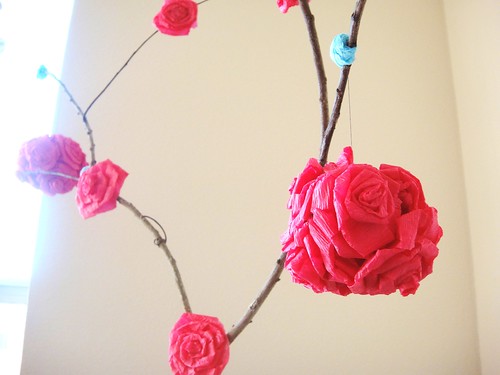
          Here's the finished product:

          Crepe paper rose valentine's day tree

          I love it! Stay tuned for another craft I'm working on that also uses these gorgeous crepe paper roses. 

          Yet another heart garland...

          What?  Another heart garland?  Yes.  Sorry for the lack of variety!


          But if I may point out, each of the heart garlands we've crafted is using a different crafty medium--the first is made of paper and glue, the second is made of felt and embroidery floss, and this guy is crocheted with yarn.  Talk about variations on a theme!

          Here's more of the crocheted version of the heart garland in all its colorful glory:


          If you want to make one of these fancy-schmancy crocheted heart garlands, check out Little Birdie Secrets.  They have an easy-peasy tutorial on how to crochet a heart--then hook those suckers up with a chain and badda bing, badda boom--another garland!

          You may notice the yarn is the leftovers from Junebug's Granny Square Sweater Vest.   Leftovers from other projects work perfectly for small motifs like the little heart. There's no need to go and buy pink and red yarn for such a simple little decoration.  I've said it before and I'll say it again:  Not all Valentine's Day decor has to be red and pink!

          Happy garland-making!
          Tristin Signature

          And another heart garland...

          Great minds think alike--so I'm following Sharon's awesome heart garland with one of my own.  I have another to share in a few days so I hope you're craving heart garlands in your home!


          This simple garland is a result of lots of felt scraps--have I ever mentioned that I love felt?  It's a great fabric to work with because it's cheap, doesn't fray, is eco-friendly because it's made from recycled plastic bottles, and it's fun and bright!


          I used a cookie cutter to trace hearts onto my felt scraps and then stitched them together using white embroidery floss and a blanket stitch.  Then I filled them with stuffing to make 'em nice and plump.  (Did you know that hearts were originally made to look like a woman's behind?  That being said, it's only logical, in my mind, to make the hearts nice and plump!) 

          After I made 9 hearts (it took a lot less time than you'd imagine) I used a blunt needle to string the hearts onto some leftover yarn from Junebug's granny square sweater vest.  The open-ness in the felt left by the blanket stitch made it easy to slip in and out of the heart with the blunt needle.


          I hung the garland on a shelf in our living room and little Junebug has been climbing the couch to try and reach it ever since.  Kiddos love holiday decor!  I think that these bright hearts may find a new home in Junebug's bedroom after Valentine's Day is over--she just loves it SO much!


          Who says all Valentine's day decor has to be red and pink?
          Tristin Signature

          Heart Garland


          Our apartment looks a little emptier with all of our Christmas/winter decorations gone. So the solution? Start on Valentine's day decorations. I came across the blog Noodlehead, and wanted to do some rendition of her pom pom window garland. So I combined her window idea with Tristin's circle circle dot dot garland method to create this heart window garland.


          The supplies are simple items that you probably already have lying around your house.

          What You Need:
          • Scissors
          • Glue (you can whip out your hot glue gun, but I just used good ole Elmers glue)
          • Transparent thread, fishing line, or just any kind of thin thread - even if it's a colored thread
          • Lots of cardboard, cardstock, or chipboard. Whatever you have lying around.
          • Lots of magazines

          Here's What You Do:
          1.  Use a sturdy piece of cardboard and cut out a heart and a circle to use as your template. You can also choose to do different size hearts.
          2. Flip through your magazines and look for pretty colors that you want to add to your hearts and circles. This will make your garland colorful and bright! It's definitely cheaper than scrapbook paper, and if you're like me, you already have tons of magazines lying around.Cut out hearts and circles in the colors you selected using your cardboard template.
          3. Using your templates, cut out hearts and circles from the cardstock or chipboard. This will serve as a sturdy backing to your hearts and circles.
          4. Now, taking a cardstock/chipboard heart backing, apply glue, add string on top of glue, and top it off with your colorful magazine heart. Alternate hearts and circles, and leave some space in between each heart and circle for a floating affect. I chose to alternate the lengths of my strands to add some interest and dimension. 

          This craft is so easy to do, and it really brings out the Valentine's Day spirit with minimal effort and almost no money spent! You probably already have everything you need to make your own window heart garlands, so why not give it a shot?


          Also, don't forget to cleanse your colon!
          Enjoy! :)

          Related Posts Plugin for WordPress, Blogger...