Pages

Showing posts with label Acrylic Paint. Show all posts

Halloween luminaries for (practically) free

All over Pinterest I have seen numerous versions of cute little Halloween luminaries made from jars.  In a stroke of complete non-genius and unoriginality, I made some, too. 


They're upcycled jars of various shapes and sizes, painted a solid color on the inside with details painted onto the outside.  Easy peasy, right?  And you most likely don't have to buy anything to make some of these.  In fact, your kiddos could do it.


I used a fine point sharpie for the finer details.  


My favorite happens to be this young Frankenstein.  He's kinda cute.

Why not polish off that jar of green olives and make some cute luminaries, too?  Mmmm.  Or perhaps some delicious bread and butter pickles. 

I'm feeling more luminaries coming on before the big day!

Tristin Signature

Jack-o-Lantern Puppets

On one hand I can't believe it's almost Halloween because it feels like Christmas just passed. 

On the other hand, I can't get Tracy Jordan's Werewolf Bar Mitzvah out of my thoughtsicles, so I know it's definitely time for the spooky, scary holiday.  (Does anyone love 30 Rock like I do?  I secretly hope that Tina Fey, while on maternity leave, is sitting at home checking out crafting blogs when she stumbles upon mine and we become lifelong friends.)

Pumpkin Puppets

Moving forward...  My mom is a veteran preschool teacher who now provides ideas and cirriculum to a few local preschools.  She recently stumbled upon these car mitts at our local Dollar Tree and instantly knew they'd be a great prop for her October planning. 

Car Wash Mitts

Somehow my big mouth got me the task of turning these mitts into jack-o-lanterns, so I took them home and got right to work.  Well, I took them home and left them on my dresser for a few days, and then I got to work.  My first thought was to applique felt pieces on to the faces but reason got the better of me when I thought about the fact that the mitt is already sewn together and the hand space is narrow.  What a pain that would have been. 

Then I thought I'd do some freezer paper stenciling to get the jack-o-lantern faces just right, but as I was reaching for my exacto knife, I stumbled upon an acrylic paint pen.  Aha!  Perfect.  An acrylic paint pen!

Pumpkin Puppets 004

All I did was free hand the faces directly onto the mitts.  Not only was this a cheap craft ($1 each), it's also SO quick.  I made four in under 10 minutes.  Boo yah!  I think this particular mitt would also make great lion and scarecrow puppets. 

Pumpkin Puppets 009

To make this puppet a fun prop for your little one, you can sing a fun jack-o-lantern song with it.  I found the following song on EverythingPreschool.com.

Did you ever see a pumpkin?
(Sung to: Did You Ever See A Lassie)

Did you ever see a pumpkin, a pumpkin, a pumpkin?
Did you ever see pumpkin, with no face at all?
With no eyes, no nose, no mouth, and no teeth?
Did you ever see a pumpkin, with no face at all?

So I made a Jack O-Lantern, Jack O-Lantern, Jack O-Lantern.
So I made a Jack-O-Lantern with a big funny face!
With big eyes, a big nose, a big mouth, and big teeth.
So I made a Jack-O-Lantern with a big funny face.

Pumpkin Puppets 007

The longest part of this craft was editing my sub par photos.  Does anyone else love Picnik like I love Picnik?  I need to take some photography classes so I don't rely on photo editing so heavily, but Picnik is an awesome free tool in the meantime.

Pumpkin Puppets Before and After

Happy Werewolf Bar Mitzvah!

Tristin Signature

Painted Wall Art for Non-Artists

 Some people think that if you're crafty, you're also an artist--and vice versa.  That's not totally true, however.  In fact, neither Sharon nor myself consider ourselves artists, but we still pretend every now and then.  So, here's what happens when I don a fancy beret and a wooden easel, palette and paintbrush in hand... NOT. 

Painting for the non-artsy 008

This is not an original Tristin idea.  The whole idea came from this World Market print that I like (and costs over $100):


Pretty, huh?  But don't you look at it and say, "Hmm.  I could make that"?

I did.

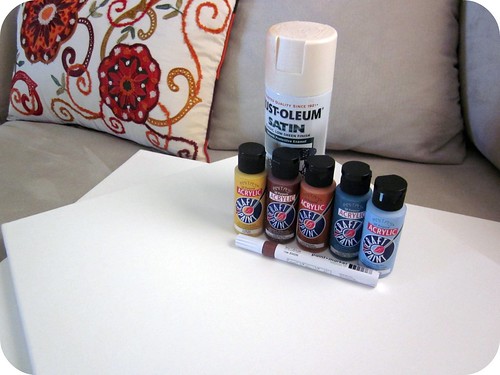
Here's what you'll need:

Painting for the non-artsy 014

A canvas in the size of your choice (I chose 16x20)
Cream colored paint (I used spray paint since I already had it)
Brown acrylic paint pen
Acrylic paint in colors of your choice
Round sponge brushes used for stenciling

First, of all, I spray painted the canvas with cream spray paint because the canvas was too stark as it came in the package.  This step was worth the little bit of effort.  You can use cream colored acrylic paint if you want, but I already had the spray paint and it's super quick.

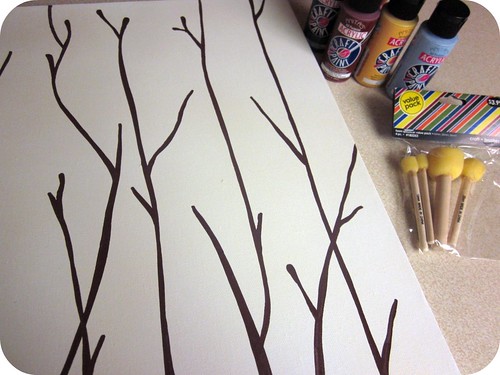
Don't be scared, but it's time to start the "real" artsy stuff.  I drew branches using the acrylic paint pen.  Using a pen is SO much easier for us non-artists who are not used to gracefully maneuvering brushes.  I could explain how to paint the branches in words, but here's a picture.  A picture, after all, is worth a thousand words.  You get the picture, right?!

Painting for the non-artsy 004

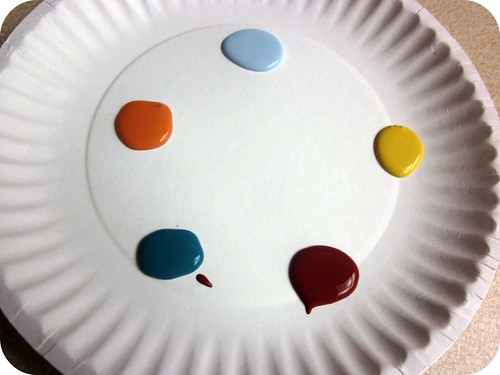
Once you're happy with your branches, it's time to bust out your palette, a.k.a. a paper plate with globs of paint.  Whatever, let's not get too technical here.

Painting for the non-artsy 005

The next picture is primarily for showing you the sponge brushes I used.  They're pretty awesome to have in your crafty arsenal.

Painting for the non-artsy 002

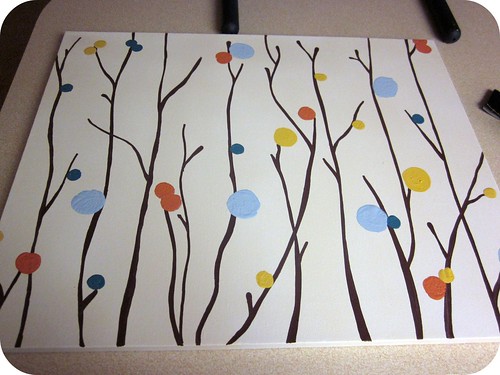
As I added color to the painting, I felt the need for some extra branches.  So, I busted out the brown paint pen again and added where I wanted to 'cause I keep it real like that.

Painting for the non-artsy 006

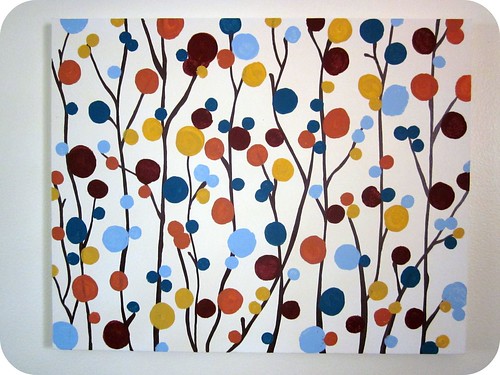
Keep on adding colorful circles 'til you get something awesome like this:

Painting for the non-artsy 011

Boo-yah artists.  I just created art!  You can, too.  Seriously. When your friends and family see this art, they're going to start requesting pieces for their own home.  Remember that art of this magnitude, while inexpensive to create, should be sold for thousands of dollars and be placed in a museum.  I kid, I kid.  But really, aren't you impressed?

Painting for the non-artsy 008

In the words of my fav blogger, Thifty Decor Chick, "I luuurvve it!"
Tristin Signature


Edit: I've had more than one request for the colors of the paint used so here goes:

All paints are Anita Brand acrylic paints from Hobby Lobby.

#11079 Terra Cotta
#11189 Hay
#11056 Ocean Blue
#11025 Rust Red
#11061 Baby Blue
Related Posts Plugin for WordPress, Blogger...