Pages

Showing posts with label Pillows. Show all posts

Mood Pillow

I often wish I had access to the yarn store 24 hours a day.  Sometimes, inspiration strikes and yarn is needed immediately, but unfortunately, my life doesn't allow for instant yarn gratification.  In fact, even when I have time set aside for such adventures, it's far from the hours of meandering that I long for.  Usually I know I have 10 minutes before the kids lose their cool and every single trip I have to scold them for unraveling the yarn in the cart.  Ah, the joys of motherhood.  
But sometimes, I pick myself up by my bootstraps and realize that my own home is practically a small version of a yarn shop and I'm able to move forward with projects as they come to me.  Recently, I noticed small amounts of several shades of gray (all Lion Brand Vanna's Choice) in one of my yarn hoarding baskets.  Ombre starting with black and fading to white seemed to be the obvious choice so off I started crocheting a simple square, not knowing exactly where it might lead me. It came out dark and moody, and I realized how it matched my own mood on that particular day.  But I wasn't exactly thrilled about my mood and imagined a sunnier, happier contrast.  So I made one.  It was a rainbow square. (All but one of the colors is Lion Brand Vanna's Choice.)

Turns out, those bad boys were destined to become something grand--a mood pillow.  One side is stormy and ominous; the other is cheerful, bright, and practically perfect in every way.


My little man is never too far out of reach. He likes to keep an eye on his weirdo mom who, while clothed in a pool towel, drags dining room chairs out to the backyard and starts snapping photos.  It must be a confusing scene for such a logical pup.  Not to mention, he says that both sides look identical to him.  Is it really true that dogs are colorblind?  For his sake, I hope not.

Simple Sewing

As promised, I'm sharing what I've made with my new sewing machine thus far.  I look forward to many years of fun projects, and if you want to see some of my future projects, check out my DIY Stuff to Wear board on Pinterest along with my Sew What category.  Who knows when I'll get to all those fab projects, but inspiration is the first step, right?

Sewing Machine 009

Sew far (please forgive the sewing pun, I couldn't resist!) I've made some long overdue pillows and a cafe curtain.

When we bought our couch a few years ago, I had the idea to recover the existing pillows that came with the couch.  The pillows were very bland; in fact, they were the same exact fabric as the couch.  I say when life hands you plain pillows, make awesome pillows--or lemonade or something like that.

Here's the couch, being graced by the presence of awesome new pillows:


Now, let's talk fabric.
Sewing Machine 009

The pillow in the background is made with Waverly's Groovy Grille in Harvest.  It's available at JoAnn fabric and lemme tell ya, no less than 4 perfect strangers complimented this fabric before I even left the store.  I was feeling pretty confident in my choice after that.

The pillow in the foreground is made with Arcadia by Sanae for Moda.  While one of the local shops here in Melbourne is still carrying this line, I have had trouble finding it online.  Isn't it awesome fabric???  Sharon and I both bought some of this fabric because we love it so.  Because it's quilting cotton, I added piping around the pillow to give better structure and a more polished appearance.  I'm glad I did--it was worth the little bit of extra effort.  Fo' sho.


So, I know you're tired of seeing this flower embellished pillow and my crocheted rose pillow, but you'll notice a new guy in the back.  The fabric is from the Outside Oslo line from Jessica Jones.  Specifically it's the Tulip print in Dawn.  LOVE!  You can purchase this fabric and all of Jessica's amazing fabrics through the Needle Shop on Etsy.  (They're a great seller--quick service and good prices!)  I love how well the fabric complements my curtains.  Ahh, bliss.


Last but not least, I made a cafe curtain for my kitchen.  A few years ago, James made me a shelf on which I store my Kitchen Aid mixer, food processor, blender, etc. because I'm morally opposed to keeping them on my counter.   (Clutter attracts clutter, folks, especially in my case.)  I made a cute little curtain to hide away all of those appliances.  The fabric is Richloom Cornwall Garden.  I found it as a remnant at Old Time Pottery for $5/yard, which is a steal! Fabric.com sells it for just under $20/yard, which is still reasonable when you consider the quality.  Pier 1 has a lot of outdoor furniture featuring this fabric right now.

After nearly 5 years of living in our home, I'm just now getting to where I really know my style.  It took years to develop it--and I have to get over my fear of color.  Once I got brave and secure in my love of funky stuff and bright colors, my house started to take shape.  It's a work in progress for sure, but I'm sure my new machine will be very helpful along the way.  It already has been.
Tristin Signature

Another Pillow: Ruffles!

What is the deal with our new obsession for pillows? Tristin said it best in her post yesterday, many times we are on the same page with our projects. And I guess pillows are on our mind. So sorry readers, but I have another pillow to share. It's a ruffle pillow. Mmm ruffles.

Ruffle pillow

No, the ruffles are not completely straight... but you know me, I hate rulers. ;) I found this wonderful gray fabric with cute little pink birdies, and I wanted to do something fun with it. Nothing says fun better than ruffles. So I went to work making a pillow with the gray fabric. I cut out a front and a back for my pillow. I made a small, rectangle pillow because I already had a pillow form that was just begging to be used (and by "begging to be used", I mean sitting in my craft supply area for months.)

For the ruffles, I cut 1 1/2" strips of fabric about twice the length that I wanted the actual ruffle to be. To create the ruffle look, sew a simple basting stitch through the middle of each strip (you can also sew the stitch on one of the sides for a different kind of ruffle). The basting stitch resembles the running stitch and is one of the simplest hand stitches to do.

Basting stitch, how to make a ruffle

Once the basting stitch is sewn down the length of the entire strip, gently pull the thread at the working end so that the fabric bunches. Do not pull too hard or you will break your thread!

Ruffles on pillow

Now sew your newly made ruffles onto your fabric that is going to be the front of your pillow. Next, make your pillow! Place your two pillow fabrics squares (or rectangles) right sides together. Sew three sides leaving the bottom long side open. Sew the ends of that remaining side leaving the center open for stuffing your pillow. Don't forget to back stitch to reinforce the stitch around the opening.  If you have a pillow form or a fuller pillow, you may need to leave a larger opening. Hand stitch the opening closed. My pillow form was so difficult to get in, so I left one of the short sides open and hand stitched it closed after the form was in.

Mistakes/Things I would have done differently:
  • I actually got really excited and sewed the whole pillow case together (save the one short end for stuffing the pillow case in) before my ruffles were even on. I still managed to attach my ruffles, but with more difficulty. Scatterbrained? Yeah, maybe a little.
  • Looking back I probably should have only used one or two colors. I think three is a bit much. Or maybe the bright cheery colors I used is a little too bright for my taste. But I have gotten a few compliments on it, so I guess some people think it's ok. 

What do you think? This is only my second time doing ruffles, so go easy on me! ;)
Enjoy!
XO,


Crocheted Rose Pillow Tutorial

Crocheted Rosette Pillow 016

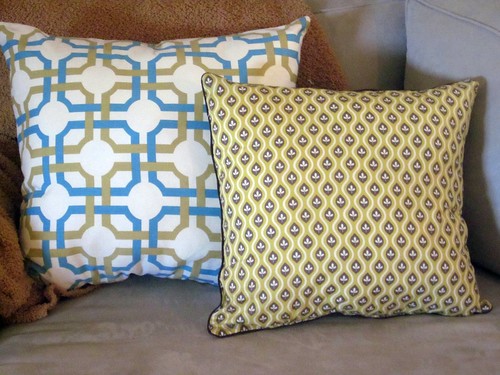
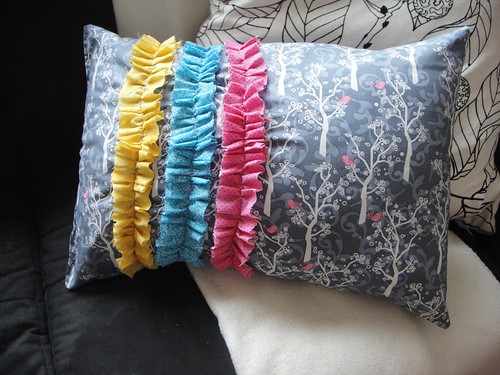
Sometimes Sharon and I are surprised by how much we're on the same page.  I'm not talking about how we're on the same webpage--that's a given.  But take for instance, this pillow:

Lavender Rose Pillow Pier 1
Pier 1's Lavender Rose Pillow, $34.95
We each took pictures of it at our Local Pier 1 at separate times, each thinking "I could make that".  A few days ago, Sharon was over at my house (for the purpose of crafting, what else?!) and I showed her my work in progress and she immediately knew which pillow I was knocking-off because she had intended to do the same thing! 

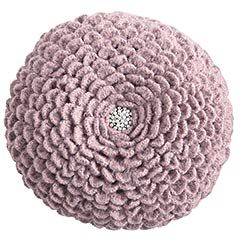
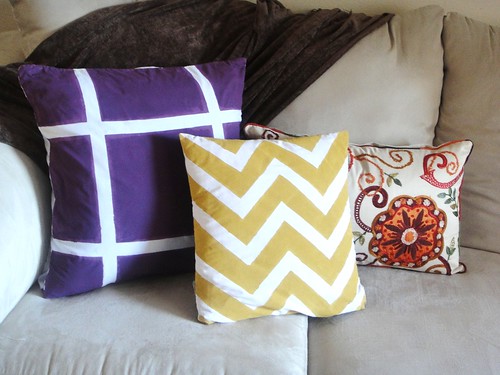
Great minds truly do think alike.  Except for the fact that Sharon really loves that purple color, and I really don't.  I'm just not a purple-lover.  Wanna make something of it?  That's what I thought. 

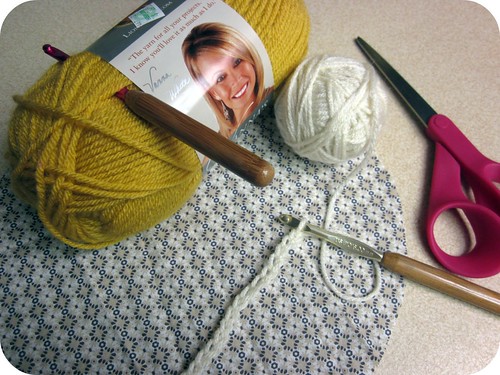
Back to the pillow--want to make one?  Sure you do.  Here's what you'll need:

crochet hooks that correspond to the size of your yarn
2 balls of yarn (can be the same color)
scrap fabric for making the pillow
poly-fil
a good old-fashioned needle and thread
an embellishment for the center (maybe a pretty brooch or a big button)

Crocheted Rosette Pillow 002

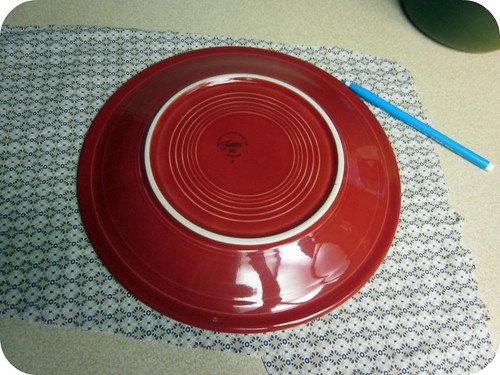
Before you start crocheting, you'll want to determine the size of your pillow.  I wanted a small accent pillow, so I traced a 10" dinner plate onto scrap fabric.  In hindsight, I wish I'd used plain fabric, but I was trying to be thrifty and use what I had on hand.   Be sure to cut two matching pieces of fabric--a front and back for your pillow.

Crocheted Rosette Pillow 003

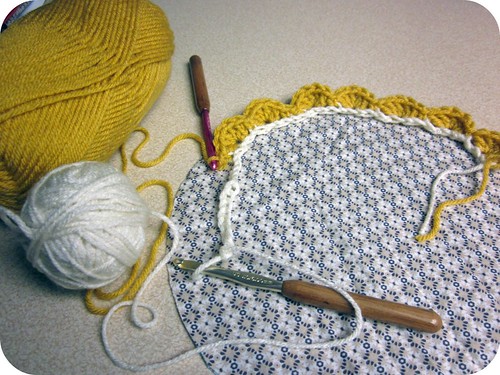
Now it's time to get crocheting.  I've been crocheting for about 6 months now, so I'm by no means qualified to make patterns or use the jargon--but here goes anyhow. Please note that I used two different colors of yarn to better show how I went about creating the pattern.  With the base color (white) I made a chain--I probably started with about 20 stitches.  Then I began to make a shell pattern using the yellow yarn, starting at the beginning of the chain.  Here's the shell pattern I used:

1 sc *skip 1 st, 5dc into next st, skip 1st, 1sc into next st; rep from * to end.

Once your shell pattern is approaching the open end of your chain, it's time to chain some more.  Then shell some more.  As I was making my shell strand, I was also tacking it down to my fabric using a needle and thread starting at the outside of the pillow. 

Crocheted Rosette Pillow 007

I know it sounds kind of complicated, because you are basically running three processes at once--the chaining, the shelling, and stitching it all down on to the fabric.  It's really not that complicated, though.  The reason I did this little by little is so that I only made enough crocheted shells for the pillow and so I didn't waste my time and resources making a string of shells 20 feet too long.  Make sense?  It worked out pretty well, though I wish I'd sewn the strands of shell closer to each other so that the petals would appear fuller like the original Pier 1 pillow. 

Live and learn, right?  With the lessons I learned, your pillows are bound to be better than mine!

Crocheted Rosette Pillow 011

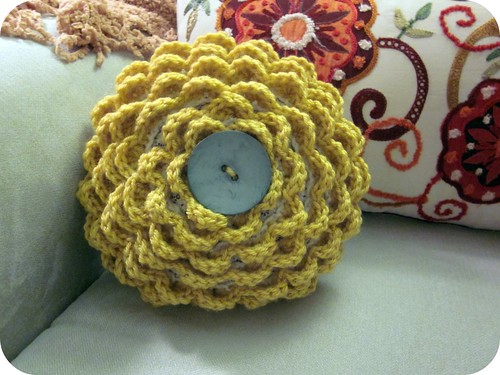
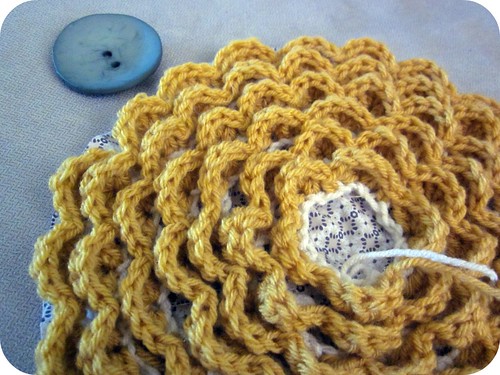
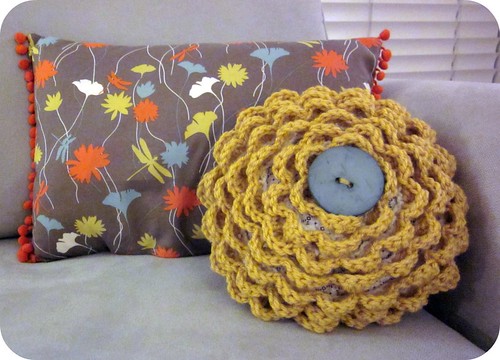
Anyway, follow the same process until you work your way into the middle of the pillow.  Now it's time to add your embellishment.  The Pier 1 pillow has a gorgeous rhinestone cluster in the center--this would be the perfect opportunity to use a brooch from a thrift store or from your own jewelry box.  I chose a big blue button I picked up at Hobby Lobby for $2.50.

Sew or pin your embellishment in place and then finish your pillow as you normally would (taking care not to sew the petals into your seams).

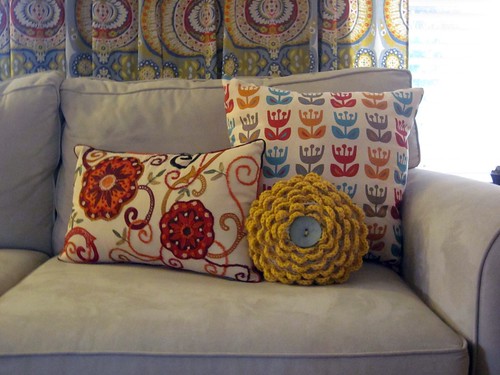
Voila!  A beautiful and unique accent pillow!

Crocheted Rosette Pillow 014

Yeah, Sharon and I are both a bit pillow-obsessed lately.  But there are worse things to be obsessed about, right?
Tristin Signature


P.S. Please send us a link or a picture if you create this pillow or any of our other crafts.  We love to see what you come up with and we'd like to share your successes with our readers!

Linky Love: Pillow Fight!


What's the one household item that most husbands love to hate?  Throw pillows.  Yep, pillows.  For years, I've avoided them knowing my husband's disdain for them.  No more, honey.  We're going to be seeing a lot more pillow action and we're gonna love it, alright? 

Do you remember the cathartic scene from "Along Came Polly" where Ben Stiller destroys all of the accent pillows that he hates?


Yeah, dudes HATE throw pillows.

Technically I'm a wuss because the living room that contains the TV and the manly reclining furniture will still remain without accent pillows with respect to my husband's preferences.  The other living room, however, is going to be my super awesome place with throw pillows.   That's marriage in a nutshell, folks--compromise--and separate spaces.

So check out these awesome DIY pillows from the blogosphere with me 'cause us gals need some pillows in our lives!  Fo' real!

This Anthropologie-inspired bolster is so profesh (Sharon's cool word for professional).  Jessica from Sew Homegrown has mad sewing skills and a great eye for colors and patterns.  Her tutorial makes the pillow seem attainable, but I think the awesomeness of those two fabrics together would be hard to replicate.  Hands down, this is my favorite DIY pillow.

The Color Path pillow is also a creation of Jessica's.  Doesn't it have great texture and color?

The Rosette pillow is a Dwell Studio for Target knock-off by Shelley over at The Westerman Family.  I love Shelley's use of burlap.  Again, texture.  Love it!  Stick it to "the man" and don't buy this pillow at a retail store; make it!

Isn't this Petal pillow precious?  (Aforementioned alliteration almost absolutely accidental). It looks a bit tedious, but it's worth the effort to get results like Allison of Cluck Cluck Sew did.

I had to throw in a crochet option 'cause I'm equal opportunity like that.  Annette from My Rose Valley used a granny square variation called the daisy square and put 'em together on a pillow.  Brilliant?  Yes.  And very cozy looking, too.

So, what's a gal to do with all these DIY pillow options?   Well, put them on your couch, of course!  Marta Writes has a great guide to picking and placing accent pillows.  (Bonus: Marta thinks it's perfectly legit to karate chop your pillows.  Gotta love that!)

DIY painters tape chevron design pillow
Last but not least, Sharon made some pillows just this week that she shared!  Aren't they pretty?  We've each been adding color to our homes and agree that throw pillows are a great (and CHEAP) way to do that.  On a recent Jo-Ann fabric expedition, Sharon and I both bought that flowery accent pillow on the right.  Great minds think alike!  You can see mine on this post.  It was kind of hard to pass up for $10.

Ladies, start your engines and make some pillows.

Gentlemen, stop complaining about the pillows.  Or else.

Tristin Signature

DIY Painted Chevron Pillow

Hellooo blogdom! Guess what, guess what, guess what! The 'Crafty Girls' now have a brand new sewing machine! Ok, so it's not brand new. And it's not ours. (Sigh.) A friend from church is letting me borrow it to sew a cover for some rocking chair cushions. And instead of sewing those (scary and complicated) cushions, I've been procrastinating by sewing other (much simpler) pillows. Cut me some slack! I'm a newbie seamstress. I have to work up to them.. or something. When I acquired this beauty of a machine, I immediately knew what my first project was going to be. I have had these pillows planned for a while now, and I was a step away from sewing them by hand. Luckily, I didn't have to.

DIY painters tape chevron design pillow

Here it is. A DIY painted chevron throw pillow. NOT the one on the left. I can only dream that some day I will acquire the skills to pull something that intricate off. But for now, let's get back to reality. I've seen HGTV use this painters tape trick many times to pull off awesome designs on homeowners walls. Unfortunately, we are renting, and I don't want to make the effort to paint and then turn around and just repaint the walls. (Ugh. Renters - feel free to grumble with me for a minute.) The solution.. apply this technique to throw pillows!


The chevron design was not my original idea. Apparently, it is a very popular and trendy design. But that is great news for us crafters because it's a simple design that we can accomplish with a little bit of painters tape and some acrylic paint (my new crafty crush). How About Orange did a tutorial for making fabric prints with tape.

DIY painters tape chevron design pillow supplies

Here's What You Need:
  • Plain white fabric (I had some of this on hand).
  • A pillow form. I actually found it cheaper to buy an actual pillow at Goodwill and use it instead of a pillow form.
  • Acrylic paint (or fabric paint) of the color you want to use. I mixed this yellow with a light tan to produce more of a mustard yellow.
  • Foam brush
  • Painters tape
  • Scissors
  • Ruler 
  • Sewing Machine  
Fortunately, I already had all of the supplies in my stash except for the acrylic paint ($0.59 each at Jo-Ann) and the "pillow form" ($1 at Goodwill), so this project cost me a little over $2.00! Whoo hoo!
      
    Here's What You Do:

    Pillow cover 

    Sew your pillow cover. Usually I prefer to make pillow covers so that you can reuse the pillows inside. Since I used an ugly Goodwill pillow for my form, I opted to simply sew it up. (For my other pillow - later on in the post - I decided to do an envelope pillow cover because I used one of my good pillows as a form.)
      DIY painters tape chevron design pillow

      Next, use painters tape to create a design on your pillow cover. Here's where a normal person would use a ruler to make precise measurements. Apparently, I'm too good for rulers because I just eyeballed it. Why am I so imprecise with my crafts?

      DIY painters tape chevron pillow

      Paint away! I know this looks yuck-o, but don't worry - this isn't the final product! Do careful strokes perpendicular and with (not against) the edges of the painters tape. This is to avoid bleeding under the tape and therefore sloppy lines.Yuck. We don't like sloppy lines.

      DIY painters tape chevron design pillow

      Here is the finished product! With the inspiration pillow. Tristin found this pillow at Jo-Ann's, and I loved it so much that I bought one too! Yes, I copied her. I'm not ashamed because look how gorgeous and fun it is! I have been wanting to change up the color pallet for our living room since.. pretty much the moment I bought all those blue and brown pillows (silly me). Since then, it's been blue and brown and blue and brown. It has been so monochromatic and just plain... blah. I hate blah.

      DIY painters tape chevron design pillow

      I loved this painters tape idea so much that I wanted to do a second pillow right away! I wasn't as happy with it as I was with the chevron one, but it'll do. The design was supposed to be more of a border, but I did it too close to the center and the result was a "tic-tac-toe" look. Oh well. At least it's purple. I love purple. It's not a blueish purple like it appears in the picture, it's a warmer purple with more red and yellow hues. Ahh. Warmer, brighter colors make me feel so warm and fuzzy inside. I think we're well on our way to a brighter and more refreshing atmosphere in our living space. :)

      Think of all the awesome design ideas you could come up with using simple painters tape! OR use freezer paper or a fun stencil to make a cool pattern or a personalized monogram. What am I? Obsessed with stencils or something? (Yes.)
      Happy Painting! :)

      Related Posts Plugin for WordPress, Blogger...