Pages

Showing posts with label Branches. Show all posts

Colorful Crocheted Leaf Branch

Crochet Branch Complete 008

Ahh, the final branch craft!  Are you ready for us to be done with branches?  Are you craving more?  Well, I may or may not have more ideas up my sleeves.  But {for now} this is the last of the branch mini-series.

Crochet Branch Complete 010

You'll need:

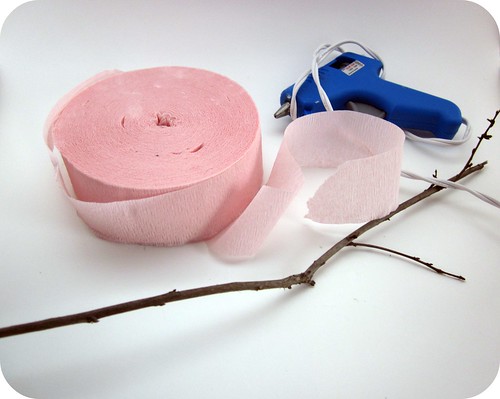
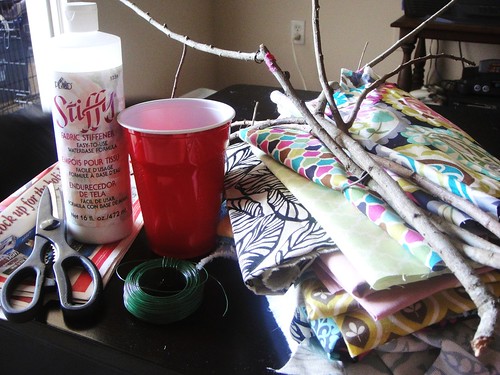
A branch that you like
Yarn (this project is a great scrapbuster!) and a crochet hook
How to crochet leaves tutorial
Floral wire
Hot glue (optional)

Much like the rest of our branch crafts, this project is practically free.  You really shouldn't have to buy much of anything to accomplish it.  If you don't already have floral wire in your craft supplies, please note that you can purchase it at the Dollar Tree.  Yep.  The Dollar Tree!

Crocheted Leaves for Branch 1

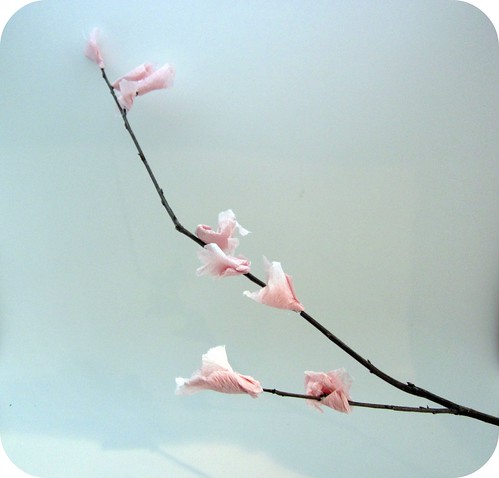
{FYI} When I came up with the idea for this branch, I thought I'd use some of Sharon's fabric stiffener to create flat and stiff crocheted leaves.  I tried it using the stiffener on one completed leaf, and found the leaf became far too heavy to be supported by the branches.  The natural softness and looseness of the yarn proved to be better in this case, as the leaves look more "alive" with their little waves and slight curling.  Live and learn!

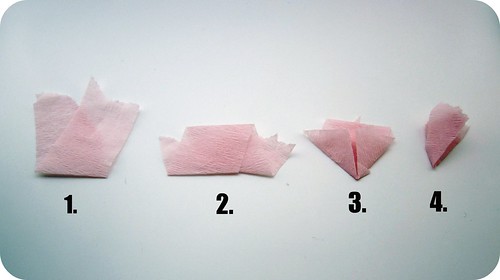
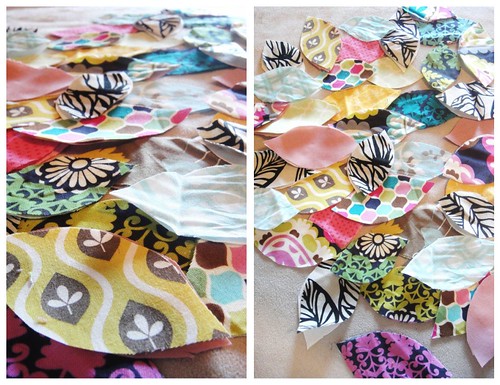
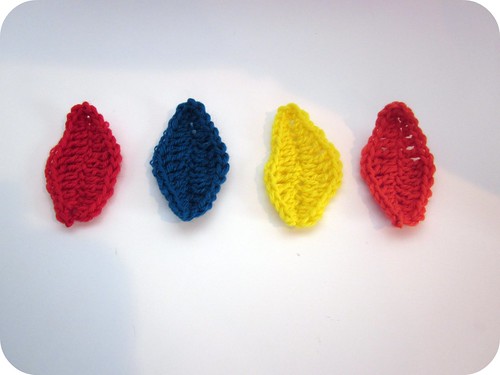
First of all, you'll want to make a bunch of crocheted leaves.  I made a tutorial on how to make simple leaves a few months ago--you can find it here.

It's a pretty simple and straightforward process.  It has been a good way to use up the heaps of yarn scraps leftover from other projects.  I just can't bear to throw any of it away and lookie here, it paid off!

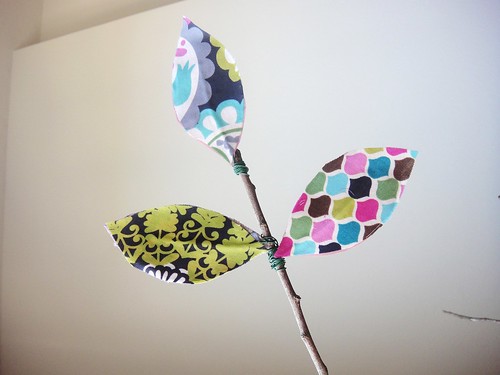
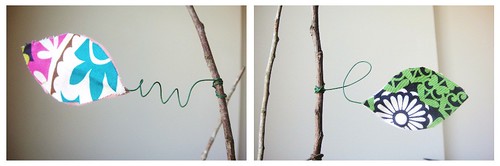
Alrighty.  Once you have an assortment of leaves, cut wire to a desired length.  My pieces were about 8" but it's totally up to you.

Crocheted Leaves with wire for branch

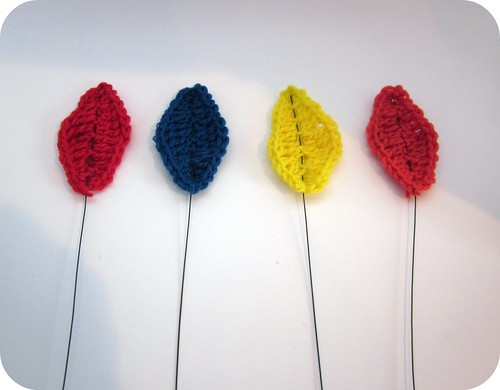
Run the wire through the center of the leaf, creating a vein-like appearance.  If your leaves are slipping around on the floral wire, you can secure the ends with a dot of hot glue to hold them in place.  Stiffer yarns like wool probably won't require hot glue, but slick acrylic yarns will probably necessitate some stabilization.
 
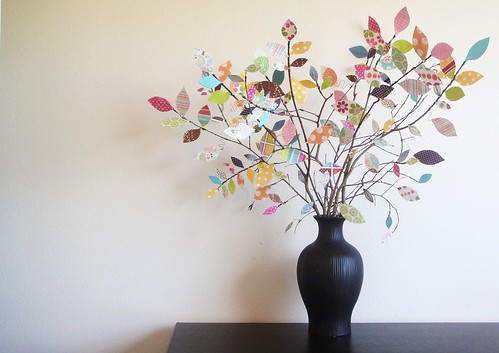
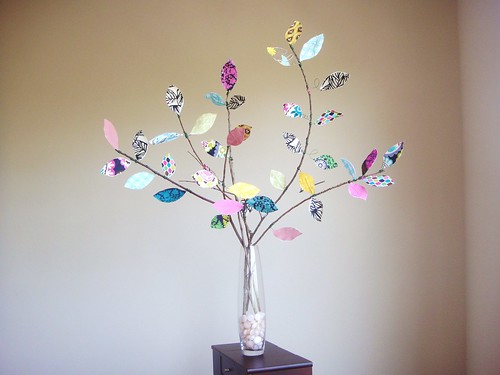
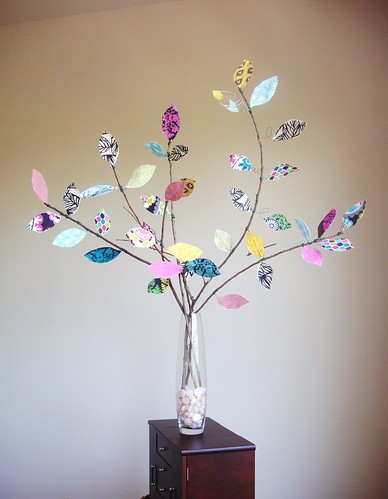
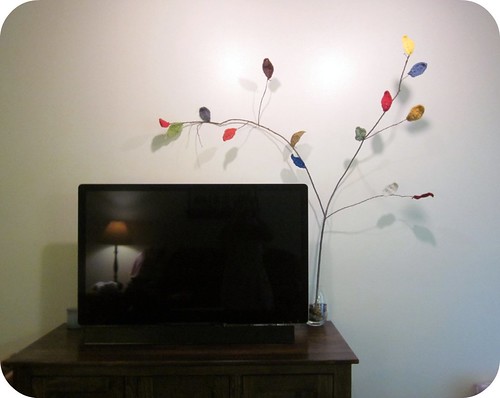
Once the leaves are all wired up, then you can attach them to the branch as you see fit. 

Crocheted leaves wrapped on branch

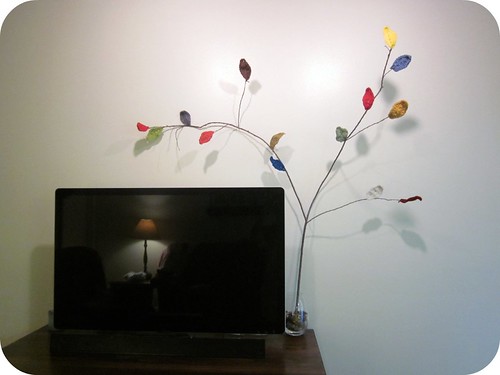
Sharon showed some fun techniques for wiring leaves onto branches on her Fabric Leaf Tree post.  You may want to check those out.  I opted for just wrapping the wire around the branches in a long swirl (the leaves are a little heavy for some of the weaker branches, so in my case the branches needed wrapped with the wire to offer some support).

Crochet Branch Complete 009

My husband says the branches around the T.V. make us look like we have rabbit ears.  He says I'm making his Google T.V. look low-tech.  I think that it's an awkward wall to decorate and I've finally found a way to decorate without putting random objects on the walls.  What do you think?  Does it just look like rabbit ears? 

And on that subject, if you have rabbit ears on your tele, you may want to spice them up with some leaves!

Tristin Signature

DIY Cherry Blossom Branches

This time of year, I really miss living in Washington, D.C. because winter is finally over and the Cherry Blossoms are...blossoming.  It's absolutely gorgeous!  You may or may not be aware that the Cherry Blossom trees in our nation's capital were a gift from Japan that symbolize the friendship between the U.S. and Japan.  That being said, what an appropriate time to remember the tragedy and devastation in the country of Japan.  The footage I have seen has been surreal--and I think it's only now set in how real the disaster is.  I hope you're keeping Japan as a whole in your prayers. 

I made a cherry blossom branch in keeping with the spirit of the Cherry Blossom festival, and it just so happens to fit in with the kick Sharon and I are on right now--branch crafts!

DIY Cherry Blossom Craft 2

We'll "branch out" to other crafts later.  Pun intended.  For now, it's branch crafts, folks!  Let's get to it.

To make a lover-ly cherry blossom branch, you'll need:

Cherry Blossom Craft supplies

A branch (duh) from any tree you like
Light pink crepe paper streamers ($ .50/roll at the dollar store)
Hot glue

That's it!  (Notice that this craft is practically free??)

There's not a real art to making the cherry blossoms--anything goes!  Cut out perfect petals, wad up pieces of paper--it really doesn't matter how you do it as long as YOU like the result.  That being said, here's how I did it:

DIY Cherry Blossom Craft 1

1. Rip off a piece of crepe paper that's about 5" long and fold it into a V-shape.
2. Fold the bottom of the V up to the top (where your jagged edges are).
3. Fold the half-formed blossom into thirds.
4. Secure with glue if you want, or just attach it to the branch and glue it at that point.  It's your call.

DIY Cherry Blossom Craft 2

I left the leaves on my branch and removed them as I added cherry blossoms so I could place the blossoms where the leaves occured naturally--in other words, I followed the pattern of nature so I didn't second guess my blossom placement.  Capiche? 

DIY Cherry Blossom Crafts 3

I placed the cherry blossom branch on a shelf in my living room so I'll see it often.  It'll serve as my reminder to keep those affected by the disaster in Japan in my thoughts and prayers.
Tristin Signature

Spring Scrapbook Paper Tree

Hello fellow crafters!

Tristin and I were invited to be today's featured guest blogger over at Everyday Mom Ideas! We were thrilled with this wonderful opportunity, and wanted to share with the readers over there one of our trees from the collection we're currently doing.

This second tree is very similar to the first one. I'm sorry! I promise, the next ones will be more diverse. But the materials used in this tree are very different and it is a lot easier to overall construct. So what are you waiting for? Go check it out!

(Since this is a guest post on a different blog, and the concept is similar to the first tree.. I may have repeated myself a little. Do forgive.) Ok, now go check it out!


Thanks, Julia, for having us on your blog!

Fabric Leaf Tree

Tristin shared with me a wonderful idea the other day. She thought that it would be fun if we both created a mini collection of trees adorned with various materials. Um, yes! What a craft genius she is! They will all be fairly simple so that anyone can create them. *Side note: if you do happen to make one, please send us a picture! We would love to see your work. :)

Fabric Leaf Tree

The first creation of the saga is this beautiful decorative tree embellished with colorful fabric leaves. This is a great table topper for a wedding, baby shower, bridal shower, or birthday. It is also perfect Easter/Spring decoration for around the house.

Fabric Leaf Tree Supplies

Here's What You Need:

Fabric Stiffener - I use Stiffy's
Floral Wire - At least 24 gauge
Fabric Scraps
Branches

Extra Supplies: Scissors, Newspaper, Plastic cup, Saran Wrap (not pictured)


Here's What You Do:

Fabric Leaves

Start by cutting out a lot of leaves. You can use a chipboard or cardboard template to make it easier and more consistent. Make sure you cut out an extra leaf for the back of each one. I cut out 40 leaves (so 80 total) which sounds like a lot, but it didn't take too much time.

Take your floral wire and cut out 40 strips (or however many leaves you're doing) 8"-10" long. Set these aside in a pile that is within reach.

Fabric Leaves Steps

Here comes the messy (but super fun) part! Cover your work space with newspaper, and right beside your work space lay down some newspaper with a large sheet of saran wrap on top. Pour a small amount of fabric stiffener into your plastic cup. Take a leaf and its back leaf and dip both into the fabric stiffener. Remove the excess stiffener by pressing and smoothing the fabric with your fingers. Do not wring!

Lift the top leaf and place a piece of wire in the center in between the two leaves. The fabric stiffener will hold the wire in place fairly well (for decorative purposes), but if you want it to be more secure, dab a little glue on the wire before pressing the top leaf back down.

Press the top leaf down on top of the wire so that it forms a sort of "vein" (like in real leaves). This was Tristin's idea too, and it looks great! Let your leaves dry for a couple of hours. I left mine alone overnight just to be sure.

Fabric Leaf Arrangement

And now for the fun part! Start with one leaf and wrap its floral wire around a branch to secure it in place. Decorate the rest of your tree to your liking. Use a more natural pattern like the branch pictured above...

Fabric Leaves - crazy curls

...or make them funky& curly. The floral wire is extremely malleable and can help you attain almost any look.

Fabric Leaf Tree

Stay tuned for the next one in the series. By the end we're going to have a freakin' forest!
What do you think the next tree is going to be?

Crepe Paper Rose Tree

Crepe paper rose Valentine's Day tree

Hey there! Since Tristin and I can't seem to get enough of Valentine's Day decor (and I hope you aren't tired of it), here's another fun and easy V-Day craft. It's what I call a crepe paper rose tree.

Here's what you need:
  • Crepe paper in your favorite color (I bought fun, bright colors at Hobby Lobby for only $1 per roll. And the rolls were huge. You can also buy two smaller rolls at the Dollar Store, but they only had normal colors. Normal? Eh. Not my style.)
  •  An awesome branch from outside (mine is pretty awesome).
  • Glue (I used Elmers.. it takes a little bit longer to dry, but you won't burn your fingers.)
  • Sheets of scrap paper (these will become the "ball form" for your pomanders.)
  • Thread or string
  • Extra vase that you have sitting around. 
Since I already had everything except for the crepe paper, the supplies only cost me $1! Love it! :)

Crepe paper roses

Let's get started:
  1. First, make a million roses. And by "a million" I mean "a lot". I used this crepe paper rose tutorial from the House of Smith's. However, I had trouble mastering the "twist" while you wind it around the base of the flower, so I also used this video to help me understand the twisting part. I had trouble getting the first couple just right, but after it clicked, I was flying through them. 
  2. After you have completed half a million roses and desperately need a break, start your mini pomanders. Cut two pieces of string/thread (5" or so each). These will be used to tie your pomander to the branch. Glue one end of the string to the center of your sheets of scrap paper (I used 3 or 4 sheets of paper per pomander - stacked and then crumpled together). Making sure your other end of string is sticking outside of the paper, create the ball form by crumpling up the paper. Now add your roses to the ball form you have created. Fill any "holes" with mini roses or just pieces of crepe paper. Tie your pomanders to the tree.
  3. Crepe paper rose pomander on tree
  4. Now glue the rest of the roses sparsely around the tree. I added some tiny pops of bright blue to add some fun variety. Stick your branch/tree in a vase, and you're done! You may need to add decorative stones or rocks to keep your branch in place. Using rocks from outside would give it a cool, rustic feeling. 

          Here's the finished product:

          Crepe paper rose valentine's day tree

          I love it! Stay tuned for another craft I'm working on that also uses these gorgeous crepe paper roses. 

          Related Posts Plugin for WordPress, Blogger...