Pages

Showing posts with label $5 or less. Show all posts

DIY Dinosaur Air Plant Holders


There's something about going to Walmart that's inspiring.  Usually I'm inspired to never go back.

This time though, I stumbled upon plastic dinosaurs and was inspire to craft.  (And to never ever go back, though I'm sure it'll happen again.)  I've stumbled across planters made out of plastic animals and I think the idea is hilariously awesome--and dinosaurs just seemed right.  Originally I intended to make these planters for some succulent cuttings from my wildly successful succulent garden (finally, I've kept plants alive!) but my husband and I found ourselves on a kid-free trip last weekend where I found an air plant vendor at a Farmer's Market.  I've always been intrigued by air plants and I'm stoked to have some of my own.  In hollowed-out plastic dinosaurs, nonetheless.  Can life get any better?


I found these hollow plastic dinosaurs at Walmart for a dollar each while searching for a slinky as a gift for a kiddo birthday party.  (When in doubt for what to give a kid, a slinky is awesome, right?!  Inexpensive, loved by generations, and made in the good ol' USA.)


Making the dinosaur transition from toy to planter is as simple as cutting a hole with an Exacto knife.  A box cutter would probably work, too.  Maybe even a steak knife.  I'm pretty sure there aren't rules on what you can and can't use to cut into dinosaur toys when you're a grown-up.


Since I'd intended to use this with dirt and succulents, I made a drainage hole.  And yes, I laughed at the placement...but it just seemed like an obvious place for a drainage hole. 

Then I spray painted those bad boys for good measure.  Ever wondered what caused dinosaurs to go extinct?  My current theory is spray paint fumes.


Since I went with the air plants, all I had to do was stick the plants into the holes I'd created.  Bam.  Pretty awesome, right?


Oliver & S Popover Sundress

I was recently asked by a lady from church "So, do you sew clothing very often for your girls?"

In an ideal world, my answer would be: "Yes, everything they wear is handmade with love".

The real answer is something like this: "No way José."

How's that for honesty?  I'll go even further and explain why in unnecessary details, because what is a blog without unnecessary detail?

1. Elliott initially hates anything I make for her.  No joke.  (Proof: see here and here.  Just because she's aged doesn't mean she's any better.)
2. We're given SO much clothing by family and friends.  It's kind of a waste to have more.
3. I'll flip if it gets ruined.  And you probably wouldn't want to witness that.
4. Typically costs WAY more that buying off the rack. (Anyone love the Gap Kids clearance racks like I do?  Holla!)
5. No guarantee of quality or cuteness.  (That's a lot of pressure!)
6. Whenever I sew, my world crashes down around me.  I forget to feed my family, I don't do dishes or keep up with housework, and then...after all the trouble... see #1.   


Last year though, I made the Oliver and S Popover Sundress  for Elliott.  The pattern is free (yay!) and it is quick and simple to sew.  She wore it once (begrudgingly) and apparently it has been shoved into the back of a drawer ever since, wadded up and forgotten.  

When I was picking through her clothing this morning, I stumbled across a hint of familiar green seersucker and decided that this dress would be worn a second time. I prepared myself mentally for a massive throwdown, and I kid you not, I walked into the living room and handed Elliott her clothing and she replied "Oh, I looooooove this dress!".

Well.

So, here, after months have gone by, someone appreciates my hard work.  Naturally, this had to be documented.


Little sister is modeling her big sister's hand-me-down Target mix-n-matches, which, despite their cheapness are virtually indestructible, and again this is very demoralizing in the sewing arena.  The bunny that Bennett has shoved in her mouth is affectionately (and truthfully) called "stinky bunny".  It's rarely very far from her grasp, which is unfortunate, because it sure could stand to be washed daily based on the amount of love it receives.

You know, the human spirit never fails to amaze me.  After just one little glimmer of Elliott's appreciation, all I can think about is sewing.

(For the sake of details--I purchased the seersucker at Joann a few years ago and used scraps of navy blue cotton for the yoke.  I had a small scrap of white piping and added it under the yoke for detail.  I used the 3T size with a 4T length, as the dress is very easy to customize.)

Puff Stitch End Table Topper


One thing's for sure--my home is a hodpodge of new things, used things, handmade things, and store-bought things.  In May, I'll celebrate 10 years of marriage and I must say that my style has morphed and evolved over this past decade--and I can only imagine that the cycle will continue.  With that understanding, I really don't put a whole lot of money into a lot of the smaller pieces of furniture that I buy.  All of our end tables are thrift store finds, and as you know, thrift store finds often come with their own... character.  (Read: flaws, nicks, dents, scratches.)  

I'm grateful to buy things that have been pre-loved, because then I don't feel the pressure of perfection.  It's a nice burden to be free of.  

The table topper I crocheted (last year) covers a cute little cast-off end table that I bought at Goodwill for $13.50.  It was a Target reject (still had the Target label attached) that has one tiny flaw in the veneer on the table top.  A vase of faux flowers has covered the flaw for a few years, but last year I made a puff stitch table topper, mostly because I just LOVE little puff stitches.   

I started with these instructions as the first rounds, and just kept going--increasing appropriately, of course.  So, yeah, pretty easy, and it was made only using yarn I had on hand.  It's all Lion Brand Vanna's Choice, in case you're curious.

I'm sure I should add some more details or some funny anecdote to end this post, but it's Spring Break and my eldest just woke from a nap--so, I'm checking out! Go forth and crochet!


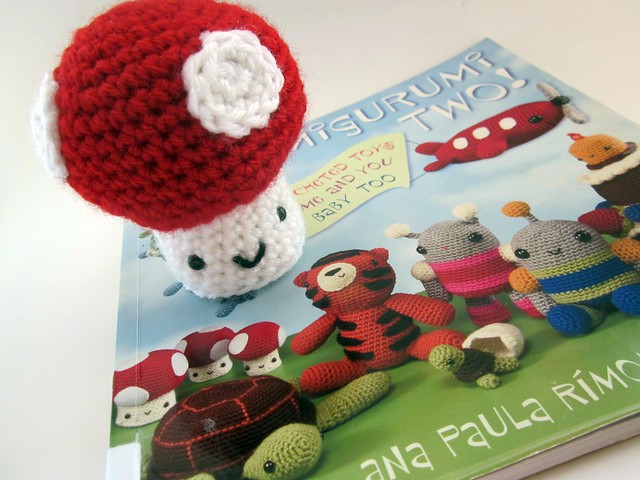
Amigurumi Two!: Crocheted Toys for Me and You and Baby Too

Amigurumi Book

A while back, as in before Bennett was born, I borrowed Amigurumi Two!: Crocheted Toys for Me and You and Baby Too from the library and actually made some projects!  (Don't worry, I returned the book.  I took these photos about two years ago and never shared!). It has seriously been so long since I've completed an amigurumi project, I now wonder how I ever spent my time on cute little things like these. Maybe one day when I'm eighty I can finally do it again. And maybe even get more than five hours of sleep, too.

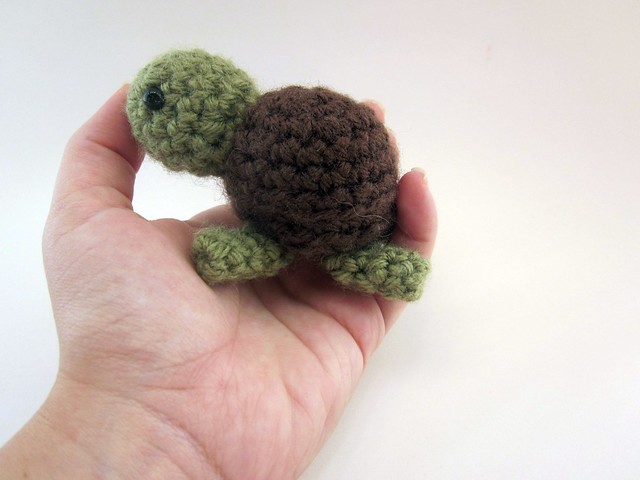
Tiny Turtle

He's so so so super-cute.  The author actually includes a pattern for a large momma turtle that these little babies (and some egg shells) can nest into.  Cool, right?  Yeah, I never made the momma.  My attention span just didn't allow for it.

Turtle in palm

It was a cute book and the author created very clear and concise patterns.  I just love amigurumi.  The counting is soothing and it's nice to be challenged occasionally by actually having to pay attention to a pattern.

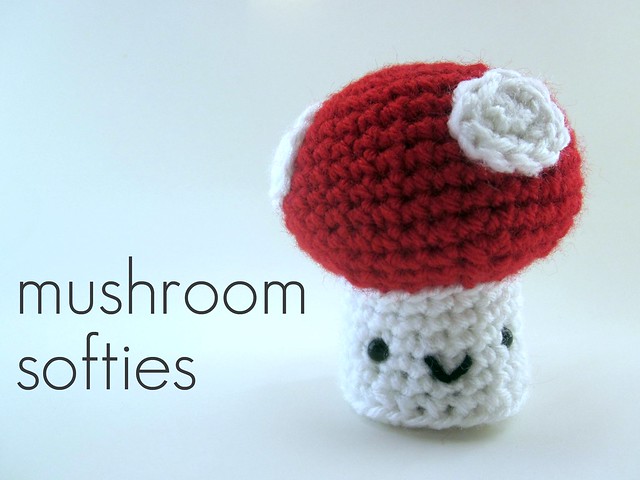
Mushroom softies

I'm thinking about using this little toadstool in some yarnbombing.  Like this:

{Source}

That'd be awesome to see on a park bench, right?!

Much love! 
Tristin

 (And if you want some yarnbombing inspiration, check out my Yarnbombing Pinterest Board.)


Embroidered TOMS


Before Elliott started preschool, I went on a search for the "perfect" everyday shoes.  She's a Florida girl through-and-through and lived in jellies up to the point that she was required by school rules to wear close-toed "tennis shoes".  Her narrow feet (SO unlike her momma's) don't agree with most kids tennis shoes on the market, and throw in the whole laces vs. velcro debacle and as it would turn out, picking shoes for your four-year old isn't so cut and dry.  Not to mention, this girl has her own preferences.  Sheesh.  

After much research and time spent reading reviews for all the shoes that hit my criteria (had to be able to be put on independently, option to wear without socks, breathable, good for romping on the playground, would look good with a variety of types of outfits, E likes the look) we settled for Toms. 

I may be a bit biased, here.  I have a pair of Toms, too, that I adore.  Navy blue, in fact.  Are you seeing a trend?  I think it's cool that for now she's excited to have matching shoes with me.  That day will pass, so I'm digging it while it lasts.


Elliott was SOO excited for school to start, but continued to voice one concern.  

"Mommy, what if you forget to pick me up?" 

It pretty much broke my heart.  I couldn't convince the girl that it was impossible for me to forget to pick her up, because when I am away from her, it's like a piece of me is missing and that I'm counting the minutes until it's time to get her again.  (Oh, I sound so sappy, but it's SO true!)  I decided I wanted to give her a symbol that would remind her that Mommy loves her and would always be back for her.  This symbol came in the form of a simple heart that I embroidered into the side of her shoe.  When she's sitting with her legs crossed, as kiddos in preschool do, she sees the heart that reminds her that Mom loves her and will be back for her.

Those worries have since left her tender heart, but my reminder remains, just in case they creep back in.


{Project deets: It's literally a freehand heart, backstitched with pink embroidery floss, a needle, and my hand. Cost is like 20 cents, if you have to buy embroidery floss.  Lucky for me, I have unimaginable amounts of embroidery floss, thanks to a momma who cross-stitched a lot in decades past.}


{Gray & Rainbow} Granny Poncho


With as much creating as I do (seriously, my hands always stay busy with something) you'd think I'd be better about sharing what I've done.  I don't always think my projects are worthy of being shared or perhaps the effort of documenting is more than I'm willing to put forth at the time.  This granny poncho, however, is one worth sharing.  Almost anywhere it goes, it receives attention and granny-love.  There's something about muted grays and vibrant rainbow stripes that is just oh-so-appealing!

The method of making this poncho came entirely from Le Monde de Sucrette. Don't let the name intimidate you; it's a blog that's written in plain English.  Does anyone else ever feel like the majority of the awesome free patterns you find on Pinterest are written in another language?  Oh, the huge problems we face.  ; )  With the "pattern" you can make a poncho of any size to suit any age.  Pretty dern awesome.

I used yarn entirely from my stash.  The colors are all Lion Brand Vanna's Choice (it's my go-to budget  friendly yarn) and the gray is almost an entire skein of Red Heart Super Saver (one of my least favorite yarns, purchased a few years ago when I was just a wee grasshopper, learning the ancient ways of crochet).  Unlike the first poncho I made for Elliott several years ago, she LOVES this one.

And now I kinda want one, too.

-Tristin

DIY House Number Plaque


Hey!  Today I have for you the simplest of crafts that adds a fun touch to the exterior of your home.  I bought an old Lenox platter from a thrift store and hung it inside my home for a while.  The only problem was that it was exactly the color of the interior walls of my house (I know, white walls, we're SO boring) so I never loved it.  

Since it already had a plate hanger on it, I decided to try it outdoors.  Cool, but it needed something.  So, natually I went to Hobby Lobby, grabbed some of their numbers (and paid for them, I might add) , glued 'em on with E-6000 and the rest is history.  And I literally mean history--I actually did this project two (TWO!) years ago and I'm just now sharing it.  But hey, now you know the glue lasts outdoors--I have proof!


Supplies:
Thrifted platter
Numbers (or letters could be cool, too)
Strong adhesive (E-6000 should be in every crafter's arsenal.)
Plate hanger

Glue the numbers on your platter/plate/tray and let cure according to adhesive directions.  Then hang it. Pretty straightforward stuff, right?  Really, it's just a good jumping board--imagine the possibilities of what yours could be!

My total project cost was around $5-6, because I can't quite recall how much I paid for the platter but it was inexpensive.  And you guys know I love cheap crafts.

Much love,
T

Rosette Embellishments

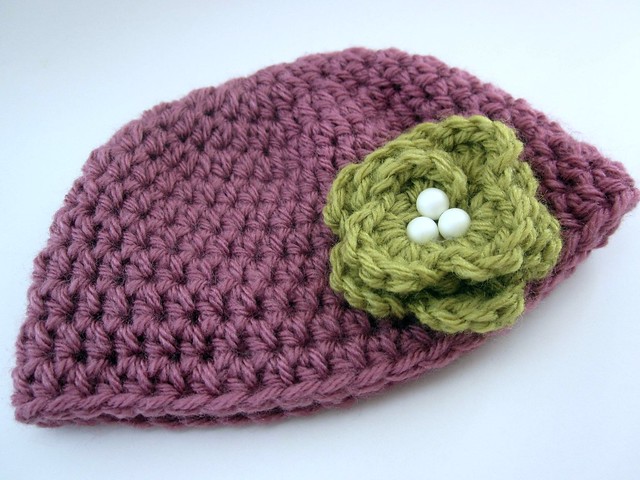
Sometimes it's all about the details, isn't it?  Especially if like me, you take the easy way out and make a simple hat for new baby gift-giving.

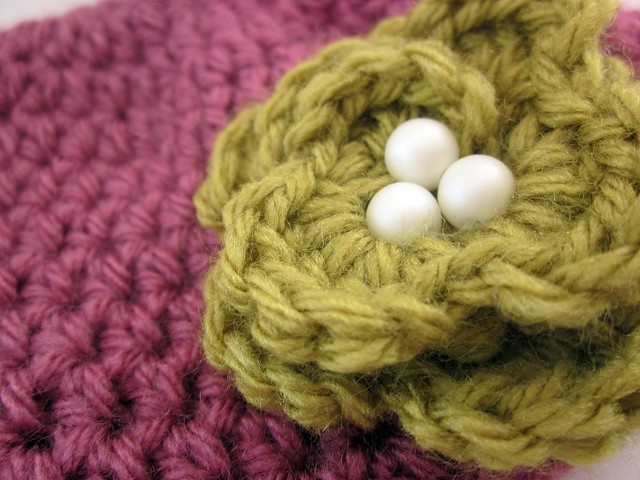
Pearl Bead Detail

It's no secret that I love to crochet hats, but a plain beanie for a baby is just too boring.  So embellishing is FUN!

Baby Beanie

I used this pattern to create the rosette that I attached to a simple baby beanie that I made.  Then I made a million more rosettes, just for fun.  I have hot glued them to alligator clips to make simple hair embellishments for Elliott.  They'd also make some cute headbands.

Rosettes 

And just in case you're wondering, none of these rosettes are being worn by the new baby gal because she's still hanging out in the uterus (we're 5 days "over" so far).  I joke to my husband that it must be like a 5 star resort in there, because neither of my gals has been in a hurry to come out.  Whatever.  All I know this time around is that I don't mind an "overdue" baby--they're a lot easier to manage while they're still nestled inside than they are when they come out. Right?!  Let's just hope she's not growing too much...  

Tristin


Day 11: Crocheted Snow-Covered Ornaments with Winkieflash of A Creative Being

Hello crafty pals and welcome to day 11 of the 12 Days of Christmas Series. Today, we have some awesome crocheted ornaments from Wink of A Creative Being. Without further ado...


This is the pattern I use to make Christmas ornaments with. It's fun, easy and fast. Let's get started! :)

What you'll need:
  • Regular, colored yarn, and white yarn. You can use whatever yarn you want, as long as the colored yarn and the white yarn are the same weight. (or close enough)
  • Sparkly yarn! For this pattern I used silver yarn (Lumina by DMC)
  • Stuffing. I use polyester filling, but you can use whatever you want, for instance yarn scraps!
  • Hooks. Use the appropriate hook for your yarn, and then go down 1 size. Because we will be stuffing the ornaments, you need a tight fit.
  • Stitch markers. You're going to be working in the round, so you'll need a marker to keep track of where you are.
  • A pair of scissors.
  • A darning needle, to weave in the ends.
  • The Christmas album of She & Him. Trust me, it's so relaxing to crochet by, and a must to get you in the right mood! :)

The terms I use are all US terms. This pattern consists solely of single crochet stitches, which are double crochet stitches for you UK people.

Alright, got everything? Here we go!

For this pattern, I'm going to use an existing crochet sphere pattern. It's written by Emily Premise-Conclusion, and I got it from her Ravelry page here. If you have a different sphere/ball pattern you'd like to use, go for it! :)

For this pattern and the yarn I'm using, which is Stylecraft Special DK, I'm using a sphere pattern that consists of 22 rows. The ornament will measure about 3 inches.

When it says 'inc' in the pattern, increase; make 2 single crochet stitches in 1 stitch. Where it says 'dec', decrease; single crochet 2 stitches together (sc2tog). I always use an invisible decrease. If you don't know how to do this, check this out.

With the colored yarn, we're now making the bottom halves of the sphere. If you're using a different pattern from mine, just follow it until you get to one row before the middle row.
  1. Start with the colored yarn. Crochet 6sc in a magic circle, or ch2, 6sc in 2nd chain from hook. (6)
  2. inc in each stitch around. (12)
  3. *1, inc* around. (18)
  4. 1, inc, 2, inc, 3, inc, 2, inc, 3, inc, 2 (23)
  5. inc, 4, inc, 3, inc, 4, inc, 3, inc, 4 (28)
  6. 3, inc, 6, inc, 6, inc, 6, inc, 3 (32)
  7. 1, inc, 7, inc, 7, inc, 7, inc, 6 (36)
  8. 6, inc, 11, inc, 11, inc, 5 (39)
  9. 8, inc, 12, inc, 12, inc, 4 (42)
  10. 15, inc, 26 (43)
  11. inc, 42 (44)
Cut the yarn but leave a little tail. Don't fasten off. Okay, that's it! You now have a colored bottom half of a sphere. I made a couple of bottom halves in different colors.


Now onto the really cool part! With white yarn and the sparkly yarn, we're now going to make the snow layer of the ornament.

So, with white and sparkly yarn attached, go as follows:
  1. Crochet around (44), using a spike stitch. If you don't know how to do this, check this out. Basically you're just making sc's, but you're inserting your hook into a different row, below the one you're in. I've done cascading spikes all around the bottom half. So I started 1 row below, then 2, then 3, then 4, then 5, and then back up again in row 4, row 3, row 2, row 1 and finally in the actual row.
    See how this creates the illusion of snow falling? You can vary your own spike stitch by making it more random, or leaving it out completely at some places. You're in charge! :)
  2. That was basically it. Now all you have to do, is complete the sphere. If you're still on this pattern, go as follows:
    42, dec (43)
  3. 26, dec, 15 (42)
  4. 4, dec, 12, dec, 12, dec, 8 (39)
  5. 5, dec, 11, dec, 11, dec, 6 (36)
  6. 6, dec, 7, dec, 7, dec, 7, dec, 1 (32)
  7. 3, dec, 6, dec, 6, dec, 6, dec, 3 (28)
  8. 4, dec, 3, dec, 4, dec, 3, dec, 4, dec (23)
  9. 2, dec, 3, dec, 2, dec, 3, dec, 2, dec, 1 (18)
    You can start stuffing now.
  10. *dec, 1* around (12)
  11. *dec* around (6). Fasten off, leaving a tail. With the tail, weave through each stitch in the opening. Pull tight to close.
And that's it! You've created your first snow-covered Christmas ornament :)


Wait, what is that you say? It doesn't look very Christmassy? Well, you're right. It needs something else! :)

Now we're going to make that little thingie on top with the loop in it, so you can actually hang this in your tree.
  1. With the sparkly yarn, crochet 6sc in a magic circle, or ch2, 6sc in 2nd chain from hook. (6)
  2. inc in each stitch around. (12)
  3. Sc around two times, so you end with 4 rows.
Finish off and leave a tail. Now pull the first tail through the center to create a loop, and tie the end to the other tail. Like this:


Now using the tail we left at the end, sew the loop thingie to the top of the ornament (the white part). And that's it! A completed ornament :)


Now you can easily adapt this pattern to make all kinds of ornaments. A couple of examples?

For instance, you could use self-striping yarn to create a stripy ornament:

Or use gold sparkly yarn and colored yarn to crochet a sphere:

Use rich, velvet yarn (which was impossible to photograph well!):


And if you crochet in the backloops only, you'll get a ridged ornament!

The possibilities are endless; let your mind go wild this holiday season! :)

xo,
wink

Day 8: Woven Star Tree Toppers with Heidi of Mom's Crafty Space

Hi everyone! I'm Heidi from Mom's Crafty Space, and I'm super excited to be here today to share this tutorial for an inexpensive Christmas decoration that packs a lot of style! Woven stars made from straw or paper have been a holiday tradition for hundreds of years, and I'm going to show you how we can use modern materials to supersize our woven star into a shimmering tree topper.

All you'll need to make this gorgeous star is a sheet of 12" x 12" glittered cardstock, scissors and glue (hot glue works best). If you have single sided glitter paper you will need to glue two sheets back-to-back to create a double sided sheet.


First, take your paper and cut it into (20) 1/2" wide strips.


Fold two strips in half and crease to mark the center. Line up the center marks and glue the two strips to form 90 degree angles.


Add four more vertical strips (two on either side of your original + shape), weaving the horizontal piece through the vertical strips. Glue at all places where the paper intersects.


Continue weaving until you have a grid of 5x5 woven strips (the tails should be around 4" long).


This step is the trickiest to explain, so hopefully the photos will help! In each corner, take the two inner corner strips and join the tips, making a twist in each strip before gluing them together. Do this with the next interior set of corner strips as well, so that you end up with two twisted points on each corner.


When all your corners are twisted and joined, it should look like this.


Now make another!


Turn one of your pieces upside down and rotate it so that the tips form an 8-pointed star when placed on top of the first piece.


Weave the remaining tails into the points, glue down and trim the ends.


 Voila, an easy peasy and super cheap way to add a lot of sparkle and shine to your holiday season! These also look incredible when hung in small groups from the ceiling - use white or silver paper to create a flurry of shimmery snowflakes that's sure to impress!


Now go find a tree (preferably one where all the lights will light up for you!) and add your shiny new topper! Happy Holidays!

Be sure to stop by Mom's Crafty Space for our other fun tutorials, recipes and holiday ideas!


Day 5: Merry Christmahanakwanza cards with Sunni!

Happy Black Friday to you all!  I hope that if you are one of those crazies who goes shopping that you stay safe--or better yet, that you WIN the fist fight, should you find yourself having to throw down.  Yeah, I love to keep things gangsta.  Today, I'm happy to have Sunni from Love Affair with my Brother visiting with a fun holiday card.  You're sure to like this one! -Tristin

Merry Christmahanakwanza to you!

I'm Sunni from Love Affair with my Brother. Yes! You read that right. I love my Brother sewing machine, and I'm not ashamed to admit it! (Let's just pretend that's what you thought when you read the title!)

I love to blog about quilting, sewing clothes for my daughters and quick and easy crafts. I'm hosting a giveaway of some beautiful Free Spirit solids from The Intrepid Thread and I'd love it if you came by and entered!


I started with a completely different idea, but ended up with these sewn cards!


Have you ever pitched an idea for a guest post or sponsor that put you in over your head? I found this to be that pitch!

I had visions of free pdf printables. A friend said "Oh, you know how to do those?" Ummm... no.

Then I wanted to do a carved stamp. Show you how to make your own custom name stamp or phrase stamp ("Merry Christmahanakwanza" for me). "Do you know how to do that?" Ummm..... no again.

These are my solution to my too lofty ideas. Sewn Christmas cards.

And even if you don't have a lot of time, I promise these are fast. I made all 4 of these in the span of about 15 minutes. If I stuck to one design, it would be even quicker!

You will need:

blank cards and envelopes

Sew line glue pen

Christmas fabric scraps

buttons

markers

fabric glue (optional and not pictured)


Use a Sew Line pen to tack down your fabric shapes before you sew.


Did you know you can sew through paper? I have a special needle, marked with a piece of tape, that I use for paper projects. The paper dulls your needle. You can use a standard foot like I did or a darning foot and free motion quilt to attach it.


When you are finished, you can tie the threads in the back, affix them with a little dab of fabric glue or just cut them. It's just a card and not likely to get the stitches pulled out!


Here's my little Christmas tree. I love the simplicity and folksy nature of these cards.


For this one I used my Sizzix Big Shot and iron on fusible. Just turn your iron down a bit from cotton setting and you are good!

This was the fastest one! Die cut, peel and iron. DONE!


A few years ago, when I lived in downtown Chicago, I had an incredible array of friends from all over the world. I have never believed that "Merry Christmas" is offensive or that we should only wish people a "Happy Holidays" to stay politically correct. But, I mashed all my friends holidays into one phrase and came up with "Merry Christmahanakwanza"! It was silly and good hearted and now I do it every year!


This one is my favorite! I used a Sharpie pen to add the details.


So take some time out from making gifts for friends and family, and creatively play. These cards are fast and simple and afford you ample opportunity to put your own inventive spin on it!

Related Posts Plugin for WordPress, Blogger...