Pages

Showing posts with label Guest post. Show all posts

Cure the Summertime Blues with Sweet and Spicy Pork Lettuce Wraps

Hey crafty pals!  Today I'm taking a break from crafting on Two Girls Being Crafty so that I can get my grub on over at Sew Homegrown.  I hate the word "grub" when related to food, so I'm not quite sure why I used it on this teaser.  Ughh.  As if I can't just delete it and come up with something else.  Anyhow, I'm honored to a part of Sew Homegrown's Cure the Summertime Blues series.

Did you know that I love food and cooking even more than crafting?  Yep.  It's actually my #1 hobby. I know how you love useless factoids about bloggers.


Anyhow, here's a picture to get your mouth watering...

Lettuce Wraps 017

Now head on over to Sew Homegrown for the full post!

Tristin Signature

Ooh, Baby Baby! {Guest Post - A DIY Baby Blanket}

Hey fellow crafters!  Remember Laura?  She's a mutual friend of Sharon and I and she's super crafty--you may remember her Fabric Canvas idea from a few months ago.  Well, she's back and this time she has created a gorgeous baby blanket!  Take it away, Laura!

Thanks again, crafty girls, for allowing me to guest post a second time! Your blog is one that I visit nearly every day, so being a part of it today is fun for me! You gals rock.  {Note from Tristin: We LOVE flattery.  It works every time!}

Some friends of my husband and I recently had a little girl, and they named her Sparrow. What a unique name! I wanted to make something for the new little one, and a baby blanket seemed appropriate. After browsing aisles of material at Jo-Ann Fabrics (coupons in hand) I settled on ultra fleece in pink and white. This is the softest material I have ever felt, and I almost didn't want to give it away! But I knew it would be perfect for a baby blanket.

Laura Guest Post 6

Since the little girl's name is Sparrow, and her mother appreciates birdwatching from time to time, I decided to incorporate that theme into my blanket design.

Laura Guest Post 1


The first sketch of the tree branch with sparrows was done with a pencil on regular copy paper taped together, however next time I'll just draw it straight onto the tracing paper so as not to double my efforts. Once drawn and corrected to my liking, I traced over it with a permanent marker so I could see it through the tracing paper. (See what I mean about doubling my efforts?)

Laura Guest Post 2


Next, I cut out the pattern and pinned it to the white fleece, and then cut the fleece according to the pattern. This was kind of tricky to maneuver at first because the material was somewhat slinky and hard to manage. Once cut out, I then pinned it to the pink fleece which was my background for the scene. Using a sewing machine with the presser foot up, I stitched around the edge of the design to the background. The reason for leaving the foot up is two-fold: the material is somewhat bulky to run through the machine, and it allowed for a nice puffy touch to the design (okay, technically there's a third reason- I just plain forgot that I left the foot up until I was almost halfway through sewing!).

Laura Guest Post 3

Next, I placed the blanket backing and the front right sides together and sewed around all except for about six inches of the blanket, leaving room to turn it right side out.

Laura Guest Post 5

The remaining six inches I hand stitched closed. And there you have it- a super soft baby blanket for a sweet little girl.

Laura Guest Post 6

I think little miss Sparrow likes it, too.

Thanks, Laura for such a fabulous idea.  It was  a pleasure to have you share such a lovely project with us, and we can't wait to see what's in store for next time!

Spring Scrapbook Paper Tree

Hello fellow crafters!

Tristin and I were invited to be today's featured guest blogger over at Everyday Mom Ideas! We were thrilled with this wonderful opportunity, and wanted to share with the readers over there one of our trees from the collection we're currently doing.

This second tree is very similar to the first one. I'm sorry! I promise, the next ones will be more diverse. But the materials used in this tree are very different and it is a lot easier to overall construct. So what are you waiting for? Go check it out!

(Since this is a guest post on a different blog, and the concept is similar to the first tree.. I may have repeated myself a little. Do forgive.) Ok, now go check it out!


Thanks, Julia, for having us on your blog!

Guest Post: Confessions of a Fabric Hoarder

Hello fellow crafty girls!  Sharon and I are excited to share with you a first--a guest blogger!  (If you recall, last week we celebrated our first guest post on someone else's blog--Sew Homegrown to be precise--but this week, we have a guest on our very own blog!)  Our fabric-hoarding friend Laura created some super fabulous wall art very inexpensively and as soon as Sharon and I saw it we knew it needed to be shared!  Take it away, Laura!

 
Den


A big thanks and a big hug to my two crafty friends, Tristin and Sharon, for letting me share one of my ideas with you! Aren't these gals great? I feel more crafty just sitting by them in church! Over the weekend my husband and I hosted a little gathering with our dear friends for dinner and fun around the fire pit. Among the taco shells and s'more-building, the girls noticed my freshly created wall art. That was the first time anybody besides my husband had seen it, so I'm glad it was a hit!

 
I LOVE PRETTY FABRICS. Love, love, love them. I could spend most of my day looking at rows and rows of fabrics in the craft store. Sometimes I do when preparing for my next project, just waiting for a color or theme to jump out at me. I believe my love of fabrics is matched only by Sharon and Tristin's love for scrapbook paper! If you looked in my closet, you would find bins full of neatly folded fabrics that I bought on a whim because I thought they were so pretty, and figured I would get around to creating something later.

My name is Laura, and I am a fabric hoarder.

Fabric_Hoard


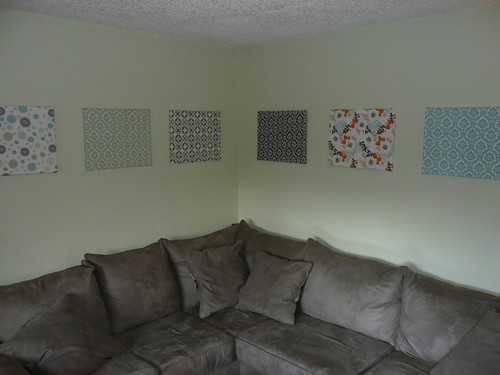
The thing is, I can only make so many quilts, throws and table toppers before my patience and my eyesight from quilting has long gone. The solution: wall art! It's a simple and inexpensive way to personalize a corner of your home, while utilizing those gorgeous patterns and prints.

 
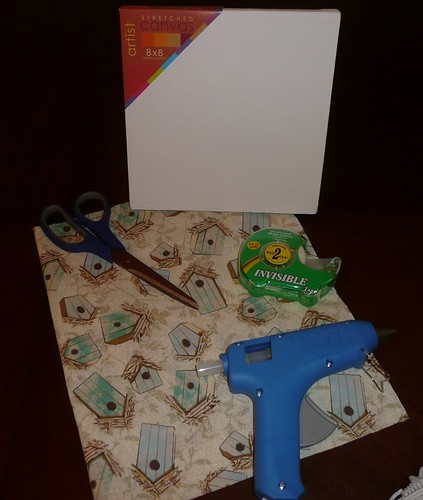
Here's what you will need:

Supplies
  • Art canvas (there are a ton of sizes and dimensions, so just choose what works for your space)
  • Pretty fabric (enough to cover the art canvas and wrap around the back)
  • Hot glue gun or staple gun
  • Scissors
  • Tape
Step_1


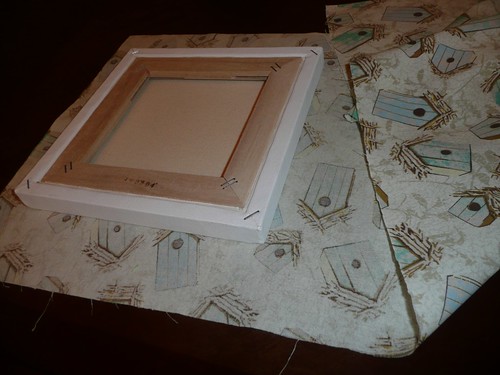
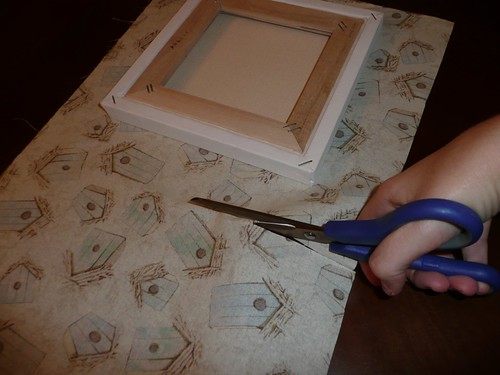
1. First, lay your fabric print side down and lay your art canvas facing down on top of the fabric. If the pattern is one with lines that need to be straight, or there is a certain portion of the print you want to display, be sure to line that up now before cutting.

 
Step_2


2. Once you have the canvas placed and measured, cut off any excess fabric.

 
Step_3


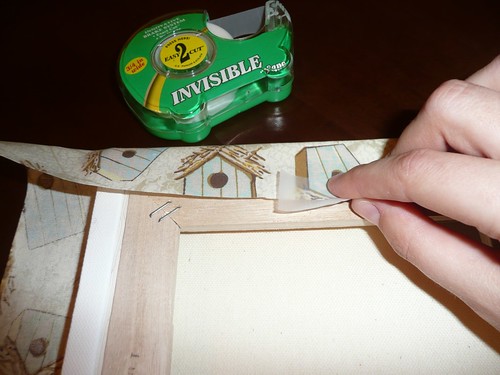
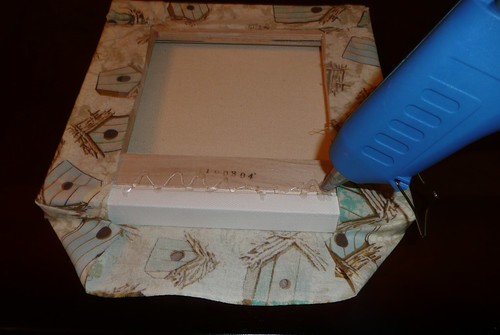
3. Fold the fabric up and around to the back of the canvas and tape it in place (this step just makes it easier on you when you begin gluing).

 
Step_4


4. Next, take your glue gun (or staple gun- I didn't have one, so I improvised!), remove the tape from one side and make a line down the edge of the canvas, then quickly fold the fabric over the glue to secure. I mention doing this quickly because if you wait over just a few seconds, the glue dries and hardens, and you're left with a lumpy mess that you just have to either scrape off or glue over, and nobody needs that kind of stress in their lives!

 
Step_5


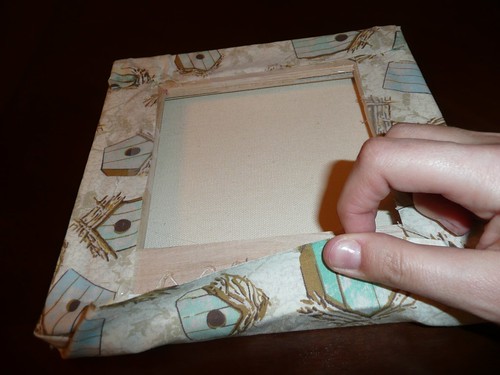
5. If you're good at wrapping gifts, then the rest is a piece of cake. If you're not, no worries, glue can mask a world of imperfections! Just fold the corners like you would a package with gift wrap, and glue it down. Simple, huh? Now go find a nail and a bare wall and display your cool new wall art!

Finished


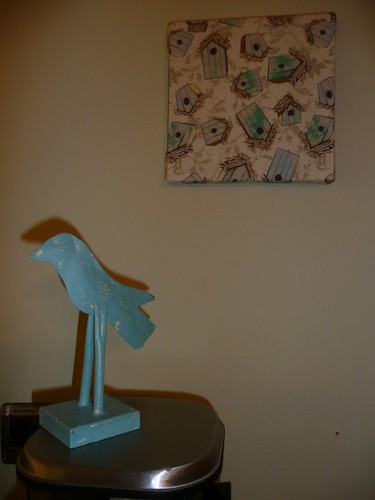
Let your imagination and creativity roam with this fun project.  The one I just assembled for you is 8"x 8".

 
Den


I had a corner of my den that just needed some love, so I used several 16"x 20" canvas to create this masterpiece. You could easily mix up the sizes, and arrange them however you want. I mentioned that this was an inexpensive project, so lemme break it down for ya...and don't forget to take advantage of those craft store coupons!

 
For one 16"x20" fabric-covered canvas you'll pay:

  $2.40 16"x20" Art canvas                   
+$2.66 1/3 yard pretty fabric                                                                                            
  $5.06

 
Just over $5!! Now that's a deal. So, if you're a self-proclaimed fabric hoarder like me, grab some art canvas and create something unique. Let the fabric's inspiration be your guide!

We're "Sew" Excited!

Hey fellow crafty gals!

Sharon and I are super-excited to announce that we have our first guest post with Jessica over at Sew Homegrown!

If you're interested in knowing more about our involvement in a BIG crochet project, check out our guest post at Sew Homegrown.

Here's a tantalizing tidbit:


Thanks, Jessica, for having us!
Tristin Signature
Related Posts Plugin for WordPress, Blogger...