Pages

Showing posts with label Fabric Paint. Show all posts

DIY Painted Chevron Pillow

Hellooo blogdom! Guess what, guess what, guess what! The 'Crafty Girls' now have a brand new sewing machine! Ok, so it's not brand new. And it's not ours. (Sigh.) A friend from church is letting me borrow it to sew a cover for some rocking chair cushions. And instead of sewing those (scary and complicated) cushions, I've been procrastinating by sewing other (much simpler) pillows. Cut me some slack! I'm a newbie seamstress. I have to work up to them.. or something. When I acquired this beauty of a machine, I immediately knew what my first project was going to be. I have had these pillows planned for a while now, and I was a step away from sewing them by hand. Luckily, I didn't have to.

DIY painters tape chevron design pillow

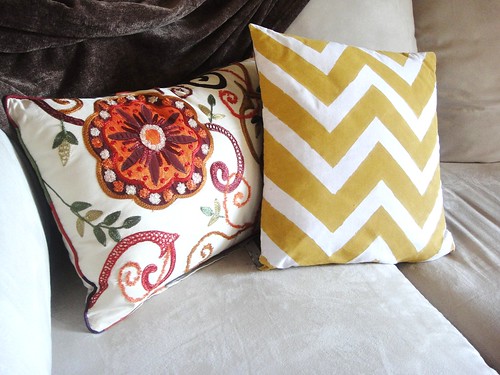
Here it is. A DIY painted chevron throw pillow. NOT the one on the left. I can only dream that some day I will acquire the skills to pull something that intricate off. But for now, let's get back to reality. I've seen HGTV use this painters tape trick many times to pull off awesome designs on homeowners walls. Unfortunately, we are renting, and I don't want to make the effort to paint and then turn around and just repaint the walls. (Ugh. Renters - feel free to grumble with me for a minute.) The solution.. apply this technique to throw pillows!


The chevron design was not my original idea. Apparently, it is a very popular and trendy design. But that is great news for us crafters because it's a simple design that we can accomplish with a little bit of painters tape and some acrylic paint (my new crafty crush). How About Orange did a tutorial for making fabric prints with tape.

DIY painters tape chevron design pillow supplies

Here's What You Need:
  • Plain white fabric (I had some of this on hand).
  • A pillow form. I actually found it cheaper to buy an actual pillow at Goodwill and use it instead of a pillow form.
  • Acrylic paint (or fabric paint) of the color you want to use. I mixed this yellow with a light tan to produce more of a mustard yellow.
  • Foam brush
  • Painters tape
  • Scissors
  • Ruler 
  • Sewing Machine  
Fortunately, I already had all of the supplies in my stash except for the acrylic paint ($0.59 each at Jo-Ann) and the "pillow form" ($1 at Goodwill), so this project cost me a little over $2.00! Whoo hoo!
      
    Here's What You Do:

    Pillow cover 

    Sew your pillow cover. Usually I prefer to make pillow covers so that you can reuse the pillows inside. Since I used an ugly Goodwill pillow for my form, I opted to simply sew it up. (For my other pillow - later on in the post - I decided to do an envelope pillow cover because I used one of my good pillows as a form.)
      DIY painters tape chevron design pillow

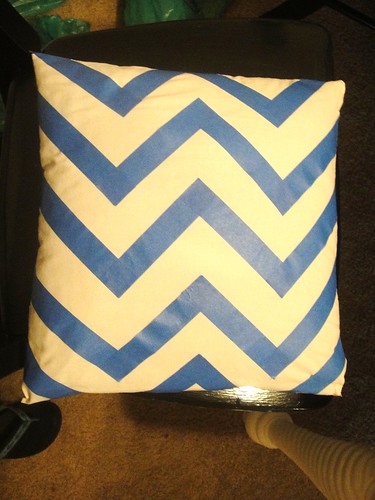
      Next, use painters tape to create a design on your pillow cover. Here's where a normal person would use a ruler to make precise measurements. Apparently, I'm too good for rulers because I just eyeballed it. Why am I so imprecise with my crafts?

      DIY painters tape chevron pillow

      Paint away! I know this looks yuck-o, but don't worry - this isn't the final product! Do careful strokes perpendicular and with (not against) the edges of the painters tape. This is to avoid bleeding under the tape and therefore sloppy lines.Yuck. We don't like sloppy lines.

      DIY painters tape chevron design pillow

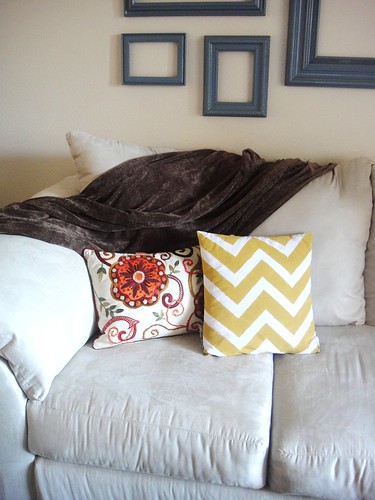
      Here is the finished product! With the inspiration pillow. Tristin found this pillow at Jo-Ann's, and I loved it so much that I bought one too! Yes, I copied her. I'm not ashamed because look how gorgeous and fun it is! I have been wanting to change up the color pallet for our living room since.. pretty much the moment I bought all those blue and brown pillows (silly me). Since then, it's been blue and brown and blue and brown. It has been so monochromatic and just plain... blah. I hate blah.

      DIY painters tape chevron design pillow

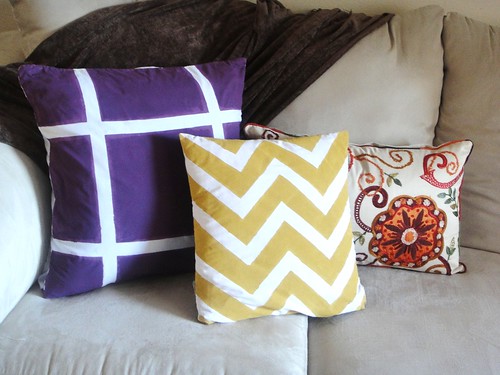
      I loved this painters tape idea so much that I wanted to do a second pillow right away! I wasn't as happy with it as I was with the chevron one, but it'll do. The design was supposed to be more of a border, but I did it too close to the center and the result was a "tic-tac-toe" look. Oh well. At least it's purple. I love purple. It's not a blueish purple like it appears in the picture, it's a warmer purple with more red and yellow hues. Ahh. Warmer, brighter colors make me feel so warm and fuzzy inside. I think we're well on our way to a brighter and more refreshing atmosphere in our living space. :)

      Think of all the awesome design ideas you could come up with using simple painters tape! OR use freezer paper or a fun stencil to make a cool pattern or a personalized monogram. What am I? Obsessed with stencils or something? (Yes.)
      Happy Painting! :)

      "R" is for Ridiculiously Awesome


       I have another home decor solution for one of our bare walls. I sure hope you aren't tired of my home decor crafts. The way I see it is - we all have houses that need decorating. Even if you are crazy and already have every inch of your place decorated (I sure don't), you can always change it up and create something new and exciting and ridiculously awesome. This is a little personal touch I made for the wall space above our bed. Isn't it gorgeous? It has a touch of elegance but it's also fun and different and custom-made.

      It all started with a frame.
       We got this beauty at Ikea for $30. We love Ikea. Sometimes we drive an hour to the closest store just to walk around and look at the showroom. Of course, we never come home empty handed. (Side note: I am not allowed in the kitchen area anymore per my husband's instructions. I find myself wanting to buy gorgeous walnut cabinets and granite counter tops for our temporary apartment.)


       Back to the frame. I knew I wanted to do something special with it. After months of it just sitting on our dresser, I decided it was time to take action! So then another month later here's what I did... I purchased some lovely fabric for the background, cut it to size, and just taped it directly onto the glass. Taping it may sound like a weird decision, but I wanted to be able to remove it in case I ever wanted to reuse the frame (I change my decor a lot). Next, I gathered a matching plain tan fabric that I already had and cut it 3 inches smaller than the original oval. You may not be able to tell in the picture, but the tan fabric has a great tweed feel and look which adds quality and texture. I used hot glue to adhere it to the background fabric.


      Next, I painted an "R" on the tan oval with black acrylic paint - my new craft crush. It was my original intention to use Tristin's freezer paper stencil idea, but I did not get around to finding an "R" online, etc. I decided to take the dangerous route and draw it myself. I am such a rebel. I also drew a bold border for the smaller tan oval just to add more drama. What do ya think?


      Here's how it looks in our room. Check out how great it looks with the lamp I recently stenciled! My husby is afraid it will fall on us in the middle of the night, and we'll turn into "Flat Stanleys" haha.

      I personally love how it turned out, and I think it looks Ridiculously Awesome. That is, of course, what the "R" stands for.


      DIY Lampshade Transformation: From Drab To Fab!

      A real Cinderella story:

      Lamp transformation

      We bought this lamp at a local Goodwill store a couple of months ago for $3. It's beautiful, bold, and the perfect blend of my two conflicting styles - modern and antique. The problem was... well, there was no problem with it, really. It is beautiful. However, since I'm always looking for something that needs some crafty-love, I came up with an easy project to make the lampshade pop more. And boy does it pop! It demands attention when you walk into the room, and ties the damask(y) pattern on our bedspread with the black detailing in our furniture. I luuuurve it.

      DIY Lampshade transformation

      Here's how it all went down...

      I didn't take a picture of my supplies because it all happened so fast. The idea struck me, and before I knew it, I was already painting like a madwoman. So, apologies.

      But here's the list of supplies:
      •  Lampshade that needs some added fabulosity in its life.
      • Acrylic or fabric paint. I used acrylic paint simply because there is always more selection, it's cheaper (only 59 cents at Jo-Anns), and it's more versatile - you can use it on various surfaces.
      • A stencil. You might recognize my stencil design. This is the same stencil I used for my canvas art.
      • Cup or shallow dish to hold the paint
      • Small brush
      • Paper towels
      • Painters tape (optional)
      Here's what I did:

      This part is extremely simple. So simple, I probably don't have to explain it. But here it is anyways.
      1. Select what you want your design to look like and position your stencil on the lampshade. You can choose to use painters tape to hold the stencil still while you paint, but that step is optional. 
      2. Paint over the stencil. 
      3. When you are sure you've thoroughly painted within the stencil border, carefully remove the stencil from the lampshade. Be careful. The stencil may now have paint on the back as well as the front. In between each of my prints, I quickly wiped the stencil off with some paper towel.
      4. Repeat the process until you have the design that you are going for. Let it dry, and you're done!
      DIY lampshade design

      Here's the finished product in all its glory! Gorgeous, right?!

      I can't believe how a simple concept and under $3 worth of supplies could turn an ordinary lamp into one with such impact and drama. Look how well it matches our already existing decor:

      DIY Lampshade transformation

      It just ties everything together. And at night, when its light is on - it has a velvety glow to it. Mmmm. I love it! I could not be happier with the result!

      A Ladybug Tee for Junebug Tutorial

      Happy Valentine's Day crafty friends!  Are you doing something special to celebrate the holiday?  For sweet little Junebug, I made a Gap knock-off t-shirt that I feel compelled to share with you.


      The idea came from a sweet shirt I ran across at Gap a few weeks ago.  Junebug and I both liked it, but being the cheapskate crafty gal that I am, I thought I could recreate it for a fraction of the price--so I made it happen!

      Here's the shirt we saw at Gap:

      I had all of the supplies on hand from previous projects except for the t-shirt, which cost $3.

      Here's what you'll need if you want to create this beauty:
      • White t-shirt in your kiddo's size, washed, dried, and ironed
      • Black, red and white t-shirt fabric paint (it's definitely better than regular fabric paint, I promise)
      • Sponge brush
      • Black puff fabric paint
      • Red embroidery floss, needle, embroidery hoop (if ya wanna get all fancy)
      • Water-soluble pen

       Let me start by saying that perfection is not the key to this shirt.  The original is funky-looking and I wanted to keep it that way, so don't go getting all freaked out about perfection--just let it go!


      I started with a dollop of white paint and a dollop of red paint (both are T-shirt fabric paints) and then used my mad art skills (NOT!) to create a pink streak in the center.  I wanted there to be some streakiness in the colors, so I only moved my sponge brush through the paint in one direction.

      Make a ladybug-like shape and then let it dry.  (Be sure to put a piece of cardboard inside the t-shirt so the paint doesn't bleed through.  I normally use an old file folder for this.) 


      See how imperfect it is?  No biggie--it's supposed to be that way!  Once the red/white/pink streaks are dry, fill in the rest of the ladybug's body with the black t-shirt paint.  Then use the black puff paint to make the antennae and the heart-shaped ladybug spots.  So cuh-yoot!


      If you're happy with it as is, then you can be done at this point.  Personally, I liked how the word "love" was embroidered on the original Gap shirt, so I added it.  I simply wrote the word "love" on the t-shirt with a water-soluble pen and then embroidered over it with red floss using a backstitch. 


      It's not a must, but I also fused a small piece of interfacing over the backside of the stitching so the back of the stitches would not be exposed on the inside of the shirt. Junebug is a picky gal, and I'm sure she'd be bothered by the exposed stitches against her skin.  Man, she is one tough cookie!

      So, here's the original next to my knock-off:


      I'd say the savings and the crafty satisfaction were worth a little bit of effort!  Whaddya think?

      Tristin Signature

      A Cameo on Canvas

      Hey crafty folks!  I have to admit that amidst all of my busy-ness creating Christmas gifts, I selfishly made myself a little sentimental token.  

      Here it is:

      Junebug Silhouette Bag

      I love cameos so having one of my little Junebug to tote around proudly is pretty precious (oh, and that alliteration was completely unintentional).

      It's a pretty simple project.  If you'd like to replicate it you can check out Prudent Baby's great tips on making cameos (3 methods) and visit my new favorite freezer paper stenciling tutorial.  Combine those two simple projects into one and you end up with a beautiful cameo on a canvas bag. 

      Junebug Silhouette

      I think this is a gift that proud grandparents would like, too, if you're still looking for last minute gift ideas!

      Tristin Signature

      Doggie Bag (and not the kind from restaurants!)

      I'd be remiss if I didn't start by saying that I am digging this COLD Florida weather! A few nights ago it dipped down to a chilly 29 degrees--what?!  It feels like Christmas and I hope the cold snap lasts a while...let's just hope my outdoor plants survive it! 

      This Christmas, my brother's wife and I committed to only make handmade gifts for one another.  One of the projects I chose to make for her is an embellished canvas bag.  I always pass by the canvas bags at Hobby Lobby and feel inspired, and keep on walking.  But when I saw the plain canvas bags on sale, I snatched 'em up and was immediately flooded with ideas on how to decorate the blank canvases...

      Here is my favorite completed bag:

      Doggie Bag Complete

      I settled on using freezer paper stencils.  There are about a million freezer paper stencil tutorials out there, so I won't bore you!   Craftster has a very straightforward tutorial here.  It's a great craft for those who are not "crafty" because it requires very little in the way of specialized tools--and very little skill, too!

      To find the Labrador silhouette image, I simply did a google image search.  Pretty easy, right?  Then I followed the instructions from Craftster.  Here's what I ended up with:

      Freezer Paper Doggie Bag

      It looked pretty plain to me, so I pulled out my stash of embroidery floss and got to work.  If you're new to embroidery, Jessica from Sew Homegrown recently had a guest provide an embroidery primer, complete with some really great links.  

      Using a backstitch, I wrote the name of my brother and sis-in-law's lab, Libby (short for Liberty). 

      Don't you think it really livened up the bag?

      Doggie Bag with embroidery

      I think that any dog lover/owner would be thrilled to get a bag like this with their favorite breed on it.  The embroidery adds a very special "custom" touch.

      After making this bag, I realized it was a bit more dog-centered than I'd anticipated, and I thought my sis-in-law would appreciate one that was focused a bit more on her.  So, I found a great website that offers free printable alphabet templates and downloaded her initial.  I embroidered some paisley shapes with bright colors, and was quite pleased with the funky bag that resulted.

      Initial bag with paisley embroidery

      The only problem left to tackle was the ugly backside of the embroidery.  You know, the knots, the weird looking stitches, etc...  To handle that problem, I looked to my sewing notions drawer and grabbed some fusible interfacing.

      Back side of bag and interfacing

      The bag is turned inside out, showing the funk that was hiding inside the bag.  The strings on the back could easily snag and break once the bag has been used a few times if it's not covered.  I cut a piece of interfacing big enough to cover the area of gnarly stitching and ironed it on according to the package instructions.  Voila!  A usable AND gorgeous canvas bag (if I do say so myself!).

      Interfacing over back of embroidery

      If you're still struggling for last-minute gift ideas for the holidays (or any occasion) these bags are really simple, quick, and inexpensive--and thoughtful, too.

      As always, questions, comments, and constructive feedback are appreciated!

      Tristin Signature

      Related Posts Plugin for WordPress, Blogger...