
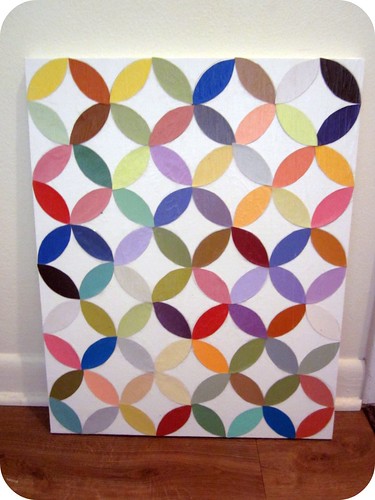
Just like my last DIY art for non-artists, this masterpiece is a knock-off of a pretty canvas from World Market.
Yeah, it costs $129 at World Market. My version cost about $3. Total. No joke.
If you want to make one, here's what you'll need:
one canvas in a size of your liking
TONS of paint chips
Mod Podge and a foam brush
Lots of patience
Saran wrap
A book (I used the Complete Works of Shakespeare Volume 1, but you can use any book you like--lol)
Saran wrap
A book (I used the Complete Works of Shakespeare Volume 1, but you can use any book you like--lol)
A template (Directions on making one follow)
Ok, first let's talk technical stuff. You're going to need to think about math for a few minutes, so brace yourself and don't be scared. Your canvas needs to have sides in a size where you can find a common denominator. For instance, if your canvas is 15"x30", your common denominator would be 3" or 5", so you'd want to choose either 3" or 5" circles (I'd recommend 3"). If your canvas is 12"x18", you'll want to choose 3". I used a 16"x20" canvas, so I used 4" circles. Whatever you do, just make sure you have a common denominator when you choose your canvas, preferably 3" or 4".
If you're mathematically inclined, a picture like this may help you envision what we're trying to accomplish.
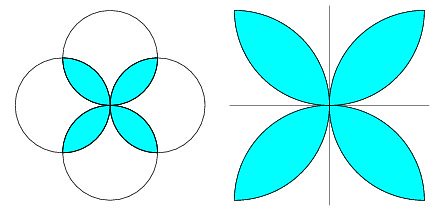
Or, here's a simple way I came up with to make my own template--it's easier than it looks so please don't get scared now!


1. Start with a circle in the size you need. (Remember to use a canvas where the sides share the same multiples or else you will not get an exact match up and you'll be disappointed.)
2. Fold it into quarters
3. Cut out your quarters. You'll need two.
4. Overlap the quarters by lining up the corners (the curved sides should overlap one another).
5. Trace along the exposed curved side.
6. Cut along the line you just traced--and badda bing--you have your template!
Use your template and trace a it a bajillion times on a bajillion paint chips and cut those shapes out. (Really, you need 4 chips per circle. Think of it this way, I used a 16"x20" canvas and 4" circles, so there are 20 circle shapes on the canvas. I needed 80 "leaf shaped" pieces cut out.)
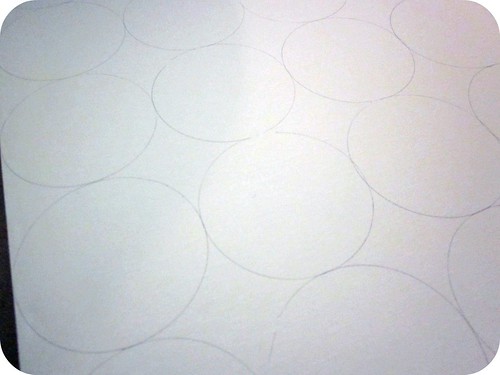
To make placement of my pieces easier, I lightly traced a 4" circle in rows over the canvas.
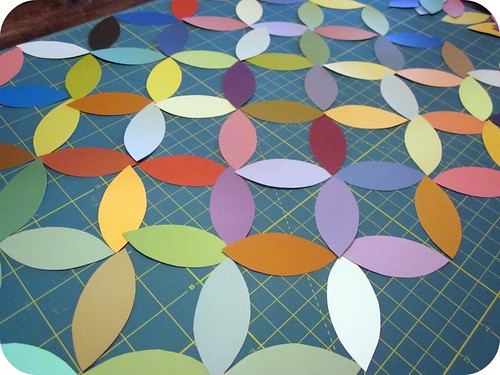
I also laid out my paint chips in the intersecting pattern prior to placing them permanently onto the canvas to ensure I was happy with the color distribution.
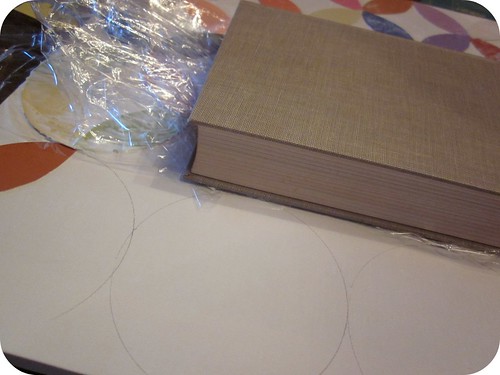
Finally, you're ready to place the leaf-shaped pieces onto your circles. It's not rocket science--look at the finished project and you'll be able to see how to lay them out. To adhere them to the canvas, I used a thin layer of Mod Podge. The paint chip cut-outs will begin to warp and fold up--don't worry! Just brush a layer of Mod Podge over the top of the paint chips, cover with a piece of saran wrap and then lay a book over it for about 15 minutes. This should prevent the edges from curling up. Be sure to remove the book and saran wrap before the Mod-Podge dries! I worked in sections over the course of a few hours to accomplish this. (It's worth the effort, pinky promise!)
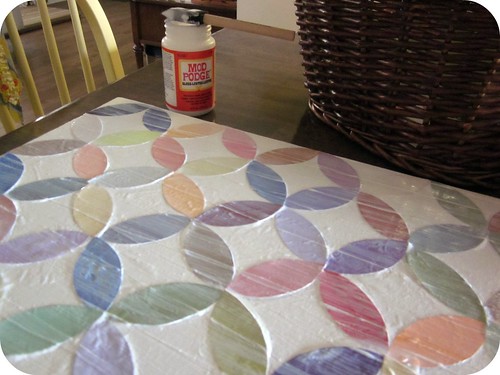
Once you have all of your pieces firmly secured, cover the whole canvas with a thin layer of Mod Podge. Once the first layer dries completely, go ahead an do one more layer just for luck. You're done! Now find a purdy spot to hang your masterpiece!
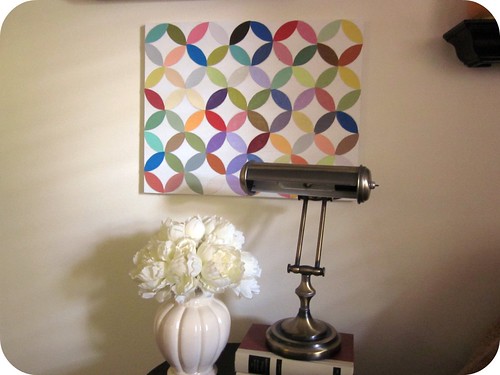
I put it in my living room for taking pictures...

But it found a permanent home in Junebug's bedroom with the Felt Heart Garland from Valentine's Day. She loves the bright colors!
okay - LOVE IT!! I also love World Market. It would look really cool too in like all shades of one color - like blue...hmmm....I really need to go get some paint chips :)
ReplyDeleteLove this, Tristin! I may be recycling the wall canvases for this little gem. I already have a bazillion paint chips that I collected for no reason!
ReplyDeleteSuch a wonderful idea! Really, really, clever!!
ReplyDeletei love this so much. i'm actually planning on buying paint for my kitchen in the next few days, so i'll just grab a huge handful of different paint chips!
ReplyDeleteThat is great! You could also actually paint the canvas too, instead of the paint chips.
ReplyDeleteI LOVE this!! I cannot wait to make one. I think I am going to start out with a small one and then see if I can tackle a bigger one.
ReplyDeleteWow Tristin! I think this is my favorite of yours so far! It looks fabulous! :)
ReplyDeleteHOW CUTE!!! I love this idea and the price! I'm seriously going to give this a try! I really enjoy your blog and a fun crafts! Thanks for sharing!
ReplyDeleteI can't wait to make this for my guest bedroom. I have two twin beds in there and I think I will make one for above each bed. Thanks for the great idea!
ReplyDeleteThis is exactly what I was looking for! I have a canvas with a small imperfection that needs covering, but I was too hoarder-tastic to throw it away LOL. Thanks for the fab idea! :)
ReplyDeleteI LOOOOOOVE this! And I love that you did it with paint chips - I thought it was going to just be paint when I saw the thumbnail, but this produces much sharper, gorgeous lines (not to mention that I get to use the paint chips I hoard). I'm adding this to my to do list right away!
ReplyDeletespectacular!! awesome diy!!! I would love for you to link it up at our link party this weekend! We are new followers
ReplyDeleteAmy
www.SistersoftheWildWest.blogspot.com
Love this!
ReplyDeleteMichael
bluevelvetchair.blogspot.com
So clever and so pretty! Thanks for sharing! I think it's high time I dip into the modge podge world. :)
ReplyDeleteThis is great! I may do one with many copies of the same color family... I am excited by the possibilities! Thank you!!
ReplyDeleteLove this too and I WAS THINKING BLUE SHADES TO! Thanks so much for sharing!
ReplyDeleteWOW ! is this ever a very neat project and cheap !! AND it looks very pricey and impressive ! Would look good in one color , different shades too ; ohhhhhh , the possibilities here !! thanks !
ReplyDeleteLove this! So creative and absolutely do-able. Great instructions, too. I'm thinking I need a blue shaded one for my master bedroom. And another for my craft room. And another one in reds for my livingroom....tx for getting my brain going!!
ReplyDeleteI have to say I like yours better than the original. :)
ReplyDeleteVery cute!
this is amazing! I love it. Pining it for inspiration.
ReplyDeletemegan
craftycpa.blogspot.com
What does: "make sure the sides share the same multiples" mean? I don't know understand the word multiples in this content. Do tell!
ReplyDeleteThanks.
Karen, what I mean by that is that each side has to have a common denominator to make sure your circles fit. In other words, you can't use a 24" x 30" canvas and use 4" circles because 30" is not divisible by 4", but you could use 3" circles because both numbers are visible by 3. You could use a 24" x 36" canvas with 4" circles though. Math is not my strong suit, but I hope that explanation helped.
ReplyDeleteI used a 16" x 20" canvas and 4" circles.
Love this!! I see a weekend project in my future :)
ReplyDeleteAmazing!
ReplyDeleteWould love to see you share it at my link party!
http://allthingsfee.blogspot.com/2011/04/calling-all-crafters-2nd-edition.html
Awesome. Even the math part.
ReplyDeleteYou know what...after the dot art I saw this painting and tried to come up with a way to create a stencil and paint it. I never thought, for even a second, to use paint chips. You are my freaking hero.
ReplyDeleteThis is so fabulous! I love it! I've been looking for a good project to do with paint chips, and this is just perfect! Thanks for the inspiration!
ReplyDeleteneat idea!
ReplyDeleteI featured this on my Fun Finds Friday today, so feel free to stop by and grab a Featured button!
ReplyDeletehttp://momscraftyspace.blogspot.com/2011/04/fun-finds-friday_22.html
Wow, I'm so glad I found this! I was going to try to recreate this by sketching but gave up. Now that I found your post I'm reinspired!
ReplyDeleteI love this blog so much! I finally decided to "follow" after filling up my bookmarks with all of the stuff I want to try! Thanks for such GREAT inspirations!
ReplyDeleteThis art completely rocks - it's so right up my alley! :D I love.
ReplyDeleteThis is very cool- love it! I have a spot in our living room that needs something- this just may be it!
ReplyDeleteThis comment has been removed by a blog administrator.
ReplyDeleteI am your newest follower from www.thestuffofsuccess.com - I absolutely love this project and I am always looking for uses for my paint chips. Thanks for sharing.
ReplyDeleteThis looks amazing! I definitely want to try it! :)
ReplyDeleteHi! I featured this project on Fun Friday Finds. I hope you will stop by and check it out.
ReplyDeletehttp://www.itsybitsypaperblog.com/2011/08/fun-friday-finds-paint-chips.html
Just made this this morning and used paint chips to match the colors in my room! Absolutely love it!
ReplyDeleteAwesome. I saw this canvas the other day at WM ($129!!! ugh) and decided I could probable make my own. I just painted mine and about 2 hours later I am really starting to love the paint chip idea, that would have made it so much simper and faster!! you rock
ReplyDeleteI love this idea! I am a bit confused with the saran wrap. can you help me to understand why and how to do this part.
ReplyDelete@ Tiffany I was having a problem with the corners of the paint chips curling up, so I needed to weigh them down. Because they were drowned in Mod Podge, I had to lay down saran wrap before being able to put a book on top to press down the curling-up corners.
ReplyDeleteHope that helped!! And good luck! (P.S. I think that if you used thinner paper like scrapbook paper or the like, you won't have the curling edges problem.)
Awesome! Thanks for sharing.
ReplyDeleteI really love this simple idea, I love the pattern and the way you executed it. Plus, awesome tutorial, and as I am math challenged, I appreciated the details on that. I think there is lots of opportunities with this to do many things . . . perhaps paint the canvas prior to the mod podge or use different types of papers for different kinds of textures. Maybe use old book pages (seems to be all the rage now). What about painting letters on different sections to form a word, names, or a quote? Possibilities are endless . . . absolutely love your interpretation and appreciate the inspiration!
ReplyDeletelove love love
ReplyDeleteThanks for the ideas and How to! Where do you find your canvases? Any suggestions on finding inexpensive canvases. They are about $20 around me.
ReplyDeleteI found a 3 pack of 16x20 canvases for $9.88 at walmart!
DeleteThis is great! I used this project as my first ever pant chip project and I love it!
ReplyDeleteThis comment has been removed by the author.
ReplyDeleteI just moved into a new apartment and have been looking for ways to spice it up and personalize it. I needed something for the bedroom and this looked perfect. I ended up painting the canvas dark brown because some of my leaflets were too pale against the original white background. It worked out great but I did encounter one problem as I started gluing the leafs on. I should start by saying that I too used a 16x20'' canvas with 4'' leaflets. Anyway, by the time I got to the end of the gluing process, I found that the last circle was too small to fit the 4'' leaves. Even though I worked really hard to make sure that I condensed my circles as much as possible and I laid them out several times prior to gluing them on, I think that it's inevitable that your leaves take up more space than you think (especially at the edges of the canvas - the leaflets don't rest at the very edge and therefore waste about .1'. And this adds up) Anyway, I wonder whether you or anyone else had the same problem and whether you think we should try cutting circles that are just under the common denominator? Should I have tried to cut a circle that was 3.10'' and made my leaflets from that?
ReplyDeleteI still love my new art piece and even though it has a circle in the corner that's smaller than the rest, I find it charming. Thanks so much for the great tutorial!
I had the same problem, but solved it by cutting 4 - 4" cirlces out of template plastic. Then I laid them across the top of my 16 by 20 canvas. I noticed that the last circle was to big on mine and the last circle extended beyond the canvas. So I just started shaving I tiny bit off each template till all 4 template fit across the canvas from edge to edge , with no overhang. Then I was able to take the template and cut my leafs. I don;t know if I am making sence, but hope this helps somewhat. Making a template really made it a lot easier for me. I am certainly not blessed in the math part. Good luck. Vicki
DeleteJust wanted to let you know that I featured your pretty art work on my blog today!
ReplyDeletewww.sweet-raisins.blogspot.coom
Hi
ReplyDeleteI am very new to crafting and don't even know the basics.....I love this idea and want to make it as my 1st crafting project...Please pardon me for asking the silly question but where can find paint chips?Thanks!!
Reena,
DeletePaint chips are available anywhere that sells house paint--hardware stores, specifically--Lowes, Home Depot, Ace, etc.
Good luck!
My local paint store gave me 6 books of outdated wallpaper books and I have been using the beautiful papers from this to do my leafs. I have done many different projects using these papers and the have turned out great. Love browing through these books, my juices just overflow with inspirations. Paint stores most of the time throw these books away, might be worth the time to ask one of your local store if they would save them for you.
ReplyDeleteI am new to modge podge. Do I put a thin layer on the canvas place the leaf shapes on and then put another layer over the top or do I just place the leaf shapes on and then apply a layer of the modge podge. Thanks for your help.
ReplyDeleteYes, Marc, a layer under AND a layer over. It acts as a glue on the bottom and a sealer on top.
ReplyDeleteI hope you love the world of Mod Podge as much as I do.
Very cool project, ladies! I shared it in my slideshow this week of project's to cover your white walls! http://www.good.is/post/7-diy-art-projects-to-cure-your-white-walls/
ReplyDeleteI just made this and I am so proud of how it turned out! Thanks for the great directions.
ReplyDeleteSo trying this--AWESOME!
ReplyDeleteLove this artwork! I'm gonna try this as we speak...
ReplyDeleteLoved your idea so much I'm right in the process of making a similar one now but with varying shades of lilac/violet/purple to match my decor. Would it work as easily if I just glued on the pieces with tacky craft glue and then modge podged on top to prevent a major sticky mess? (I'm good at messes lol) Waiting for your reply. Thanks!
ReplyDeleteLeena May 17, 2012 8:00 pm
Leena,
ReplyDeleteI think you'd be just fine to do it that way! Whatever glue/adhesive you choose to use, just make sure that you use a thin/even layer so that you don't get bubbles/bumps underneath.
Best of luck!!
Tristin
Very cool project! I work at Pier 1 and just saw a rug in this exact style!!
ReplyDeletewhat kind of canvas we can use?or can we use some paper chart for this?thanks!!
ReplyDeleteWhen you're referring to paint chips, do you mean the paint display samples or something different? I feel like the display samples are too small for this. Thank you for any response, I'm new to crafting as well.
ReplyDeletewould you advise against spray painting the canvas before the decoupaging begins? I don't like the stark white canvas look, and was thinking just a touch of almond satin finish spray paint in the background.
ReplyDeleteI love it, I Love it, I LOVE it!! Thanks for sharing!
ReplyDeleteWow, it's looking so unique and awesome art, i have never seen this before, you have made amazing 'circles Wall Art' i know that wall art can make our interior more attractive and this type wall art can make it extraordinary. I wan to say thanks for sharing this great easy Circles Wall Art making tutorial.
ReplyDeletehome wall art decor
Im now a fan of your work.
ReplyDeleteI stumbled upon this idea on pinterest while looking for some wall art ideas for my dorm room and decided to give it a try. It turned out absolutely beautiful and was really easy to complete! Thank you so much for sharing the project and easy to follow tutorial!
ReplyDeleteThanks for the idea. I kept getting hung up on the geometry of this geometric art, but ultimately, I conquered! I ended up doing a scaled down, simplified version that was a lot easier for me to complete. I put on my blog here: http://nolocomo.wordpress.com/2013/11/11/art-for-the-non-artist-geometrics/
ReplyDeleteI know it's been a million years since you posted this and then since I tried to make something equally awesome, but I finally got my act together and shared my versions over at my blog. If you want to see them, they're all here. Thank you so much for the awesome tutorial and inspiration - I gave you full credit for the genius of this! : )
ReplyDelete-Mel the Crafty Scientist
This comment has been removed by a blog administrator.
ReplyDeleteNew subbie here...I'm so late to the party but its still happening...love love love this art and will be doing or trying one soon ;-)...BTW was in Ikea this morning and totally saw a recall on the wall lights in Junebugs room check it out... http://www.ikea.com/ms/en_AA/about_ikea/press/product_recalls/index.html
ReplyDeleteHeadquartered in Pomona, California, Wall26™ currently operates three large-scale printing facilities, strategically located across the United States of America. This allows Wall26™ to compete with the best in the space and offer Fast 2-Day Shipping anywhere in the USA. canvas art paintings
ReplyDeleteBuy TIE PIN MAGAZINE HOLDER and Add to the beauty of your home or office with this beautifully crafted magazine, books, files or newspaper holder. It can help you to organized magazine books files and so on, make your desktop neat and tidy.
ReplyDeletealexander mcqueen
ReplyDeletehermes birkin bag
supreme shirt
goyard outlet
jordan 1
kd shoes
jordan outlet
kd shoes
yeezy outlet
yeezy
goyard outlet
ReplyDeletefear of god
bape hoodie
palm angels
hermes belt
golden goose outlet
kobe byrant shoes
goyard bag
bape
goyard
A beautifully chosen wall painting can instantly transform any space into something elegant and vibrant. I always recommend checking out Vibecrafts for their amazing collection of artistic and premium wall paintings that truly elevate home décor.
ReplyDeleteThis comment has been removed by the author.
ReplyDeleteGreat insights on the importance of choosing the right wall art for any living space! A well-designed table not only
ReplyDeleteenhances functionality but also elevates the overall décor. If anyone is planning to upgrade their living room, I’d
suggest exploring Vibecrafts – they have a wide range of stylish and durable center tables that perfectly blend elegance
with practicality. Truly a must-check for modern homes!
Discover stunning wall painting designs at Vibecrafts. Our horizontal wall paintings bring elegance, color, and charm to any room, making your walls a true reflection of your style and personality
ReplyDeleteWonderful thoughts on canvas painting! I just saw some lovely modern and traditional designs at Vibecrafts that can elevate any room's vibe. So if anyone is looking for quality canvas paintings that also have artistic styles, take a look at Vibecrafts, as they have some incredible collections!
ReplyDeleteThis blog beautifully explains how wall artcan transform the look and feel of any space. From modern abstract to traditional designs, wall art creates a unique identity for your home. If you’re planning to buy stylish and high-quality wall art online, Vibecrafts is the perfect choice. Their collection blends creativity with elegance at great pricesto explore their exclusive range.
ReplyDeleteThis comment has been removed by the author.
ReplyDelete
ReplyDeleteThis blog beautifully explains the essence of warli art , one of India’s most traditional and expressive tribal artworks. Known for its simple yet meaningful designs, it adds a rustic yet classy feel to walls. For anyone looking to buy authentic and stylish Warli art online, Vibecrafts is the perfect choice. Their collection offers premium-quality and affordable designs
ReplyDeleteAbsolutely love how madhubani painting can transform a space! Vibecrafts offers such a stunning collection — stylish, affordable, and perfect for showcasing memories. Their unique designs add warmth and personality to any room. Highly recommend Vibecrafts if you're looking to upgrade your home décor with high-quality, elegant frames. A must-visit for every interior enthusiast.
Great insights! A wall painting really does change the vibe of a room and makes it feel more alive. I’ve seen how the right design can completely uplift interiors. Recently, I found some unique and vibrant options at Vibecrafts that blend perfectly with both modern and traditional décor.
ReplyDeleteThis blog beautifully highlights the charm of abstract painting . More than just art, they create emotions and set the tone of any living space. If you’re planning to buy premium-quality abstract paintings online, Vibecrafts is the best choice. Their collection blends creativity with elegance at affordable prices
ReplyDelete