Pages

Showing posts with label Christmas. Show all posts

Day 9: Bottle and Branch decor with Michael of Blue Velvet Chair

Hey pals!  Due to an email glitch, I have day 9 of the 12 days of Christmas series for you a few days out of order.  So, we have Michael from Blue Velvet Chair sharing a beautiful point of attraction with us--beautiful bottles and branches. 

Hello to everyone here at Two Girls Being Crafty. My name is Michael and I'm the host of Blue Velvet Chair, a blog dedicated to showcasing recycled and repurposed design, arts and crafts. I've looked forward to sharing a bit of holiday cheer with you since the day I 'got the call' to join this fabulous line-up of creatives for the 12 Days of Christmas.

When I'm decorating for the holidays I have two things in mind...how can I do it on the cheap and how can I reuse what I already have. Today I'd like to share my table 'centerpiece' that is a bit thrift, a bit recycle, and a bit creating something new.
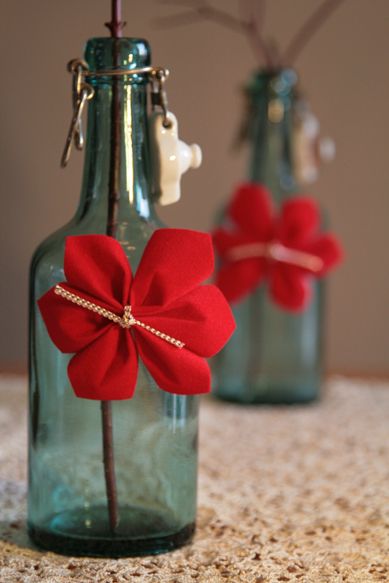


Back in May, I picked up some antique turquoise bottles from the early 1900s during a thrift store run. They became the perfectly understated centerpiece for our Thanksgiving dinner with friends when I added some simple red-colored twigs that a neighbor had trimmed from their shrub. So now we have the thrift bit.


The recycle begins when I decide to use these same bottles and twigs for my Christmas table decor. But what could I do to add some holiday cheer?  Create a little something new to add to the bottles.


Now I'd like to share how to DIY your own little poinsettias to add 'instant holiday cheer' to something you already have that can be recycled as Christmas decor. I used an old roll of red velvet ribbon (this stuff seems to last forever!), some gold braided ribbon, and scissors. Simple.
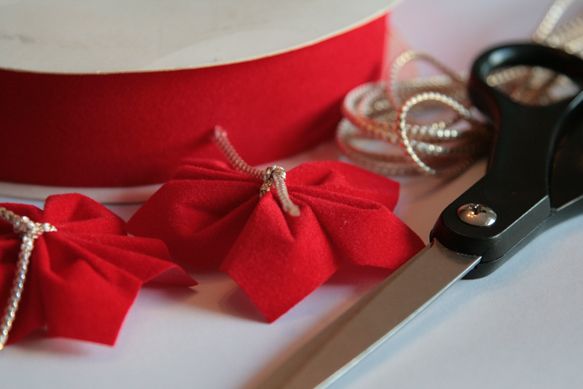


Cut three strips from the red velvet ribbon. Mine were about 3.5 - 4 inches long (about 10 cm).
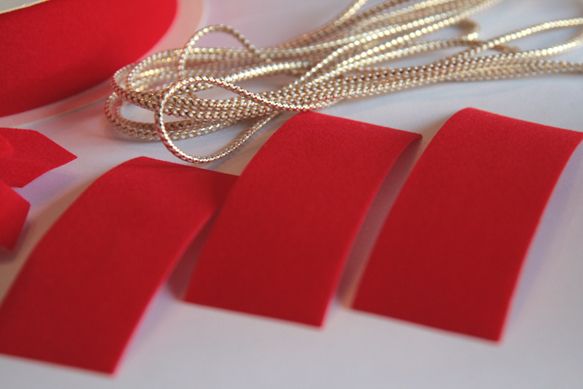


Cut the tips of the ribbon as shown below.
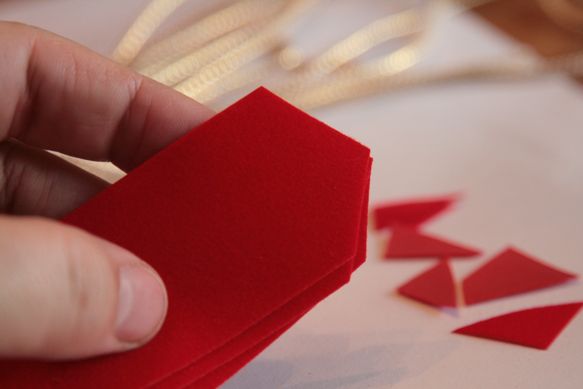


Here's where I wish I could show you via video (maybe I can make one quick and post later at Blue Velvet Chair). Press in the center of the ribbon with your thumb,while you use your pointer fingers to fold down the outside edges. I hope the photo below shows this well for you. So the center and the two outer edges are all folded downwards.


Because you want to put three of these together, you'll have to hold the first two between your thumb and pointer finger on one hand while you use the other hand just beside to create the next folds.
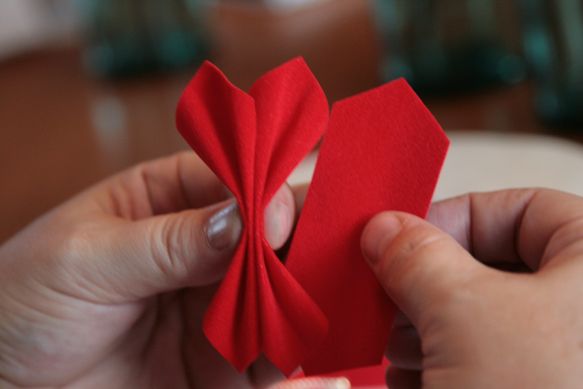


There. All three folded and held in a pinch. This process (folding the three pieces of ribbon) literally takes a total of 1 minute max.


Take a (pre) cut piece of the braided gold ribbon - or use whatever you have around - and tie around all three 'petals'.
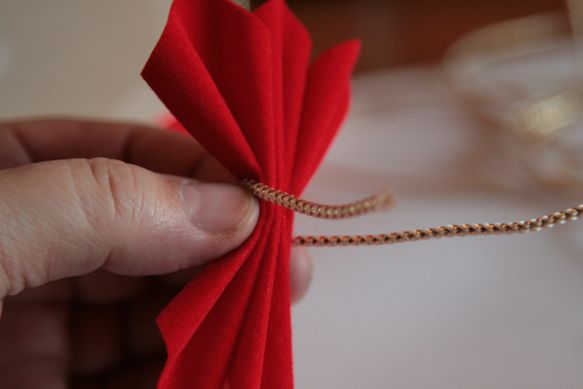


It will look like this once you get it tied and knotted.
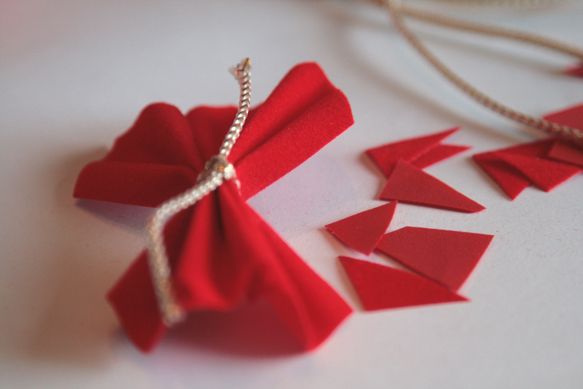


And now time to create the poinsettia! Simply take your pointer finger and push from the bottom near the knot in order to 'spread' each petal. This will create the roundness of the flower due to the stiffness of the red velvet ribbon.
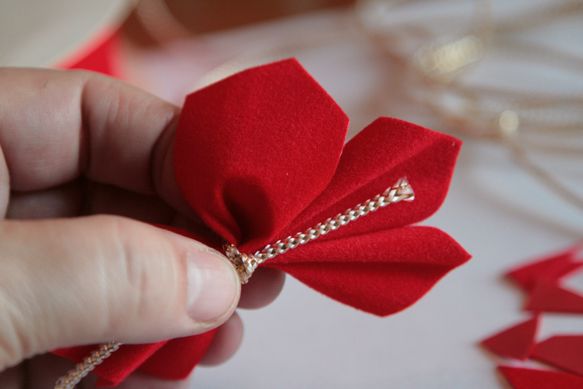


Ta dah!  Your own little DIY poinsettia flower. I promise these little pops of holiday cheer can be added to almost anything and you'll get some fun results.


I just love the contrast of them against my old turquoise thrift bottles. This color combo works so well because they are contrasting colors on the color wheel.
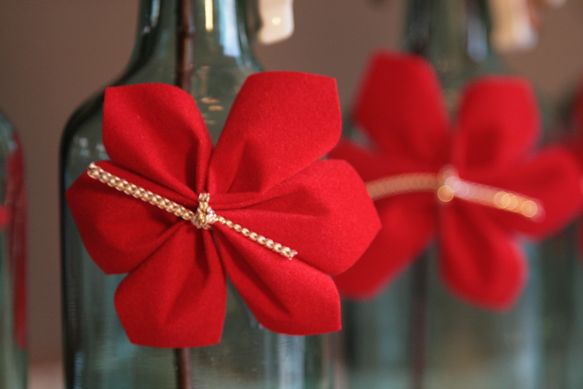


Happy holiday cheer.


Happy happy.
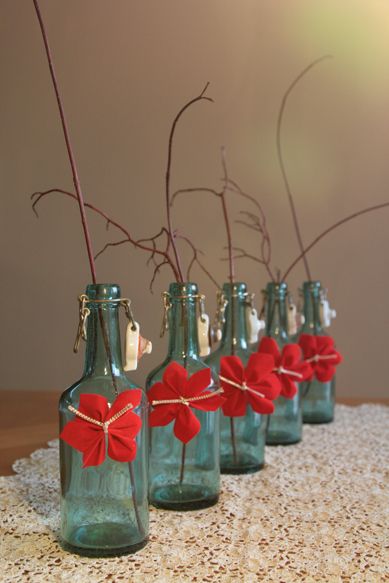


Happy holidays to you all.


There you have it. Mere minutes to create your own little recycled-thrifted-creating something new holiday cheer.  My dream project is to create a big beautiful wreath full of these little beauties. My sister made one back in the 90s, and I've been wanting to create one ever since. 15 years should be enough time for the idea to simmer...don't you think?


If you'd like to see some more of my hybrid style holiday decor, you are welcome to visit Blue Velvet Chair. We'd love to see you there!


Happy Holidays everyone!


Michael

Day 11: Crocheted Snow-Covered Ornaments with Winkieflash of A Creative Being

Hello crafty pals and welcome to day 11 of the 12 Days of Christmas Series. Today, we have some awesome crocheted ornaments from Wink of A Creative Being. Without further ado...


This is the pattern I use to make Christmas ornaments with. It's fun, easy and fast. Let's get started! :)

What you'll need:
  • Regular, colored yarn, and white yarn. You can use whatever yarn you want, as long as the colored yarn and the white yarn are the same weight. (or close enough)
  • Sparkly yarn! For this pattern I used silver yarn (Lumina by DMC)
  • Stuffing. I use polyester filling, but you can use whatever you want, for instance yarn scraps!
  • Hooks. Use the appropriate hook for your yarn, and then go down 1 size. Because we will be stuffing the ornaments, you need a tight fit.
  • Stitch markers. You're going to be working in the round, so you'll need a marker to keep track of where you are.
  • A pair of scissors.
  • A darning needle, to weave in the ends.
  • The Christmas album of She & Him. Trust me, it's so relaxing to crochet by, and a must to get you in the right mood! :)

The terms I use are all US terms. This pattern consists solely of single crochet stitches, which are double crochet stitches for you UK people.

Alright, got everything? Here we go!

For this pattern, I'm going to use an existing crochet sphere pattern. It's written by Emily Premise-Conclusion, and I got it from her Ravelry page here. If you have a different sphere/ball pattern you'd like to use, go for it! :)

For this pattern and the yarn I'm using, which is Stylecraft Special DK, I'm using a sphere pattern that consists of 22 rows. The ornament will measure about 3 inches.

When it says 'inc' in the pattern, increase; make 2 single crochet stitches in 1 stitch. Where it says 'dec', decrease; single crochet 2 stitches together (sc2tog). I always use an invisible decrease. If you don't know how to do this, check this out.

With the colored yarn, we're now making the bottom halves of the sphere. If you're using a different pattern from mine, just follow it until you get to one row before the middle row.
  1. Start with the colored yarn. Crochet 6sc in a magic circle, or ch2, 6sc in 2nd chain from hook. (6)
  2. inc in each stitch around. (12)
  3. *1, inc* around. (18)
  4. 1, inc, 2, inc, 3, inc, 2, inc, 3, inc, 2 (23)
  5. inc, 4, inc, 3, inc, 4, inc, 3, inc, 4 (28)
  6. 3, inc, 6, inc, 6, inc, 6, inc, 3 (32)
  7. 1, inc, 7, inc, 7, inc, 7, inc, 6 (36)
  8. 6, inc, 11, inc, 11, inc, 5 (39)
  9. 8, inc, 12, inc, 12, inc, 4 (42)
  10. 15, inc, 26 (43)
  11. inc, 42 (44)
Cut the yarn but leave a little tail. Don't fasten off. Okay, that's it! You now have a colored bottom half of a sphere. I made a couple of bottom halves in different colors.


Now onto the really cool part! With white yarn and the sparkly yarn, we're now going to make the snow layer of the ornament.

So, with white and sparkly yarn attached, go as follows:
  1. Crochet around (44), using a spike stitch. If you don't know how to do this, check this out. Basically you're just making sc's, but you're inserting your hook into a different row, below the one you're in. I've done cascading spikes all around the bottom half. So I started 1 row below, then 2, then 3, then 4, then 5, and then back up again in row 4, row 3, row 2, row 1 and finally in the actual row.
    See how this creates the illusion of snow falling? You can vary your own spike stitch by making it more random, or leaving it out completely at some places. You're in charge! :)
  2. That was basically it. Now all you have to do, is complete the sphere. If you're still on this pattern, go as follows:
    42, dec (43)
  3. 26, dec, 15 (42)
  4. 4, dec, 12, dec, 12, dec, 8 (39)
  5. 5, dec, 11, dec, 11, dec, 6 (36)
  6. 6, dec, 7, dec, 7, dec, 7, dec, 1 (32)
  7. 3, dec, 6, dec, 6, dec, 6, dec, 3 (28)
  8. 4, dec, 3, dec, 4, dec, 3, dec, 4, dec (23)
  9. 2, dec, 3, dec, 2, dec, 3, dec, 2, dec, 1 (18)
    You can start stuffing now.
  10. *dec, 1* around (12)
  11. *dec* around (6). Fasten off, leaving a tail. With the tail, weave through each stitch in the opening. Pull tight to close.
And that's it! You've created your first snow-covered Christmas ornament :)


Wait, what is that you say? It doesn't look very Christmassy? Well, you're right. It needs something else! :)

Now we're going to make that little thingie on top with the loop in it, so you can actually hang this in your tree.
  1. With the sparkly yarn, crochet 6sc in a magic circle, or ch2, 6sc in 2nd chain from hook. (6)
  2. inc in each stitch around. (12)
  3. Sc around two times, so you end with 4 rows.
Finish off and leave a tail. Now pull the first tail through the center to create a loop, and tie the end to the other tail. Like this:


Now using the tail we left at the end, sew the loop thingie to the top of the ornament (the white part). And that's it! A completed ornament :)


Now you can easily adapt this pattern to make all kinds of ornaments. A couple of examples?

For instance, you could use self-striping yarn to create a stripy ornament:

Or use gold sparkly yarn and colored yarn to crochet a sphere:

Use rich, velvet yarn (which was impossible to photograph well!):


And if you crochet in the backloops only, you'll get a ridged ornament!

The possibilities are endless; let your mind go wild this holiday season! :)

xo,
wink

Day 8: Woven Star Tree Toppers with Heidi of Mom's Crafty Space

Hi everyone! I'm Heidi from Mom's Crafty Space, and I'm super excited to be here today to share this tutorial for an inexpensive Christmas decoration that packs a lot of style! Woven stars made from straw or paper have been a holiday tradition for hundreds of years, and I'm going to show you how we can use modern materials to supersize our woven star into a shimmering tree topper.

All you'll need to make this gorgeous star is a sheet of 12" x 12" glittered cardstock, scissors and glue (hot glue works best). If you have single sided glitter paper you will need to glue two sheets back-to-back to create a double sided sheet.


First, take your paper and cut it into (20) 1/2" wide strips.


Fold two strips in half and crease to mark the center. Line up the center marks and glue the two strips to form 90 degree angles.


Add four more vertical strips (two on either side of your original + shape), weaving the horizontal piece through the vertical strips. Glue at all places where the paper intersects.


Continue weaving until you have a grid of 5x5 woven strips (the tails should be around 4" long).


This step is the trickiest to explain, so hopefully the photos will help! In each corner, take the two inner corner strips and join the tips, making a twist in each strip before gluing them together. Do this with the next interior set of corner strips as well, so that you end up with two twisted points on each corner.


When all your corners are twisted and joined, it should look like this.


Now make another!


Turn one of your pieces upside down and rotate it so that the tips form an 8-pointed star when placed on top of the first piece.


Weave the remaining tails into the points, glue down and trim the ends.


 Voila, an easy peasy and super cheap way to add a lot of sparkle and shine to your holiday season! These also look incredible when hung in small groups from the ceiling - use white or silver paper to create a flurry of shimmery snowflakes that's sure to impress!


Now go find a tree (preferably one where all the lights will light up for you!) and add your shiny new topper! Happy Holidays!

Be sure to stop by Mom's Crafty Space for our other fun tutorials, recipes and holiday ideas!


Day 7: NOEL Art with Hannah of Young and Crafty

I’m so excited to be guest posting over at Two Girls Being Crafty! My name is Hannah and I blog over at Young and Crafty and would love if you would stop by and visit. 


Y&C

I’ve got a SUPER easy Christmas craft for you today. 
DSC02477

Really, this is probably so easy a 4 year old could do it!
DSC02399

I took a 12x12 piece of scrap wood. 
DSC02460

I painted it green and then used my Cricut to cut out letters for a stencil.

DSC02466

Of course, no project is complete without lots of mess ups! Just go back and paint over the white with green paint. 
DSC02479

Done and Done!
Easiest.project.ever.
DSC02477

The simplicity is what I like about it the most. 
This is my all time favorite project, my pallet art (Tristin here: Hannah's pallet art happens to have been inspired by our very own DIY Art for Non-Artists!  Don't you love it on the pallet?):
DSC02187

If you are looking for a fun link party, I host one every Friday night called Free for All. I would love for you to link up and share your crafts and projects!
3
SD-SilverDamask-3-1
Related Posts Plugin for WordPress, Blogger...