Pages

Painted Wall Art for Non-Artists

 Some people think that if you're crafty, you're also an artist--and vice versa.  That's not totally true, however.  In fact, neither Sharon nor myself consider ourselves artists, but we still pretend every now and then.  So, here's what happens when I don a fancy beret and a wooden easel, palette and paintbrush in hand... NOT. 

Painting for the non-artsy 008

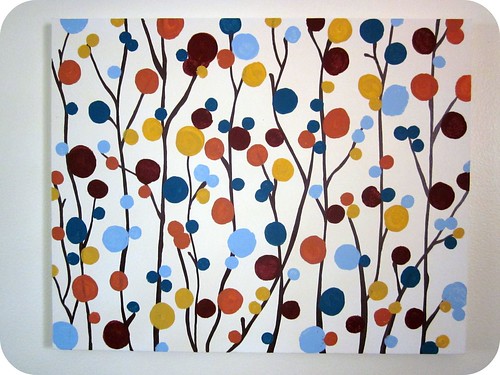
This is not an original Tristin idea.  The whole idea came from this World Market print that I like (and costs over $100):


Pretty, huh?  But don't you look at it and say, "Hmm.  I could make that"?

I did.

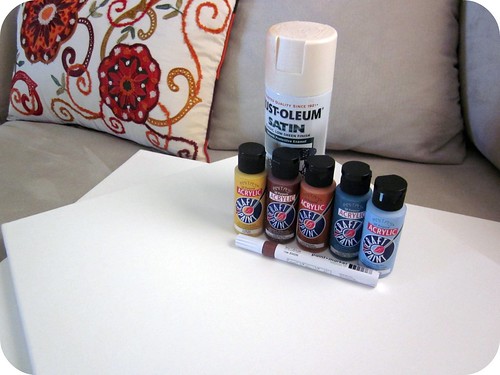
Here's what you'll need:

Painting for the non-artsy 014

A canvas in the size of your choice (I chose 16x20)
Cream colored paint (I used spray paint since I already had it)
Brown acrylic paint pen
Acrylic paint in colors of your choice
Round sponge brushes used for stenciling

First, of all, I spray painted the canvas with cream spray paint because the canvas was too stark as it came in the package.  This step was worth the little bit of effort.  You can use cream colored acrylic paint if you want, but I already had the spray paint and it's super quick.

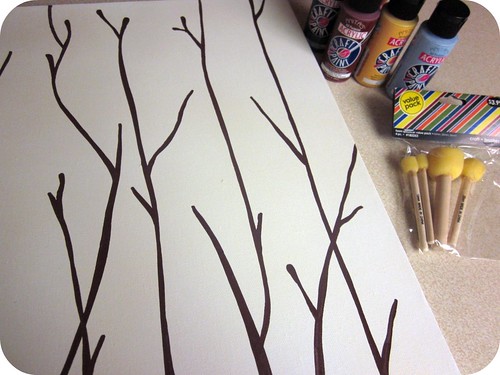
Don't be scared, but it's time to start the "real" artsy stuff.  I drew branches using the acrylic paint pen.  Using a pen is SO much easier for us non-artists who are not used to gracefully maneuvering brushes.  I could explain how to paint the branches in words, but here's a picture.  A picture, after all, is worth a thousand words.  You get the picture, right?!

Painting for the non-artsy 004

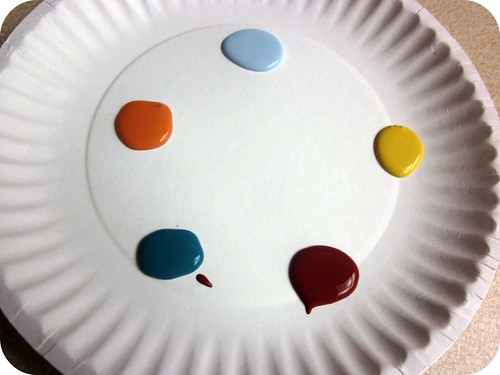
Once you're happy with your branches, it's time to bust out your palette, a.k.a. a paper plate with globs of paint.  Whatever, let's not get too technical here.

Painting for the non-artsy 005

The next picture is primarily for showing you the sponge brushes I used.  They're pretty awesome to have in your crafty arsenal.

Painting for the non-artsy 002

As I added color to the painting, I felt the need for some extra branches.  So, I busted out the brown paint pen again and added where I wanted to 'cause I keep it real like that.

Painting for the non-artsy 006

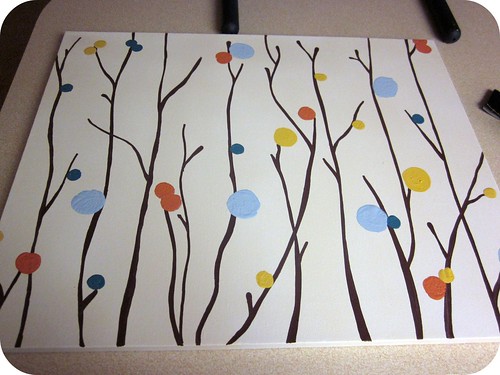
Keep on adding colorful circles 'til you get something awesome like this:

Painting for the non-artsy 011

Boo-yah artists.  I just created art!  You can, too.  Seriously. When your friends and family see this art, they're going to start requesting pieces for their own home.  Remember that art of this magnitude, while inexpensive to create, should be sold for thousands of dollars and be placed in a museum.  I kid, I kid.  But really, aren't you impressed?

Painting for the non-artsy 008

In the words of my fav blogger, Thifty Decor Chick, "I luuurvve it!"
Tristin Signature


Edit: I've had more than one request for the colors of the paint used so here goes:

All paints are Anita Brand acrylic paints from Hobby Lobby.

#11079 Terra Cotta
#11189 Hay
#11056 Ocean Blue
#11025 Rust Red
#11061 Baby Blue

Linky Love: Pillow Fight!


What's the one household item that most husbands love to hate?  Throw pillows.  Yep, pillows.  For years, I've avoided them knowing my husband's disdain for them.  No more, honey.  We're going to be seeing a lot more pillow action and we're gonna love it, alright? 

Do you remember the cathartic scene from "Along Came Polly" where Ben Stiller destroys all of the accent pillows that he hates?


Yeah, dudes HATE throw pillows.

Technically I'm a wuss because the living room that contains the TV and the manly reclining furniture will still remain without accent pillows with respect to my husband's preferences.  The other living room, however, is going to be my super awesome place with throw pillows.   That's marriage in a nutshell, folks--compromise--and separate spaces.

So check out these awesome DIY pillows from the blogosphere with me 'cause us gals need some pillows in our lives!  Fo' real!

This Anthropologie-inspired bolster is so profesh (Sharon's cool word for professional).  Jessica from Sew Homegrown has mad sewing skills and a great eye for colors and patterns.  Her tutorial makes the pillow seem attainable, but I think the awesomeness of those two fabrics together would be hard to replicate.  Hands down, this is my favorite DIY pillow.

The Color Path pillow is also a creation of Jessica's.  Doesn't it have great texture and color?

The Rosette pillow is a Dwell Studio for Target knock-off by Shelley over at The Westerman Family.  I love Shelley's use of burlap.  Again, texture.  Love it!  Stick it to "the man" and don't buy this pillow at a retail store; make it!

Isn't this Petal pillow precious?  (Aforementioned alliteration almost absolutely accidental). It looks a bit tedious, but it's worth the effort to get results like Allison of Cluck Cluck Sew did.

I had to throw in a crochet option 'cause I'm equal opportunity like that.  Annette from My Rose Valley used a granny square variation called the daisy square and put 'em together on a pillow.  Brilliant?  Yes.  And very cozy looking, too.

So, what's a gal to do with all these DIY pillow options?   Well, put them on your couch, of course!  Marta Writes has a great guide to picking and placing accent pillows.  (Bonus: Marta thinks it's perfectly legit to karate chop your pillows.  Gotta love that!)

DIY painters tape chevron design pillow
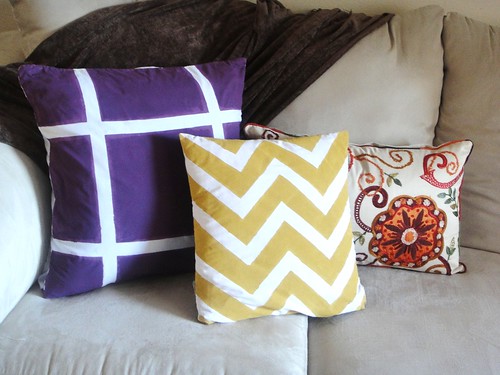
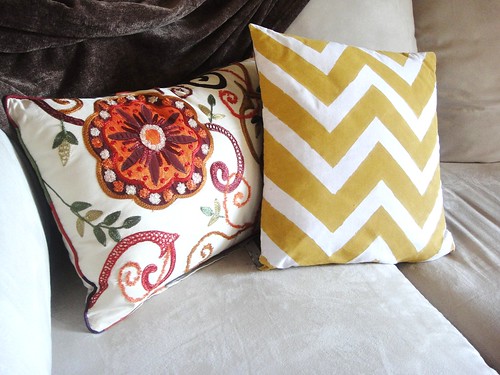
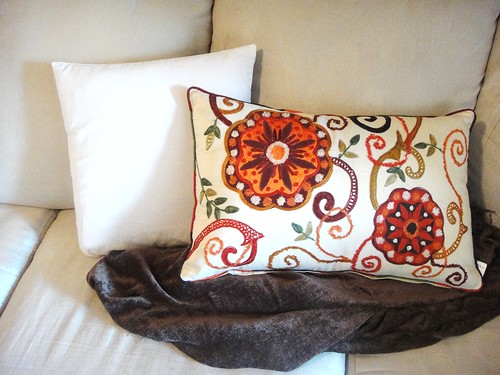
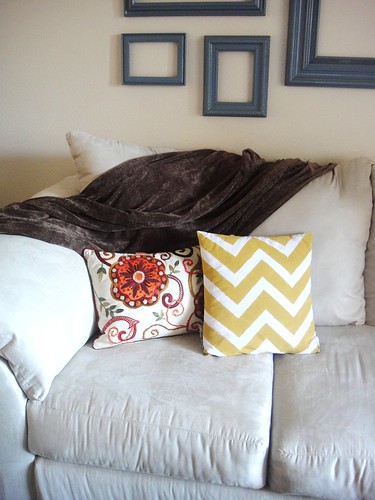
Last but not least, Sharon made some pillows just this week that she shared!  Aren't they pretty?  We've each been adding color to our homes and agree that throw pillows are a great (and CHEAP) way to do that.  On a recent Jo-Ann fabric expedition, Sharon and I both bought that flowery accent pillow on the right.  Great minds think alike!  You can see mine on this post.  It was kind of hard to pass up for $10.

Ladies, start your engines and make some pillows.

Gentlemen, stop complaining about the pillows.  Or else.

Tristin Signature

DIY Painted Chevron Pillow

Hellooo blogdom! Guess what, guess what, guess what! The 'Crafty Girls' now have a brand new sewing machine! Ok, so it's not brand new. And it's not ours. (Sigh.) A friend from church is letting me borrow it to sew a cover for some rocking chair cushions. And instead of sewing those (scary and complicated) cushions, I've been procrastinating by sewing other (much simpler) pillows. Cut me some slack! I'm a newbie seamstress. I have to work up to them.. or something. When I acquired this beauty of a machine, I immediately knew what my first project was going to be. I have had these pillows planned for a while now, and I was a step away from sewing them by hand. Luckily, I didn't have to.

DIY painters tape chevron design pillow

Here it is. A DIY painted chevron throw pillow. NOT the one on the left. I can only dream that some day I will acquire the skills to pull something that intricate off. But for now, let's get back to reality. I've seen HGTV use this painters tape trick many times to pull off awesome designs on homeowners walls. Unfortunately, we are renting, and I don't want to make the effort to paint and then turn around and just repaint the walls. (Ugh. Renters - feel free to grumble with me for a minute.) The solution.. apply this technique to throw pillows!


The chevron design was not my original idea. Apparently, it is a very popular and trendy design. But that is great news for us crafters because it's a simple design that we can accomplish with a little bit of painters tape and some acrylic paint (my new crafty crush). How About Orange did a tutorial for making fabric prints with tape.

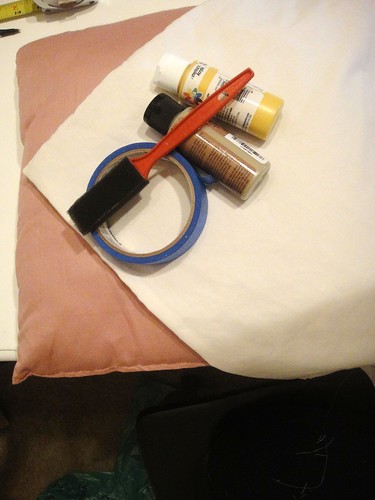
DIY painters tape chevron design pillow supplies

Here's What You Need:
  • Plain white fabric (I had some of this on hand).
  • A pillow form. I actually found it cheaper to buy an actual pillow at Goodwill and use it instead of a pillow form.
  • Acrylic paint (or fabric paint) of the color you want to use. I mixed this yellow with a light tan to produce more of a mustard yellow.
  • Foam brush
  • Painters tape
  • Scissors
  • Ruler 
  • Sewing Machine  
Fortunately, I already had all of the supplies in my stash except for the acrylic paint ($0.59 each at Jo-Ann) and the "pillow form" ($1 at Goodwill), so this project cost me a little over $2.00! Whoo hoo!
      
    Here's What You Do:

    Pillow cover 

    Sew your pillow cover. Usually I prefer to make pillow covers so that you can reuse the pillows inside. Since I used an ugly Goodwill pillow for my form, I opted to simply sew it up. (For my other pillow - later on in the post - I decided to do an envelope pillow cover because I used one of my good pillows as a form.)
      DIY painters tape chevron design pillow

      Next, use painters tape to create a design on your pillow cover. Here's where a normal person would use a ruler to make precise measurements. Apparently, I'm too good for rulers because I just eyeballed it. Why am I so imprecise with my crafts?

      DIY painters tape chevron pillow

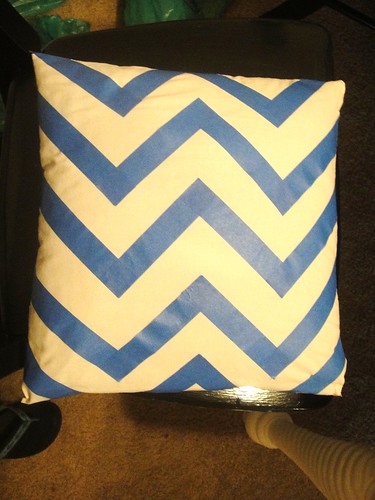
      Paint away! I know this looks yuck-o, but don't worry - this isn't the final product! Do careful strokes perpendicular and with (not against) the edges of the painters tape. This is to avoid bleeding under the tape and therefore sloppy lines.Yuck. We don't like sloppy lines.

      DIY painters tape chevron design pillow

      Here is the finished product! With the inspiration pillow. Tristin found this pillow at Jo-Ann's, and I loved it so much that I bought one too! Yes, I copied her. I'm not ashamed because look how gorgeous and fun it is! I have been wanting to change up the color pallet for our living room since.. pretty much the moment I bought all those blue and brown pillows (silly me). Since then, it's been blue and brown and blue and brown. It has been so monochromatic and just plain... blah. I hate blah.

      DIY painters tape chevron design pillow

      I loved this painters tape idea so much that I wanted to do a second pillow right away! I wasn't as happy with it as I was with the chevron one, but it'll do. The design was supposed to be more of a border, but I did it too close to the center and the result was a "tic-tac-toe" look. Oh well. At least it's purple. I love purple. It's not a blueish purple like it appears in the picture, it's a warmer purple with more red and yellow hues. Ahh. Warmer, brighter colors make me feel so warm and fuzzy inside. I think we're well on our way to a brighter and more refreshing atmosphere in our living space. :)

      Think of all the awesome design ideas you could come up with using simple painters tape! OR use freezer paper or a fun stencil to make a cool pattern or a personalized monogram. What am I? Obsessed with stencils or something? (Yes.)
      Happy Painting! :)

      Sunshine Medallion Curtains

      After 5 years in my home with NO curtains, I got brave and picked some bold ones!  Today, I'm excited to share them with you.

      I'm glad that I waited this long to purchase window treatments.  Had I purchased curtains 5 years ago, I know I would have picked brown or beige, or something equally as bland.  And now that I'm getting braver and more confident in my love of color, I would have felt terrible about being stuck with lackluster curtains. 


      Here's a rundown of some of the items of interest in the room:

      The curtains are the Sunshine Medallion curtains from Urban Outfitters.  (Purchase with caution!  As much as I adore these new curtains, they are not even close to perfect.  The pattern starts at various points--you can notice this in the above photograph--and there are many imperfections in the fabric itself.  Luckily, the two panels I placed in the center have patterns that start at a similar place.  I called UO to seek a resolution and their only answer was for me to order several more sets and return the unneeded portion.  I think it would probably take ordering 12 more panels to "get it right" and I was unwilling to shell out the $38 x 12.  Though the representative I worked with was very nice and polite, I was a bit disgruntled at the suggestion. While they did waive my shipping fee they were unwilling to negotiate a price adjustment.  Even though I love the curtains because of their unique print, the quality is NOT worth $38/panel in my opinion.)


      The curtain hardware is the Martha Stewart Living 72"-144" Hemisphere 1" Rod Set in Mahogany available at Home Depot.

      The couch that I love dearly is the Amalfi Sectional sofa in Linen from Haverty's.  (The configuration we purchased is Option A Reversed).

      That awesome pillow came from Joann Fabrics.

      I still have more transformations and decor to share with you in upcoming posts--so keep an eye out!  Things are coming together slowly but surely!
      Tristin Signature

      Frogs and snails and puppy dog tails

      A few weeks ago Sharon and I attended a baby shower for one of the ladies of our congregation who was expecting a baby boy (the baby is now "out", as his big sis told me).  We had a great time eating cake and drinking punch (which Sharon may or may not have been overly enthusiastic about, but I won't tell) and watching the momma open up all those cute boy gifts. 

      The mother-to-be is not in fact a "new" mom--this is baby # 3 for her, so she's practically a pro.  With that in mind, I went a more practical route in my gift-giving than I usually would.


      I made two casseroles for her freezer and put them in a cheapie cooler ($2) for transport to the shower.  (FYI, people definitely take a second glance when you show up to a baby shower 30 minutes late with wet hair and a cooler in your hand.  Did you get a good visual?)  With practicality in mind, I also included a package of diapers 'cause you can never have too many!


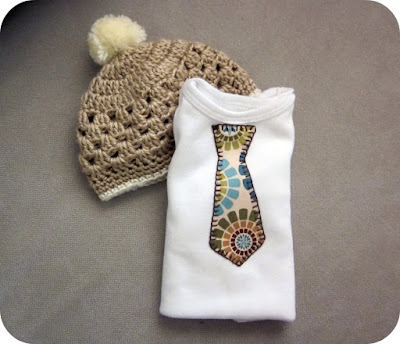
      For fun, I made a cute little tie onesie and a matching crocheted hat.  The hat was made using a free tutorial offered by Girl in Air.  The tie onesie was a result of "winging it".  I fused fabric adhesive onto the back of the tie and finished the fabric edges with Fray Check to prevent fraying (as the name implies).  Because I've been loving embroidery lately, I used a blanket stitch on the edges to finish the onesie.


      Seriously guys, I want to blanket stitch everything.

      I know about a bazillion other women having boys (and by "a bazillion" I mean two) so look out for more baby boy crafts to come! 
      Tristin Signature

      "R" is for Ridiculiously Awesome


       I have another home decor solution for one of our bare walls. I sure hope you aren't tired of my home decor crafts. The way I see it is - we all have houses that need decorating. Even if you are crazy and already have every inch of your place decorated (I sure don't), you can always change it up and create something new and exciting and ridiculously awesome. This is a little personal touch I made for the wall space above our bed. Isn't it gorgeous? It has a touch of elegance but it's also fun and different and custom-made.

      It all started with a frame.
       We got this beauty at Ikea for $30. We love Ikea. Sometimes we drive an hour to the closest store just to walk around and look at the showroom. Of course, we never come home empty handed. (Side note: I am not allowed in the kitchen area anymore per my husband's instructions. I find myself wanting to buy gorgeous walnut cabinets and granite counter tops for our temporary apartment.)


       Back to the frame. I knew I wanted to do something special with it. After months of it just sitting on our dresser, I decided it was time to take action! So then another month later here's what I did... I purchased some lovely fabric for the background, cut it to size, and just taped it directly onto the glass. Taping it may sound like a weird decision, but I wanted to be able to remove it in case I ever wanted to reuse the frame (I change my decor a lot). Next, I gathered a matching plain tan fabric that I already had and cut it 3 inches smaller than the original oval. You may not be able to tell in the picture, but the tan fabric has a great tweed feel and look which adds quality and texture. I used hot glue to adhere it to the background fabric.


      Next, I painted an "R" on the tan oval with black acrylic paint - my new craft crush. It was my original intention to use Tristin's freezer paper stencil idea, but I did not get around to finding an "R" online, etc. I decided to take the dangerous route and draw it myself. I am such a rebel. I also drew a bold border for the smaller tan oval just to add more drama. What do ya think?


      Here's how it looks in our room. Check out how great it looks with the lamp I recently stenciled! My husby is afraid it will fall on us in the middle of the night, and we'll turn into "Flat Stanleys" haha.

      I personally love how it turned out, and I think it looks Ridiculously Awesome. That is, of course, what the "R" stands for.


      Linky Love: Spring is here! Almost.

       A little inspiration candy for your eyes.

      Mmmm. Spring. The season of bringing forth life. 
      I know, I know. It's only February. Maybe it's the 80 degree weather we've been having, or maybe it's because Tristin has been talking about the pollen on her car (it's ok, she knows I love her). Either way, it feels like Spring is trying as hard as it can to break through the.. er.. place... where seasons are kept until it's their time to come back out again.

      Whatever. You know what I mean. 
      It feels like Spring is almost here. Ergo, I have been glancing at Spring inspired crafts all over the blog-world. Shall we take a peek?


      I just love love love the color turquoise. Something about it makes me feel warm and fuzzy inside. And makes me want to dance a little. Any other turquoise lovers out there? We should all get together for a quick turquoise lover boogie sometime. (Have I mentioned staying on topic is not one of my fortes?) Anyways, do you have some boring old (winter) shoes that you want to spruce up for the (better than winter) Spring season? Well then check out Resa Likes Colors' tutorial for her acrylic paint shoe makeover. I have become such a fan of acrylic paint. I want to paint everything. I may have to try this.


      I. am. in. love. How stinkin' adorable is this? Noodlehead shares her full tutorial for these super cute gathered clutches. I already have almost all of the supplies, and you bet I am going to make some of these. They are just too cute to pass up!


      Another shoe one? What am I? Obsessed with shoes?? (Yes.)
      Aren't these sugary sweet nylon chiffon fleurs precious? They create such a soft, delicate, and romantic look. Learn how to make your own chiffon fleurs by visiting Grosgrain's tutorial.


      Hellooo Spring!
      Often we get tired of our old furniture that we are constantly staring at day in and day out. This includes our dining table. Well then why not dress it up with this super fun and colorful table runner? I love all of the colors, and it definitely screams "spring" to me. :) Get Betz White's full tutorial here.


      And lastly, we can't forget Tristin's adorable fabric button earrings. I love how you can choose any fabric you want or use scrap fabric that you already have. I love choosing fun fabrics! Don't they give off such a playful, spring-y, rolling-in-the-grass-laughing feel? They're perfect for any occasion! And a definite must have.

      Well folks, that's all I've got. Hope it starts to feel like Spring where you are too!
      Happy Saturday! 
      XO,


      A Shirt for a Con Man

      Isn't crafting for men the hardest?  On one of my many google adventures scouring the internet for crafts to make for men, I came across a crocheted apple-sleeve. 

      What's a crocheted apple sleeve, you ask?  It's a small crocheted piece with a button that you can wrap an apple in (and I mean real apples, the kind you eat--not the computers).  Really?  Is that all we have to make for men?  Apple sleeves?  Gals, we can do MUCH better!  Remember the fabulous beanie Sharon made for her hubby?  How 'bout the "I hate Mac" shirt I made for mine?  We can do better than apple sleeves, my crafty friends! 

      Whoa, what a tangeant.  Anyhow, my father-in-law's birthday came around a few weeks ago and here's what I made for him:


      Yeah, it says "con-man" which is a play on words in many ways that apply to my father-in-law.  The most obvious way is that he loves Converse shoes (hence the picture). 
      
      I make a huge mess everytime I craft.  I wish I was a neater crafter!
      I used freezer-paper stenciling to create the design on the t-shirt.  Seriously, it is one of the most satisfying ways to craft.  You've gotta give it a try!   How About Orange's Tutorial is simple and straightforward-I'd highly recommend checking it out.  I used a google image search to find an image of a Converse shoe, then I used the copy feature on my printer to blow it up to a larger size.


      Here's the design cut out of freezer paper with an exacto knife and ironed down onto the washed and dried t-shirt.  Once you've made the template and have ironed it down, all you have to do is sponge fabric paint over the open areas.  I always use matte fabric paint that is specifically designed for t-shirts when I do this and I think it makes a much nicer result than your run-of-the-mill fabric paint.


      It is SO satisfying to pull away the freezer paper and to see such crisp and professional results.  Ahhh.  Almost as satisfying as the first bite into a hot Krispy Kreme doughnut.  Almost.

      So, what have you been making for the men in your life?  Lame apple sleeves or something cooler?
      Tristin Signature
      Related Posts Plugin for WordPress, Blogger...