

This is not an original Tristin idea. The whole idea came from this World Market print that I like (and costs over $100):

Pretty, huh? But don't you look at it and say, "Hmm. I could make that"?
I did.
Here's what you'll need:
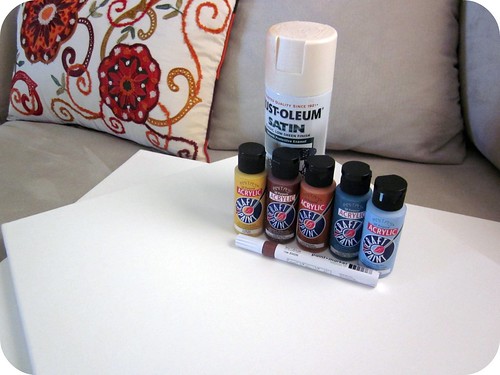
A canvas in the size of your choice (I chose 16x20)
Cream colored paint (I used spray paint since I already had it)
Brown acrylic paint pen
Acrylic paint in colors of your choice
Round sponge brushes used for stenciling
First, of all, I spray painted the canvas with cream spray paint because the canvas was too stark as it came in the package. This step was worth the little bit of effort. You can use cream colored acrylic paint if you want, but I already had the spray paint and it's super quick.
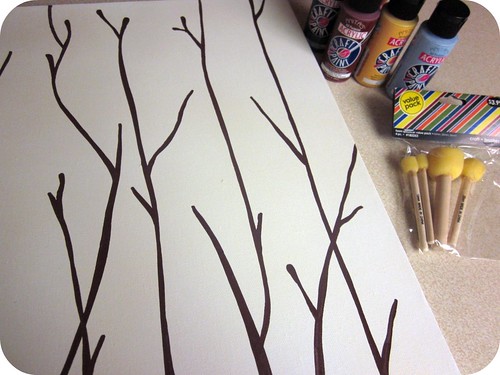
Don't be scared, but it's time to start the "real" artsy stuff. I drew branches using the acrylic paint pen. Using a pen is SO much easier for us non-artists who are not used to gracefully maneuvering brushes. I could explain how to paint the branches in words, but here's a picture. A picture, after all, is worth a thousand words. You get the picture, right?!

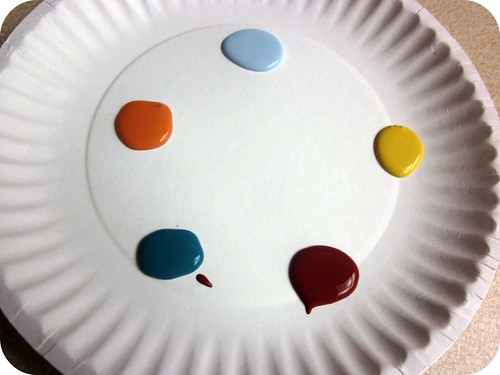
Once you're happy with your branches, it's time to bust out your palette, a.k.a. a paper plate with globs of paint. Whatever, let's not get too technical here.
The next picture is primarily for showing you the sponge brushes I used. They're pretty awesome to have in your crafty arsenal.
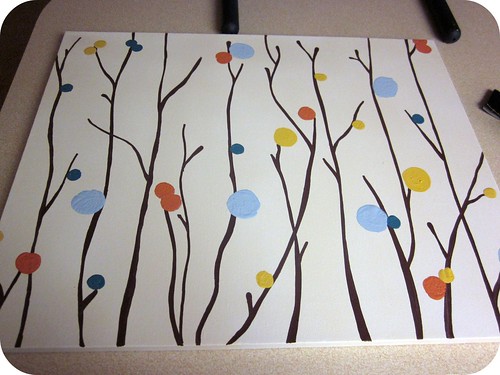
Keep on adding colorful circles 'til you get something awesome like this:
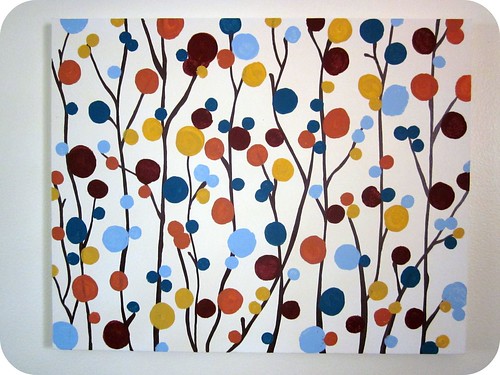
Boo-yah artists. I just created art! You can, too. Seriously. When your friends and family see this art, they're going to start requesting pieces for their own home. Remember that art of this magnitude, while inexpensive to create, should be sold for thousands of dollars and be placed in a museum. I kid, I kid. But really, aren't you impressed?
In the words of my fav blogger, Thifty Decor Chick, "I luuurvve it!"
Edit: I've had more than one request for the colors of the paint used so here goes:
All paints are Anita Brand acrylic paints from Hobby Lobby.
#11079 Terra Cotta
#11189 Hay
#11056 Ocean Blue
#11025 Rust Red
#11061 Baby Blue
SO CUTE!!! And totally doable for those of us who cannot paint worth a lick!
ReplyDeleteLooks great on your wall!! I'm printing out craft store coupons as I'm typing this. :)
ReplyDeleteThat is really cute! And looks "oh so easy!"
ReplyDeleteI think my play room might have one of those soon! Even my three year old can help make the "circles."
I love it! I even like yours better than the original!
ReplyDeleteWow, that's amazing!! It looks beautiful!
ReplyDelete~Mary
That's so neat! What a great idea, I love it! :D
ReplyDeleteTristin, I think this is my favorite "crafty girl" project yet. I guess I'm the relative that is putting her order in for one of my own because I'm not going to do it myself. I will however allow your Junebug to paint away over here. I hope that is a fair trade. :)
ReplyDeleteAWESOME!!
ReplyDeleteLove it very cool. Just might have to add it to my list of projects. Thanks for sharing.
ReplyDeleteHugs & Kisses Curly.
T,
ReplyDeleteI LOVE IT! It's a very cool design, simple, fun, & stylish. Love all the colors you chose. Don't ya just love those sponge painters?!
This turned out really great! The colors are so fantastic.
ReplyDeletewell done! i think i'd have issues drawing those nice branches though. took my first painting class.. and it was much harder than i imagined.
ReplyDeleteThis is so cute! Great job. I love it :)
ReplyDeletePS- I'm doing my first ever giveaway on my blog and I'd love if you would come and participate! Check it out: http://mygirlishwhims.blogspot.com/2011/02/my-first-giveaway-and-introducing-your.html
Love this! I could do this!
ReplyDeletegreat job, so cute! we're next to each other on oneprettything,isn't that nice? would love it if you'd share this on Sunday at craft schooling Sunday! all the best!
ReplyDeleteYay! I'm so happy to have seen this! I'm totally making this over the weekend...thank you so much!
ReplyDeleteLove it! You picked great colors. I want one (or several).
ReplyDelete(Found you via One Pretty Thing)
ReplyDeleteI love this! So simple, but still beautiful and effective. I have a great blank spot on my living room wall that's just waiting for one of these!
This is so great! I could totally do this. Thanks for sharing.
ReplyDeleteI freaking love this! I really want to try this in cherry blossom colors! Thanks for the great tutorial, I'm your newest follower:)
ReplyDeleteThis is awesome! I need a big art piece for our Master Bedroom and everything I have found is a fortune. I think I may have found the perfect solution after seeing your post! Love it
ReplyDeletehttp://itsybitsypaper.blogspot.com
I like this! Good work! And great tutorial : )
ReplyDeletecraft-interrupted.blogspot.com
Looks awesome! I may have to try this in the colors of my baby boys nursery. :)
ReplyDeleteThanks for sharing this idea. I am (now) having 4 of my grandchildren doing this as a collaborative art work for their parents. It is just a small canvas (8" X 10"). Their ages are 11, 9 , 5, and 4. They are having fun.
ReplyDeleteThanks again.
I like yours better than the original one you show.... Well done!
ReplyDeleteI love this project! What a simple way to create custom art. I like your rendition better than the original - especially your color choices.
ReplyDeleteTotally AWESOME!
ReplyDeleteYour newest follower, Jessica from myworldmadebyhand.blogspot.com
came over from Five Seconds From Crazy... thanks for the inspiration. I will be making one, or ten of these. So great.
ReplyDeleteStephanie at www.punky-noodles@blogspot.com
I haven't got to my updates today, but found this through Five Seconds From Crazy even though I am a follower! :D
ReplyDeleteI ADORE this!!
ReplyDeleteAwesome knock-off! What a fantastic idea, I think even I could do that! :D
ReplyDeleteThis is a fabulous idea!!!!
ReplyDeleteToo cute! And I think you're short-selling your talent. Branches actually aren't that easy (even with a paint pen!) and yours turned out great! Only difference between the circles and leaves is leaves are eye-shaped.
ReplyDeletePut that beret back on! :)
Wow, that looks wonderful! I really love it!
ReplyDeleteRachel @ Maybe Matilda
Oooh you didn't just knock this off, you knocked it out! What a fabulous project! You are so talented! I'd love to have you share this at my VIP party today @ http://designergarden.blogspot.com/2011/03/vip-party-7.html
ReplyDeleteThat is a wonderful idea! You did a great job with it. Love the bursts of colors!
ReplyDeleteThis is such a wonderful idea!!
ReplyDeleteVERY cute!
ReplyDeleteYou know, I was cruzin the net to find stuff to do with paint chips.... YAY!!! Who needs paint? :) Well, I will need black, bot other than that! I have two sizes of round punches and a hole punch so that will cover it!! WooHoo!!! Thanks!!!
ReplyDeleteThat is awesome!
ReplyDeleteI've put together a round up of great wall art ieas on Craft Gossip today and included your post. :) You can see it here
ReplyDeletehttp://homeandgarden.craftgossip.com/25-awesome-wall-art-ideas/
If you would like a Craft Gossip badge showing you've been featured, you can grab one here :)
http://homeandgarden.craftgossip.com/grab-a-craft-gossip-button/
Saw this on Pinterest and LOVE it! What a great idea.
ReplyDeleteAnna
www.askannamoseley.com
Pretty! I have recently gotten into painting and plan on doing a mini wall art gallery over my couch. This would be perfect!
ReplyDeleteVery cool! LOVE IT!!!
ReplyDeleteLove it! Great knock off. I love when you can save a bundle by doing it yourself.
ReplyDeleteI just found blogging and love your blog! I made my own version of this painting on a very thin canvas and framed it! I am very pleased :)
ReplyDeleteThis comment has been removed by a blog administrator.
ReplyDeleteI like the original more than this version... In the original there is many layers of colors. Sally put her heart and soul into this painting I dont like the idea of copying her art. How would you feel if you were a hard working artist and then someone came up with a totorial to copy your art? I feel this is wrong.
ReplyDeleteI totally agree!
ReplyDelete@Melissa, I'm sorry I wasn't clear and I'm afraid you misunderstood me. I'll clarify. I agree, there's no harm if you just copy it and put it up on your wall. Personally, I'd be embarrassed about doing that but then, I'm a painter. The ethical issue I wanted to draw the author's attention to was writing a blog post that encourages people en masse to copy a specific someone's artwork. I wouldn't get too worked up about this if the circumstances were different -- say, if the artist was deceased, filthy rich, or the blog didn't have a wide readership, but this isn't the case.
ReplyDeleteI believe it only really matters if the artist in question minds -- as I said, I would be horrified if it was me but maybe another artist would simply be flattered! I've informed the artist (which I believe the authors really should have done to ask permission) so it's up to her.
I think this is a ridiculous argument. I see nothing being sold on this site or any money being made here. Art is interpretive and honestly this is a very simple design. I'm sure Sally's idea for straight lines with colorful dots on the top was far from an original idea. If you look reeeaaaaally closely, you'll notice that neither of the paintings are Picasso quality. No more originality here than a bowl of fruit.
ReplyDeleteyeah, trying selling that argument to the artist who makes her living on her art.
Delete@Anonymous, I could rebut each of the points you make. However, I'm deciding to bow out instead as I can see the tone of this discussion spiralling downward (as online discussions invariably do). The only two people who's opinions on this topic matter - the author and the artist - have been made aware, so my work here is done.
ReplyDelete@Anonymous: First, I agree - art is indeed interpretive, and like many great things, often builds upon that which came before. That's great, and all as it should be. So is posting tutorials on how to achieve styles and effects others have discovered - that's just part of the same thing.
ReplyDeleteReplicating someone else's work for one's own use...mostly okay, although it's in a fairly grey area.
However, there's decidedly something off about publishing directions on how to replicate someone else's work publicly, regardless of how 'easy' it is - particularly with the tone that this article takes, mentioning the cost of obtaining a print legitimately. How would the artist feel, reading this?
Bear in mind that considerations of what makes something intellectual property do not take into account the ease with which the thing can be duplicated by others. That's why we *have* intellectual properly protection - if every piece of IP was impossible for anyone else to replicate, then there wouldn't be any need for copyright.
Whether it occurs with the use of a paint-brush, or a digital camera and a printer, we're still talking about duplicating someone else's work, presumably without their permission. While it may not be an instant court case, it's most definitely questionable.
I LOVE THIS! It would be adorable to do on an entire wall!
ReplyDeletewow i love this project and it looks so easy to make! i have to make one or at least try.
ReplyDeletewow11 i like your version better
ReplyDeletei like the simplicity and complexity of it.
ReplyDeletevery clever! and lovely~!
ReplyDeleteJust finished making one for my daughter's bedroom in Cherry Blossom colours! LOVE it!! Thanks for sharing!
ReplyDeleteThis is so awesome!!! We're definitely going to have to try it. Thanks for the tutorial!!
ReplyDeleteThis comment has been removed by the author.
ReplyDeleteI love this! What are the color names that you used? Did you get the brushes at Hobby Lobby?
ReplyDeleteJust added a link to this on my blog! Thanks again for sharing!! I just LOVE this!!
ReplyDeleteWow great work. It is looking like a growing tree.
ReplyDeleteI just saw this at Bed, Bath and Beyond last night for $80! Thanks so much for showing us to re-create it on the cheap. :) I can't wait to try!
ReplyDeleteThanks for the great tutorial. I made this today and it came out great, I love it!
ReplyDeleteToo funny, I just saw this at World Market and took a pic with my phone thinking it could be made WAY cheaper! Totally going to do it!
ReplyDeleteI want to do that I want to do that!
ReplyDelete:-)
Wow, very nice!
ReplyDeleteThat is great!!! I appreciate your telling how you did it. I think I can!!!
ReplyDeleteI saw this on pinterest last week, so my sister & I made one tonight for my living room...for under $20. Plus it looks awesome!! Thanks for the tip.
ReplyDeleteSo, I made this this weekend and it turned out awesome. I used silver (metallic) spray paint and a black acrylic pen to make the trees. To match my room, I used 2 purples, a blue, and a grey. It looks fabulous. My family was VERY impressed. I can't wait to hang it once it dries!! Thank you so much for sharing!!
ReplyDeleteThank you so much for this inspiration!!!!
ReplyDeleteWe created something very similar for our living room (yours looks much better, but we welcome actually having something on our walls with colors that tie in with the rest of the room)
You can check out our creation here:
http://wwwfrozensunshine.blogspot.com/2011/09/big-news-last-of-our-art-and-beginning.html
THANKS!!!!!
I love this piece of art. Everything about it.
ReplyDeleteI love yours. I like it better than the inspiration.
ReplyDeleteLove it!!!
ReplyDeleteI saw this at a wedding, but instead of the leaves being painted on, the guest used ink & stamped a fingerprint! It was awesome! Using the same idea as a Christmas present for the grandparents !
ReplyDeleteI love this so very, very much. I'm seriously considering making some as Christmas presents.
ReplyDeleteYes, this is pretty awesome! Thanks for sharing, we'll have to give it a try!
ReplyDeleteThis is such a fun and easy painting to do, and the colors can easily be changed to match any decor! Thank you for sharing!!
ReplyDeleteI just stumbled upon your site, and I am going to be late for work. You 2 are so creative! I'm not certain whether I like the projects or the comments better. Thank you!!!
ReplyDeleteI really love this, it looks beautiful. It makes a great craft idea to do with my kids. Thanks a lot for sharing.
ReplyDeleteOH MY GOSH that's soooooooo awesome!!!!! I cannot, for the life of me, properly control a paintbrush. It's such a pathetic mess. However, I have great handwriting so I know the paint-pen would be my new best friend. Add to that the sponges and I might just be artsy-fartsy afterall. THANK YOU for sharing this oh-so-innovative project. This is amazing. I'm so excited. I want to go to Hobby Lobby RIGHT NOW and buy supplies but it's almost 10pm on a Saturday night AND they're closed tomorrow. So sad. But I'm doing this. Soon. Very soon.
ReplyDeleteAWESOME-SAUCE!!!!!!!!!!!!!!!!!!
can you tell I'm just a little excited?!
haha
I love this!!!
ReplyDeleteDo you mind if I feature it on my blog?
So I attempted this... I can honestly say, I have zero talent. My attempt involved me spilling red paint on my canvas. Now Im trying to come up with ideas on what to do on an all red canvas...
ReplyDeleteLOVE this! Thanks for sharing!
ReplyDeleteLike your version better! Very cute!
ReplyDeleteI love this project. I just did one for my house today. Had an empty space on my wall and it fills it perfectly. It was so fun and so easy. Thanks for the awesome idea. I'm also going to make some for Christmas presents. Thank you thank you thank you!!
ReplyDeleteI'm making this as we speak. Wish me luck! I have zero artistic skill!
ReplyDeleteI love the idea, that is going on my wall.
ReplyDeleteThanks for the inspiration! I had so much fun creating my own version inspired by both the original painting and your take on the idea.
ReplyDeleteI'm a huge fan of art, and I love to create, but have little experience with painting and I loved this project!
Great idea using the round sponge brushes- it certainly made the project easier.
Chrysta
I love this idea! You made it seem so simple that I tried it out myself. Even though I'm not very artistic, I think it turned out well (although I prefer your colours). If you'd like to check it out it's posted on my blog.
ReplyDeleteLove this! Pinning it now!
ReplyDeleteI love love LOVE this! So stinking cute. Question though...where in the world did you get your acrylic paint pen??
ReplyDeleteI'm doing this project now, and I picked up a set of them at Michael's. It was 16 dollars, but now I have multiple colors of acrylic pens. Oh the art to be made.
DeletePerfect, thank you so much! Good luck on your project as well :)
DeleteThis is my project for the weekend! I just redid my bathroom and have been looking for something for the wall! Thanks for the genius idea!
ReplyDeleteLove this!! I am definitely pinning it. Must try someday!
ReplyDeleteJust brushed a cream-ish color over my canvas & waiting for it to dry. Can't wait to get started!
ReplyDeleteAcrylic paint pens can be had a Michael's for $2.99 each in the ceramics department. The brand to go with is Garden Craft, Terra Cotta Marker, 3 mm. Good luck.
ReplyDeleteYou used wonderful colours!
ReplyDeleteThanks for sharing!
Ambra
Love it, can't wait to try to make one.
ReplyDelete@last Anonymous: She provided a link to the print which clearly states who the original artist is...nothing unethical about it.
ReplyDeleteAbout how much do you think you paid for the materials?
ReplyDeleteThis is pretty tacky... You know you could buy the original print at target now instead of creating a "copy",..
ReplyDelete@all Anonymous--I'm guessing it must keep you busy trolling all over Blogland to post (anonymously!) your opposition to knock-offs of art, furniture, etc....
ReplyDeleteI posted as Anonymous above Kathy....
ReplyDeleteWhile I *totally* understand the need to DIY and save money, advocating plagiarism is not cool and not impressive. The truly creative don't need to copy other people's work.
It's insulting to call people trolls who actually have legitimate opinions and concerns.
My apology for using the term trolling...perhaps "surfing" thru Blogland is better. I do feel strongly if one feels the need to be critical, they should post using their name instead of anonymously!
DeleteOnce again, Blogland is FULL of knock-off designs. For anything original created, there is always someone who can create a similar item (be it a painting, furniture, whatever!) that the rest of us can enjoy & perhaps create ourselves - even when we didn't think we could be crafty at all. Thanks, Two Girls Being Crafty" & all the other wonderful bloggers I follow for being an inspiration & for providing the tutorials!! Blessings!!
Love the idea! How do you keep the colors from not fading?
ReplyDeleteAlmost one year later, my colors have not faded, even in my sunny Florida home. If you are concerned about fading, I'd suggest a thin layer of ModPodge over the finished painting, which acts as a sealer. (Please, not homemade ModPodge which is known to yellow very quickly--the real stuff, please!) ; )
DeleteAwesome tutorial! The picture is beautiful!
ReplyDeleteI think the fake is to childlike... The original is more mature...
ReplyDeleteI started mine today. Looks good so far. I am using different colors.
ReplyDeleteWell first i tell you nice templet. Amazing wall art and really impressed with the work. I will surely contact you and will follow you now,,
ReplyDeleteVery nice. I'd like to try it. Thank-you.
ReplyDeleteI feel like i would maybe not screw this up. thanks!
ReplyDeleteBRILLIANT!
ReplyDeleteArtful wall. Cool layers.
ReplyDeleteThank u sooo much for this Idea... I just made it but with a different color palete!! And I LOVE IT!! Its so easy and fun and beautiful! Thanks one more time for this wunderful Idea!! :)
ReplyDeletei'm working on the branches now and my brand new paint pen ran out half way through. :(
ReplyDeleteWow, I'm impressed! It looks beautiful. I've never heard of acrylic paint pens. Will have to try them out. Thank you for the tutorial; I'm going to try it myself soon!
ReplyDeleteLove your post and finally just did 2 of these today! I posted mine on Pintrest and linked back to this blog post-hope that is OK! The only extra step I did was use distress ink around the edges and through the "empty" spaces to make the paintings look more aged/weathered. Not sure if the link will work-but here are my 2:
ReplyDeletehttp://a3.sphotos.ak.fbcdn.net/hphotos-ak-ash4/288148_10151099057449810_2071894256_o.jpg
Thanks for sharing your idea!!! We're remodeling our house and this make a nice piece to add to our decor!!!
ReplyDeleteI was inspired by this project. My entire family are artistic except me. I was finally able to paint something I'm not embarrassed to hang on the wall!!
ReplyDeleteThis problem looks just like its name suggests: the hide of an alligator.
ReplyDeletehouse painter phoenix
Just finished mine! Looks great. Is there a way i can upload the picture to show you?
ReplyDeletecan i do it using poster colors?
ReplyDeleteA perfect match isn't always the best wall color choice so allow at least one of the sample boards to be an imperfect match. It just might be the spark that gives your room that non-formulated designer look.
ReplyDeleteThank you for your idea...I made one for myself and it was fun!! Your entry is a like jackpot for someone looking to do a quick but quality art project! - Cheers Aa
ReplyDeleteHi everyone, from Nova Scotia, Canada. I have recently learned how to do designs similar to "Zentangles", but I do them in my own looser style. I just found this blog tonight, totally by accident, and thought what fun it would be to do the branches and circles, but put fewer and maybe larger circles. Then add "tangles" around the outside of each circle, filling in the tangles as the spirit moves me. Thought this might be a good idea to share, as I have just joined the blog tonight. Maggie
ReplyDeleteWhen it comes to decorating, choosing paint color can really be a challenge. While you may feel that there are so many choices you're bound to find the right one, you may end up feeling that there are so many choices you don't know where to start.
ReplyDeleteJust made a list of items to buy tomorrow because I am definitely doing this. I've been looking for something for the wall above my stove. I will be using reds/oranges/yellows for the colors. Once the 'painting' is dried I'll zig zag twinkle lights behind it and VIOLA I'll have have a kitchen night light.
ReplyDeleteThanks for the FUN light.
CHEERS, CC
if u do this painting in 2-3 canvases merging, it'll luk awesome....i like this 1 too.....AWESOME
ReplyDeleteMy friends and I did this project last Thursday...it was great! Even though we used the same tutorial, they all came out very unique. We posted about it on our blog, please check it out...thank you for the awesome and easy to follow tutorial!
ReplyDeletenice
ReplyDelete