

Hey there! Since Tristin and I can't seem to get enough of Valentine's Day decor (and I hope you aren't tired of it), here's another fun and easy V-Day craft. It's what I call a crepe paper rose tree.
Here's what you need:
- Crepe paper in your favorite color (I bought fun, bright colors at Hobby Lobby for only $1 per roll. And the rolls were huge. You can also buy two smaller rolls at the Dollar Store, but they only had normal colors. Normal? Eh. Not my style.)
- An awesome branch from outside (mine is pretty awesome).
- Glue (I used Elmers.. it takes a little bit longer to dry, but you won't burn your fingers.)
- Sheets of scrap paper (these will become the "ball form" for your pomanders.)
- Thread or string
- Extra vase that you have sitting around.
Let's get started:
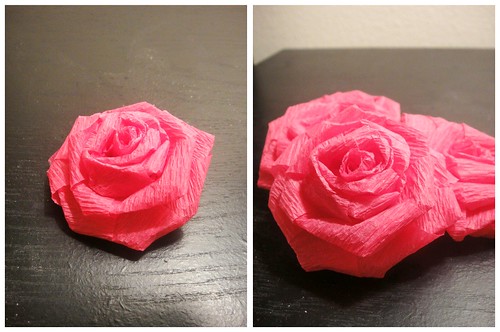
- First, make a million roses. And by "a million" I mean "a lot". I used this crepe paper rose tutorial from the House of Smith's. However, I had trouble mastering the "twist" while you wind it around the base of the flower, so I also used this video to help me understand the twisting part. I had trouble getting the first couple just right, but after it clicked, I was flying through them.
- After you have completed half a million roses and desperately need a break, start your mini pomanders. Cut two pieces of string/thread (5" or so each). These will be used to tie your pomander to the branch. Glue one end of the string to the center of your sheets of scrap paper (I used 3 or 4 sheets of paper per pomander - stacked and then crumpled together). Making sure your other end of string is sticking outside of the paper, create the ball form by crumpling up the paper. Now add your roses to the ball form you have created. Fill any "holes" with mini roses or just pieces of crepe paper. Tie your pomanders to the tree.
- Now glue the rest of the roses sparsely around the tree. I added some tiny pops of bright blue to add some fun variety. Stick your branch/tree in a vase, and you're done! You may need to add decorative stones or rocks to keep your branch in place. Using rocks from outside would give it a cool, rustic feeling.
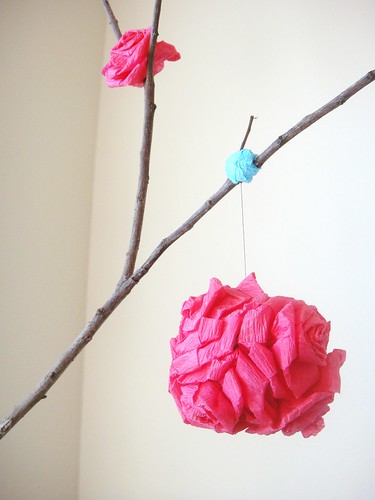
Here's the finished product:

I love it! Stay tuned for another craft I'm working on that also uses these gorgeous crepe paper roses.

Sharon! this is my favorite so far! I love it! I might have to use it sometime in the future...
ReplyDeleteI LOVE this!
ReplyDeleteStopping by from Thrifty Chick to say hi. This is such a clever and cute idea. I can see these being used for lots of holidays as well as party decorations! Thanks for sharing.
ReplyDeleteI'm coming from Thrifty Decor Chick - what a fabulous idea!
ReplyDeleteYou did use the same You Tube video I did. Yours look great! I am a new follower too.
ReplyDeleteHello! I'm hoping on over here from Thrifty Decor Chick, and can I tell you how HAPPY I am! I did NOT understand the twisting thing on the crepe paper roses either! I am so glad you posted that video tutorial link! FABULOUS! I am now following you guys! Excited to explore your blog! If you have a moment, pop on over to my blog and follow me if you like! I'm a newbie too! :)
ReplyDeleteWhat a stinkin cute idea! I am also stopping over from TDC! Thank you for sharing the paper roses! I can't wait to use them in our house!
ReplyDeleteThese are amazing! Need to find my left-over crepe paper immediately! Thanks for the insiring pictures, too!
ReplyDeleteWhat a fun project!! Thank you for sharing the link and the video b/c I'm not good at the twisty thing either; maybe these will help :)
ReplyDeleteThis is so gorgeous! Thank you for sharing!
ReplyDeleteWhat a cute idea! I love the roses.
ReplyDeleteadorable, LOVE IT! well done. jen
ReplyDeleteThese are sooo pretty! Love the crepe paper roses and the simplicity of the centerpiece! Thanks for sharing with the Pink Hippo Party!
ReplyDeleteYou Have been featured on CraftOManiac, thanks a bunch winks- jen
ReplyDeleteThis is absolutely wonderful! Not fussy-looking, but still packs a nice pop of color. I can't wait to make one/several for the corner of my living room. Thanks so much for sharing!
ReplyDelete