

Today I'm going to share with you my wall of empty frames. I stole this idea from The Nester who made a similar one on the wall to the side of their stairs. Craftiness meets home decor!
Our living room wall was very bare. Like just-color-a-dang-picture-and-put-it-up-here bare. Since we are renting, we don't want to spend the extra time and money painting and then soon after, repainting. I also didn't want to buy a humongous piece of art and just slap it up there. Don't get me wrong - I love wall art, but I wanted to incorporate something a little more unique and interesting. (Even though frame walls are definitely not a new concept.)

Here is our unbelievably bare wall [before]
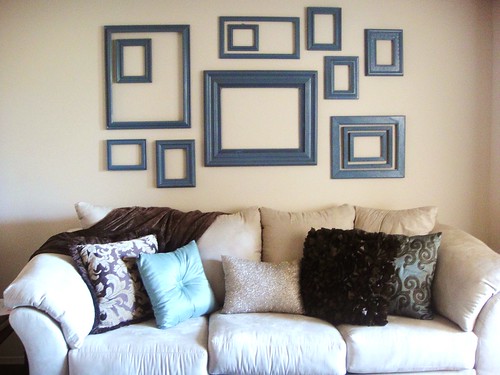
And here is our awesome frame wall [after]
Ah! Much better.
The concept is simple -
1. Collect interesting frames of all sizes
2. Remove the art and/or glass panel from inside the frames
3. Play around until you find a beautifully well-balanced arrangement that you love
4. Spray paint your frames
5. And finally, hang them up
Some notable tips -

Some notable tips -
- You can also incorporate oval frames to give your wall a different dimension and look.
- Be careful when removing glass paneling or artwork from inside the frames! I had to use my husband's tools for some of the demolition (removing staples, etc.) and I even had to carefully smash one of the glass panels in order to remove it. If you do not want to go through this much trouble, then when you are buying the frames, keep in mind that you will have to remove whatever is inside of them.
- Find free frames on craigslist or buy them cheap from thrift stores.
- If you want the spray paint to adhere better, sand the frames down beforehand. Always spray paint in a well ventilated area, preferably outside.
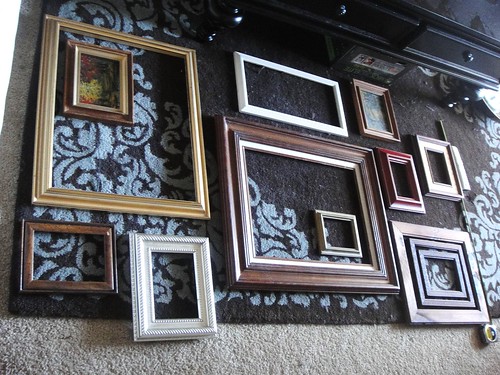
- Some people who have also done frame walls say to lay the frames down on a large piece of butcher paper and trace the frames where they are positioned. Then adhere the paper to the wall the frames are to go on, and nail the frames on top of the paper and onto the wall. Carefully remove the paper. I decided to fore go that method. I just had my frames in the arrangement I wanted and then eyeballed their position on the wall. Below is a picture of my frame arrangement before the spray paint.
If you have a sad, bare wall, then vamp it up with this fun and interesting display of
empty frames!
That's a very cute wall - and great for us renters :)
ReplyDeleteI'm going to do this to my high wall behind our love seat! I'm using a combo or turquoise and green frames :-)
ReplyDeleteGreat frame wall! So very artsy and perfect for the space. Also may I say that I just want to jump on your couch and curl up! It looks so cushy and nice :)
ReplyDeleteThis is awesome! I've been collecting little frames for months so I can do something like this on my daughter's bedroom wall. It looks great!
ReplyDeleteI love this! This is always a great way to fill up wall space. Love the color w/ your pillows.
ReplyDeleteThis turned out great! Can you come do my wall above my bed in the master?
ReplyDeleteWhat a fun idea, very creative indeed. The wall looks really nice with the frames.
ReplyDeleteI did a frame wall too check it out!
ReplyDeletehttp://jackieandtina.blogspot.com/2011/02/almost-finished-frame-wall.html
Over from Thrifty Decor Chick. LOVE this! Such a huge transformation. I am going to have to do this at my house soon!
ReplyDeleteVery nice. What a great idea. Looks fab!! :)
ReplyDeleteLooks great! Adds so much drama.
ReplyDeleteLove it. Would be a fun way to add a bright color too if you can't paint.
ReplyDelete