

We finally have coasters! Whoo hoo! As I mentioned in the Linky Love post last Saturday, we have been needing some drinking coasters for a while now. I have been perusing the internet for a DIY coaster tutorial that was easy with a beautiful result. Well, I found out that there are a lot. But I really wanted to take a stab at the ceramic tile coasters. Ooh, violent. I know this ceramic tile coaster tutorial has been done many times, but c'mon people! We needed coasters really badly. I'll share with you what I did as well as the link to the tutorial I followed by Prudent Baby.
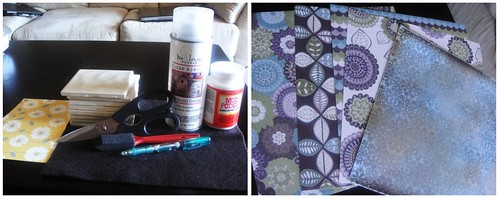
Fortunately enough, I already had almost all of the supplies on hand! How's that for easy?
- Scrapbook paper, wrapping paper, pretty napkins, any paper product of that nature. Prudent Baby says not to use anything printed off because the ink will smear.
- Scissors
- Pencil
- Felt or cork board (felt is a whole lot cheaper)
- Mod Podge (I've had this for a while now, so I don't remember how much a container of it is... maybe around $5? But it lasts!)
- Water-resistant, Clear Acrylic spray or Polyurethane spray (this costs around $5, but yet again - it lasts).
- Foam/sponge brush
- Ceramic Tiles (these are super cheap! I got mine for free from a friend, but they are around 16 cents a piece, depending on what kind of tile you get.

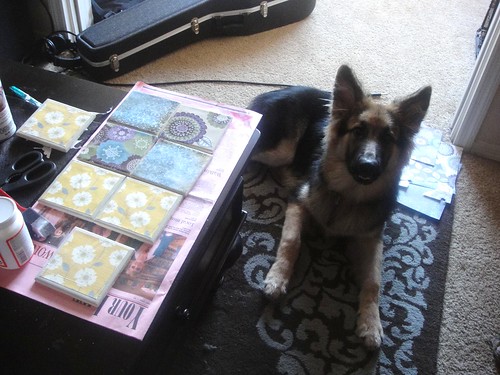
First, trace the tile onto your paper and cut it out. You can choose to leave room on the sides for a border, but I like the paper to cover the entire surface. I did, however, have a border on my yellow coasters because I used small cards for the paper, and I didn't want to have a crease in the middle of my coaster. Yes, you can also use cards for this project! There are so many fabulous cards out there with gorgeous designs. You can also get creative and cut out patterns and paste them onto your coasters to create your own picture (like the bottom cut out in the picture above).
It was my intention to pick one theme or the other (yellow or the blues and purples), but I loved them both so I chose to do four in the yellow and four in the blue/purple/flower theme.

Next, take your Mod Podge and podge up that tile. I used glossy, but you can certainly choose to do matte if you like. Carefully place your paper onto the podged (what a fun word) tile. You have a couple of precious seconds to play around with your paper to get it straightened out on the tile, but once those seconds are up, don't move it! Or you'll end up with a goopy, podgey mess. Wait a couple of minutes for the paper to stick to the tile and then podge the top of the paper. "Podge" may be my new favorite verb.
Let the tiles dry for 15-20 minutes, then apply another coat on top. Repeat this process a few more times.
Isn't our baby beautiful? I have to brag on her. She's a 50 pound puppy who is crazy and always wants to play (as all puppies are), but she just sat there like a well-behaved lady while I sat on the floor and crafted at her eye and tail level. I am such a proud mommy. :) I usually do projects on my craft table a.k.a. our dining room table, but the coffee table was closer to the big windows and provided more ventilation. I was so afraid our puppy would try to lick the mod podge, but she didn't even bother me at all. She just sat there watching me. Maybe she was watching my methods so that she could go and make her own doggie coasters. Or maybe I've gone insane.

The next step is to make felt circles for the bottom of your coasters. You can do this in between coats of mod podge while you're waiting for them to dry. Another option is to cut the felt into squares to cover the entire bottoms of the tiles. You can also choose to use cork board which looks fancier and more professional. I went with felt circles. Cause that's how I roll. And because I had limited felt in my supply of craft scraps.

Glue them on! Be sure to use a waterproof glue like the amazing E-6000 or any other glue of that nature. The husby was helping me take pictures (another one of his ways to "craft" with me. Ha! He's adorable.) I was trying to get him to take pictures of me gluing the felt on, but I ended up with two or three pictures of the coaster and a million ugly pictures of me! Maybe next time I'll let him glue and I'll take the pictures.
The final step is to spray your coasters with the clear acrylic (or polyurethane) spray. I chose the glossy coating, but the matte look would work well too. Apply according to the directions given on the can. I did a couple of coats for extra waterproofiness.

Here is the yellow set.

And here is the other set. I'm not sure if I'm going to keep both sets (because we definitely could use all 8) or give one set to someone for a present (another great reason to make these).
And that's all! They're so beautiful! They add so much to the space even though that's not their main purpose. I love them.They are so bright and cheery and have such a cool texture from the mod podge and the brush strokes. Also, they were less than $5! Well, not counting the mod podge (which I already had) and the clear acrylic spray, but those will be used for many more projects in the future, so I only count a percentage of their cost. Only $5?? Whaat? Subliminal message: Must make coasters now.
So long, nasty water rings! Good riddance.

They look so nice! I love them!!
ReplyDeleteOur puppy Ollie who's a 9 month old Golden Retriever sits just like that whenever I craft something on his level. I have an odd habit of always using my hot glue gun while sitting on the floor (I know I'm weird) and was really nervous he'd get too close to it the first time. But he just sat and starred like that too.
ReplyDeleteLove this project by the way. I've been meaning to make some of these myself.
I saw your comment at Dollar Store Crafts about your experience with the dollar store plastic cup melting. If you feel like taking a picture, email it to me & we will post it on craftfail.com (and link to your blog)!
ReplyDelete-heather
This comment has been removed by the author.
ReplyDeletethis project is definitely going on my "to-do" list! love it!
ReplyDeletefab coasters! i've made some before & love them...but yours are gorgeous! also wanted to let you know that i made a wreath inspired by your paper wreath! i loved it so much & had to get right on making my own...lol! i made sure to give you credit & linked up to a few parties too. hugs! ~if you would like to visit, here's the link: http://scrapcandydesigns.blogspot.com/2011/02/cutie-patootie-paper-wreath.html
ReplyDeleteof course you could post my wreath!! it would make my day & tickle me pink...lol! thanks so much! super big hugs!!
ReplyDeleteLove em, Sharon! I had plans to make these a million times. I made it as far as getting the tile and putting cork on the bottom. I never 'podged' the tops, which is the most fun part! Plan on finishing mine soon. I love the yellow paper you used so much!
ReplyDeletemaybe it's because I'm 9 months pregnant, but I missed where the Clear Spray comes in? My guess would be that you spray after your final coat/ dry time of the Modge Podge? Sorry... just wanted to make sure I didn't miss something important. I've had a box of tiles in my garage for a long time now and I think this is the perfect thing to do with them!! Thanks for the idea.
ReplyDeleteThese coasters are so cute. I might have to try them myself.
ReplyDeleteHopefully you will like the fabric. It was still pretty but I couldn't get over the shock of seeing it look so differently than it did in the pictures online. It may be great for what you need it for.
I love that Richloom fabric. I wish it had been a little less feminine. I would have totally used it in place of the urban outfitters fabric if it had. -Cristi
Thank you "Anonymous"! I did forget to include the directions for the clear acrylic spray. I have included the now. You just apply it after the mod podge is completely dry. Thanks for catching it!
ReplyDeleteAmazing...........
ReplyDeleteI love this Post, collection of images everything.
cork tile flooring
I want a ceramic tile back splash for my kitchen this could be an option for that project. thanks
ReplyDeleteCurious. Glazed or unglazed ceramic tiles? Or does it matter? These are awesome!
ReplyDeleteKim - It really shouldn't matter, but I used unglazed ceramic tiles. If you have glazed ceramic tiles then definitely go ahead and use them. For a glazed finish look you can use glossy mod podge.
ReplyDeleteIf I don't have Polyurethane Spray but have some clear Polyurethane (I think it's indoor/outdoor) in a can would that work?
ReplyDeleteI love these! I recently made one coaster, because that's how ambitious I get, but instead of paper I used acrylic glass paints and painted a design. I had large tiles (5x5's maybe?) and with the cork on the bottom, instead of a coaster, I use it to carry hot bowls from the kitchen. Looking at that description now I guess some people would just use a plate, but what fun is that?
How well would these stand up to heat if I wanted to use them to put pans on?
ReplyDeletethey stick
DeleteYay. Very cool.
ReplyDeleteWhat a great idea! The people we bought our house from left tons of tile that I had no idea what to do with. Now I do!
ReplyDeleteCan you use these as trivets? I was unsure how the Modge Podge and the acrylic spray would hold up to the heat after they had cured. I know the tile itself would be okay.
ReplyDeleteTried it, they stuck and took some prying to get it off... disappointed. Also had the same problem with a hot mug on the coasters
Deletea resin finish will heat proof your coasters for hot drinks, but not for use as a trivet for a dish.
DeleteI've seen tutes about making coasters before, but yours are by far the cutest I've ever seen! Thanks for posting yours in blogland!!! :-)
ReplyDeleteThank you for the very clear tutorial!
ReplyDeleteJust wondering if you spray the clear acrylic on both top and bottom or just the top and sides?
Thanks for the inspiration :)
such an awesome idea!!
ReplyDeletereally great idea! I bet wallpaper remnants would work too. But love it! Thank you!
ReplyDeleteI love these! I just made some Halloween ones. If I was wanting to sell these do you know a price I could sell them at four a set of four?
ReplyDeleteI would sell them for 6.00 set of 4 I started doing these I would sell one for about 2.00 . If your looking to get tiles there are slot of places to get them.. just don't use the brush on use spray. Lol.
DeleteWhat is the scrapbook paper called that is the second picture (not the yellow)? I love those and would like to do a similar set.
ReplyDeleteThis is a fabulous idea...great for kids to participate in for teacher's gifts!!! Love it!
ReplyDeleteim a fan! and i tried a couple of them, they look nice BUT, if i put a hot teacup on it, so for the first time when i pick up the cup - it tends to stick to the coaster. WHY is that happening? PLEASE help. im so sad about it! tried changing the mod podge coats and the amount of spray to seal it, but still the same. :( HELP.
ReplyDeleteIt might be that the clear coat needs more time to cure. Try letting it sit for about a week before using it.
DeleteI had the same problem. Also, next time I will use Zots (adhesive dots) to attach the felt.
DeleteI love this idea! its so so so cute and will work on my tight college budget!!! Thanks so much!
ReplyDeleteI just made some of these for a friend's wedding gift. I loved the way they turned out. The only bad thing about them, is that mine ended up smelling like the clear acrylic. I let them sit outside overnight, but needed to give them to her the next day.
ReplyDeleteSo, if you are making them for a gift, try an allow some time to not smell :)
Great tutorial!
Mine stick to the cup too. :( It makes me very sad.
ReplyDeleteI used decoupage sealer, so I guess it doesn't matter what type of sealer you use.
On a better note, I got my tiles for 8 cents each at Floor and Decor.
I tried to remedy this problem by applying a coat of mod podge then putting sand on the surface of the coasters...THEN sealing it. It does remedy the suction problem with the sand, but it also makes the image a bit cloudy. Some images might look cool that way - you have to experiment.
DeleteOk, these are super cute and they sound pretty easy to make, but they won't be absorbent...right? I'm not sure that I want coasters that won't absorb condensation.
ReplyDeleteThey most likely will not absorb any liquid. The sand comment i posted above may remedy this situation but you have to experiment with prototypes...i have not very much but it did absorb some coffee. Can i wash it off ? Haven't tried yet. The sand process is brand new to me.
DeleteYou are so right your cup sticks and forms suction and they do not absorb moisture runs off have to put a folded paper towel under your glass they are cute but not efficient as a coaster looking for a different material to make these coasters out of but still loving the look and the simplicity of making them any ideas?
DeleteI too would like to know where you got the scrapbook paper that is purple, aqua and green floral. That is the print of the new shower curtain I got and really want to make some of these to go in there:D Please let me know where you got it. Thanks.
ReplyDeletePeachess
I love love love these! I think they will make amazing gifts! I have added this tutorial to my DIY Christmas gifts list on my blog! http://hippiefarmchicks.blogspot.com/
ReplyDeleteDo you think we can do these with pictures? We travel tons and I thought 'where we've been' coasters could be a great x-mas gift for my husband...? Not sure if the picture type of paper would work? Maybe if I printed them out on scrapbook paper?
ReplyDeleteif you go onto youtube under modgepodge and look at the different video's it will show you how to do it and i just watched some yesterday.
DeleteThe purple-ish papers came from Hobby Lobby, I believe.
ReplyDeleteThese coasters are *not* absorbent.
I think you could absolutely use photographs though I might suggest getting them printed professionally as many inkjet printer inks can bleed--but if you have a high quality printer, it's worth a shot. After all, the tiles are less than 20 cents each.
As far as those of you who have sticky coasters, I'd suggest trying a new sealer. Also, if it's humid in your area, then this may just be a problem during humid times (which I've noticed with a few of my mod podge projects). Once the cooler, dryer air comes it seems like the problem goes away.
the problem i have had with the coasters is one due to suction. There is no break in the surface so the liquid makes a vacuum under the glass.
DeleteThis is why i tried a sand coat as mentioned above.
DeleteLOVE this idea! My Winter Texan craft class will get a kick out of this project, thanks for sharing!
ReplyDeleteAngela
fabulouslyflawedcrochetcreations.blogspot.com
I just wanted to comment on using pictures. Try using the HP Self Serve Photo Center, found in most Wal-mart locations. Only HP, not Fuji or Kodak....the baking process they use DOES NOT run like most photo's. I've used these in some of my projects with great success.
ReplyDeleteALSO if you are finding that your finished product is sticky due to your choice of finishing spray...try Modge Podge's Outdoor Podge as it is weatherproof. I live by the coast and it is ALWAYS humid here and I have better luck with this than with the original.
Hope this helps!
Angela
fabulouslyflawedcrochetcreations.blogspot.com
I am making these for my family for Christmas! love this idea so much! Would photographs work for this or would the mod podge mess them up? Thanks!
ReplyDeleteEmily
cute idea...and you could actually buy felt with sticky backing already on it and just stick it on!
ReplyDeleteSo if they aren't absorbent does the wanter just drip right off?
ReplyDeleteThese are fab! Thanks for a great tutorial, will have to give these a try, also maybe table mats with bigger tiles?
ReplyDeleteWendy x
How do I prevent bubbles from forming after i podge the scrap paper to the tile?
ReplyDeleteKymber- Amy from Mod Podge Rocks is the authority on all things Mod Podge. Here is a link to a few beginner videos, where she addresses things like wrinkling and bubbling. Hope it helps!
ReplyDeletehttp://www.modpodgerocksblog.com/p/start-here.html
Where can I find ceramic tiles? THey should be about 4"X4" right? help!
ReplyDeleteI got mine at Menards for $0.13 each! :)
DeleteMorgan
follow-and-believe.blogspot.com
Thanks so much for the great idea! I featured it on my blog: http://www.organizinghomelife.com/archives/1048
ReplyDeleteLove! Found your blog via pinterest, and my take on these coasters should be under our tree tonight. (Er, well, we don't have our tree yet, but you get the idea.) :)
ReplyDeleteHow Many times do I Spray the tiles???
ReplyDeleteI've had this post pinned for awhile and I want you to know that I am SO excited because I bought the stuff (that I didn't already have) for this project today! Thanks for the inspiration!
ReplyDeleteThank you so much for this! This is the best tutorial I have found yet.
ReplyDeleteI made a set for my boyfriends Parents and Grandparents - I hope they love them as much as I do!
Thanks for sharing :-)
ReplyDeleteWhile podgeing up my tiles I noticed that they where going to stick to my newspaper. I put the small sized canning jar lids under the tiles. This helped so much! I could podge the whole tile and not have to worry about newspaper bits sticking to my pretty tiles. I did notice the tiles slipping on the rings...I might felt the bottoms of my next tiles before I podge them up. Podge is such a fun word! Thanks for the help on these great cheap christmas projects!! ~Meg
ReplyDeleteIf you buy a roll of freezer paper and lay the tiles on the SHINY side of the paper you will not have an issue with the tiles sticking. Even if some mod podge dries on it, you will be able to put the tile off the paper easily without it ripping.
DeleteAlso - I had the same issue with sticky coasters after I sealed it with Polycrylic and allowed it to cure for over 30 days. I am now trying some Dupli Color Engine clear paint on top of everything so hopefully that will rectify the issue.
Did the new paint top work for you? I'm in the beginning process of making my coasters and am having the sticky issue. I used Outdoor Mod Podge, and they have been drying for 2 days.
DeleteI just made some Christmas-y ones for my mom, and I love how they turned out! Now I want to make some for everyone!
ReplyDeleteThe purple & green floral paper can also be found at Target for $ .99 and there are 5 different pages.
ReplyDeleteCould I do this using fabric? I had curtains altered to fit in my living room and have lots of material left over . . .
ReplyDeleteI don't see why you couldn't. I have covered wooden plagues with fabric and mod podge before.
Deletewow thanks for the idea! i realllly love the purple and teal paper you used. I dont see it online at hobby lobby or target but if anyone has any more info that would be amazing! thanks!
ReplyDeletethe tile could be handpainted with acrylic paint?
ReplyDeleteI made these as Christmas gifts this year and they were a hit!!! Thank you so much for this awesome tutorial. I will definitely be making more in the future.
ReplyDeleteI have been looking for inexpensive artwork for my newly redecorated bedroom. The room is 14 x 24, so I have alot of wall space to cover. I am going to purchase some larger, possibly 8x10, tiles and make a grouping for one wall of my room. Thanks so much for the great idea.
ReplyDeleteI've never done anything like this before, and this may be a silly question, but where do you get the ceramic tiles? I've checked Hobby Lobby's website and didn't see any big enough for coasters. Thanks!
ReplyDeleteHome Depot and Lowes carry 4x4 white tiles for only 16 cents each. ; )
DeleteCould you use brush-on polyurethane rather than the spray? It would be one less thing I'd need to buy. This seems like a fun project and I already have tiles left over from my bathroom. : )
ReplyDeleteI'm sure the brush-on will work, but we haven't tried it personally so I can't vouch for it--but with tiles costing only $ .16 and spray on poly being $4/can, I'd give it a go before buying the spray-on! Why not, right?
DeleteI have trued brush on with the polyurethane yeah spray is better when I did all the work I did on tiles sneers I was up set. No night I went and got spray much better
DeleteI love my Sonic drinks and I think these would be the perfect coasters for them! Thanks for the info! :)
ReplyDeleteI love this idea would it work for back splash tiles do you think?
ReplyDeleteExcellent idea! I am waiting for my modge podge to dry right now. I added strips of paper to the sides as well; it really gives the coasters a polished feel. Thanks for sharing. :)
ReplyDeleteI made these over the weekend. very simple craft with beautiful results. FYI if you dont already have the Mod Podge and the Spray this craft will cost about $20.
ReplyDeleteOk so i have done about 30 of these as little gifts and they came out so perfect!! the only problem is, that hot coffee cups stick to the tiles!! How can this be fixed??
ReplyDeleteAs soon as I saw this tute, I thought "back splash" for the kitchen. I'm a DIY type and will be making my own "green" countertops out of concrete and recycled colored glass. These would be the perfect solution and compliment for the countertops. Thanks so much!!!
ReplyDeleteLoved it, pinned it! Kally Zwolak
ReplyDeleteLoved it, pinned it! Kally Zwolak
ReplyDeleteMine turned out very cute! Thanks! Do you know where I could buy a holder for them?
ReplyDeleteyou can modge podge at home using 50% elmers glue and 50% water. it works amazingly and is super cheap.
ReplyDeleteHave you tried the home made mod podge on the tiles? I'm wondering if that would eliminate the sticky problem.
Deletei have been wanting to do this foe a couple months and even bought the materials. When I saw your finished ones I had to laugh because I have some of the same paterned paper as you. LOL. Yours look great by the way!!!
ReplyDeleteThis was an awesome post. Thanks for sharing. I made some of my own a few weeks ago (and just shared a pic on my blog if you are interested). Instead of using felt on the bottom, I bought adhesive back foam sheets and cut those into little squares.
ReplyDeleteYou could just cut felt squares slightly smaller than the tiles them selves and then you don't have to cut a bunch of small circles.
ReplyDeleteThese are super cute, but like someone else mentioned above, not very functional if beverages roll right off and onto the table surface anyway...? Would be cute as a wall art project tho!
ReplyDeleteThis is a great project! I had fun making mine! I have a question though... I've noticed that if I leave anything sitting on my coasters, i.e. a hard plastic water bottle, it leaves an indention in the acryllic. I used Mod Podge spray acryllic. What acryllic spray did you use? Do you have the same problem? Thanks!
ReplyDeleteI too used the Mod Podge Acrylic and let cure for roughly 1 week. Still indented and scratched easily, I was so disappointed. I've read that polymers like Envirotex Lite work well, but the application process is trickier and it's more expensive.
DeleteThis was a fun project and thanks a lot for the tutorial. Unfortunately the tiles are not very functional. I've seen a few other comments of people inquiring about what to do about hot coffee cups sticking to the tiles and making indentation marks, but I haven't seen anyone really reply with any suggestions of how to prevent that. Maybe using a different sealer? Can someone who owns this site reply please, it would be greatly appreciated! Thanks again for taking the time of showing us how to make it! I would love to distribute these as gifts over the holidays, but I don't really wanna if they don't work that well :(
ReplyDeleteLJ, I don't know that Sharon or myself have had such sticking issues, so truthfully I am not sure of how to respond. I *would* definitely be sure to use real mod-podge and not the homemade variety, as anyone who has used both knows there is a vast difference in quality. Real mod-podge is an absolute necessity.
DeleteI'd try a different sealer... but I have no surefire answer being that the issue hasn't consistently arisen in my case. We're not one of the "paid for" blogs where companies are buying our supplies, so we often haven't tried every solution because we're just average crafters (on budgets) showing what has worked for us.
Here's a reply I made to someone else's comment that may be helpful:
"These coasters are *not* absorbent.
I think you could absolutely use photographs though I might suggest getting them printed professionally as many inkjet printer inks can bleed--but if you have a high quality printer, it's worth a shot. After all, the tiles are less than 20 cents each.
As far as those of you who have sticky coasters, I'd suggest trying a new sealer. Also, if it's humid in your area, then this may just be a problem during humid times (which I've noticed with a few of my mod podge projects). Once the cooler, dryer air comes it seems like the problem goes away."
I realize that may not be a satisfactory answer, but an answer nonetheless! Sorry I can't be more helpful! ; )
Thanks so much for getting back to me! I read that comment earlier today. I don't have any issues with humidity in my area and I did use the real mod podge (I never even knew you could make a home made version!) I went to autozone and purchased a clear coat sealer that is heat resistant and I let it dry for 2 hours and it worked! No more sticking when using a hot mug. I recommend anyone having issues with their coaster's not working properly to use that, otherwise, you'll have a bunch of beautiful tiles that you don't know what to do with as I did. I'm so happy I get to use them now! Thanks for the response! ;)
DeleteAutozone... What a great idea... I never thought of that!!
Delete@LJ what did the heat resistant sealer cost (ballpark?) Also how long did you let it cure?
DeleteVery cool idea do have the name and price for the heat resistant sealer I want to try it ty
DeleteHeat resistant sealer--I never knew such a thing existed--thanks for sharing that info and for going the extra mile!
ReplyDeleteI wish we had the ability to troubleshoot each issue, but when readers share their successes, we all win. Thanks!
Exactly! One more tip for users that I'd like to share by this experience is thatthe paint will take a couple days to cure. I handled one of my coasters a day later (my mistake for being impatient) and it wasn't quite ready to be used and it left a mark on the coaster. So, after 3 days they were fully functional. You can find this paint at either pep boys or auto zone, and it's 6 bucks. The brand is Dupli-Color clear engine coating spray (heat resistant up to 500 degrees). It is non-yellowing also! Glad I could be of some assistance :)
DeleteLJ,
DeleteThank you for this tip, but i have one questioned do you use the dupli spray instead of the acrylic spray or after the acrylic spray? thank you thank you thank you, made so many coasters and all of them stick having been racking my brain how to fix the situation. if you could reply here or email me at JAMA816921@yahoo.com that would be great
did you find out if you apply the dupli-color on top of the mod podge or on top of the mod podge and acrylic sealer? i've been searching for the answer as well and bought many clear sealers that all stick! thanks for any help!!!
DeleteMade these last night with my bf. They turned out pretty darn cute. Bf & I will be gluing on the corkboard for the bottoms today or tomorrow. Think I'll also find some 1/4" ribbon to glue around the edge so it looks more "finished" so to speak. Thanks so much for the tutorial! :)
ReplyDeleteAnother idea to finish the edges is to paint the sides the same color as the tile in the early stages before mod podging. I did a few asian themed ones on black tiles (A bit more expensive, but totally worth it) and the rest are on white tile and I just painted the sides the same color with the little 2 oz. folkart acrylic paints in the craft section at Walmart.
DeleteIs there any reason that this wouldn't work to use the decorated tiles as a backsplash for my kitchen? I'm having a problem finding something that I like. Could you use the paper to decorate and seal them and not use the cork for the back? Would they hold up to being set on the wall and grouted? And stand up to being wiped down? I'm just wondering if there is something I'm not thinking of. Thanks!
ReplyDeleteI don't see why it wouldn't stand up to being grouted to a wall. The only problem I see happening in the kitchen is grease. The coasters are kinda sticky. (I haven't found a solution yet, but there's some great suggestions in earlier replies) I can see little grease spots sticking to the surfaces and it might be hard to wipe off an already sticky surface.
DeleteLooks like you shopped at Hobby Lobby :)thanks for sharing! I tried and forgot to put the modge podge on the top of the tile and just sprayed the acrylic spray... kinda wrecked the paper. Thank goodness I bought plenty more!
ReplyDeleteI have made tons of sets of these, I can not get the acrylic to cure. Used many different brands. When I stack them they stick together. And the mod podge has little bubbles I can't get out! Ugh
ReplyDeleteI made these and i followed the directions exactly - i allowed all three coats of mod podge to dry completely, cured them overnight, then sealed them, then cured that for 24 hrs and as soon as I set a warm mug of coffee on them it melted straight down to the paper. do you have any tips or advice on how to prevent this??
ReplyDeleteVery clever. I'm like you, I never had a coaster when I needed one. I'll have to give these a try.
ReplyDeleteJust an FYI you can make your own Mod Podge. 1/2 elmers glue and 1/2 water. I just started making these and instead of the spray can clear sealer I bought a quart of clear polyurethane and used a foam brush to apply it, I works like a charm! I hate spraying stuff because no matter what it goes everywhere.
ReplyDeleteThe sticking problem is possibly due to moisture absorption. Water-based poly, Mod-Podge, etc. can become re-hydrated and get sticky where it touches something. Spray/apply a top coat which does not say "water-based" on the label and see what happens. Ran into this years ago with my first Mod-Podge project - several hat boxes covered w/ torn wrapping paper. Even after drying for over a week while we were out of town, the lids stuck to the boxes here and there, and the box bottoms stuck to the one below.
ReplyDeleteJust a silly question, your puppy looks like she could be a sister to our puppy. Would you share with me where she came from? I am in Colorado, annie373@me.com our puppy is almost a year and her name is Lucy.
ReplyDeleteDO you think that you could do this with fabric instead of paper? i found some really cute stuff on clearance a while back and have been looking for something to make with it. but there is not a lot there to actually do something big with.
ReplyDeleteEveryone should definitely read all the posts by others. Almost everyones questions are answered by others commenting. Great project idea. Gonna try one set and if they work I'm going to make them for all my sister-n-laws for christmas. Thanks!!
ReplyDeleteI have made tons of these - My only recommendation is using the heavier felt (what I use; its pretty stiff and can be cut with an exacto (craft)knife.. I cut out a square and affix to the bottom - makes it much more finished.
ReplyDeleteI absolutely love this craft! My only problem --- they yellowed!! Did I use the wrong combo of mod podge and sealer? I used the authentic Mod Podge and a Clear Poly Sealer. So disappointed, I will still use them as they now have an 'aged' look but would like to fix the issue for my next set.
ReplyDeleteI used the "glossy" brand Mod Podge and Mod Podge also makes glossy" Mod Podge Clear Sealer spray. You can buy it at Wal-Mart...same area as the Clear Sealers and Mod Podge
DeleteStill wonder if the mod podge clear sealer sticks after drying......All my hard work and spots from the felt. I used a clear polyurethane sealer........Should it be acrylic? Love these coasters and want to use for Christmas gifts. Thank you
DeleteI made these over the weekend, I used paper from scraps I had around the house, but I also made some with pictures. I had so much fun with these, and I am making them as gifts for Christmas. I am so excited. Thank you so much for this craft idea. I LOVE IT SO MUCH!!! I wish their was a way I can upload my pictures so I can show you how mine came out. :)
ReplyDeleteCleaning Westcombe Park Do not forget that the dirty carpet is dangerous for your health.
ReplyDeleteAfter cleaning the carpet, make sure that it is completely dry. The wet carpet will gather more dirt and hair than the dry one.
Hi there! I found you on Pinterest a while back and just wanted to stop by and let you know how much I enjoy your blog! I also shared your link in a post I did on my blog called Oh how Pinteresting! These coasters are just great!
ReplyDeleteI was trying to make a larger one as a trivet and the paper bubbled all over. I tried the link above regarding this issues, but I just go a page not found. Will this not work for larger surfaces (12x12)? Do I need to put the podge on the time, put the paper on and let it try before I put more podge on the top of the paper? I saw the comment about the heat resistant clear coat from the auto store and will use that. Any advice is appreciated.
ReplyDeleteI meant to say do I need to put the podge on the TILE and then let it DRY before I put the podge on the top.
DeleteThe other thing I thought of was to use a spray adhesive to put the paper on the tile and then modge podge on top of that. Do you think that would work or not? I am afraid it may change to color of my paper though.
ReplyDeleteMy sister and i made several sets of four last night. We have not put on the acrylic spay yet, so we are going to try the spray from auto zone. We so hope it works because they are sooo cute!
ReplyDeleteDefinitely a fun little project! I used photos but the possibilities are endless! I'm glad I stopped to read your tutorial! I'm getting ready to put some Envirotech on my first set of coasters. The only thing I've forgotten or just didn't click in my crafty little mind was what glue to use for the pads. I have E6000 but just didn't think that far I guess! Thanks :)
ReplyDeleteThanks for this! Mine are turning out great!
ReplyDeleteOne recommendation I have for your tutorial is to maybe include the glue you used for the felt bottoms in the list of materials at the beginning of the tutorial. I wrote down the list of materials and didn't see that I needed that glue until I was finished :(
I made something very similar.....i hand painted, cured, then sealed them...... as far as absorbing...... I cut wine corks length way... glued around edges. Works great. It matched the design well.... maybe a possibility for some. Love these designs. Just beautiful!
ReplyDeleteThanks for this!! I made coasters that turned out really cute! It was so easy!
ReplyDeleteHas anyone tried using glittered scrapbook paper? It would coordinate with my dresser perfectly, but I'm afraid all that podge would spoil the shine on the paper.
ReplyDeleteI made these for a Christmas gift for my MIL, and they turned out great...until she put a mug of hot coffee on one. The mug wasn't super hot, and it still melted the clear acrylic sealer. I applied three coats of it, but that didn't seem to matter. Any suggestions to avoid this?
ReplyDeleteI am with Sage Magazine and we would love to feature this in our April issue. If you are interested, here is our contact info: sagemagazineonline@gmail.com, www.sagemagazineonline.com, www.facebook.com/sagemagazine
ReplyDeleteThank you!
Hi Sharon,
ReplyDeleteI loved reading this piece! Well written!
Merlen Hogg
soudal
Excellent diy tutorial!! love the idea and the result looks amazing!! Great blog !!!Might try this very soon!! Do you think it could be done on spray painted tiles surrounding a fireplace??? I might try the coasters first for a practice round!!he he! Thanks for the inspiration !!
ReplyDeleteLove your site...so many fun ideas! Thank you so much for sharing, keep up the great work!
ReplyDeleteYou said that the tiles are $.16 a piece.... Where are you finding tiles that cheap? I'm looking all over the internet and not finding anything that my budget can afford me - we want to make them with my students as a father's day gift and to do that I would need 80 tiles.. and I'm not finding them for less than a dollar each.. If you could link me to some cheaper tiles I would really appreciate it! Thanks so much!!!
ReplyDeleteCdependung where I live some times a place like restore or a barging outlet might have them cheap I got mine restore
DeleteI got mine at Lowe's in the flooring section for 16 cents a piece.
DeleteI think that these ceramic tile ottawa are so great. They really make the bathroom look so great.
ReplyDeleteJustKraft: These are some great ceramic coaster ideas.Thanks for sharing.
ReplyDeleteLove love love these! And....the best part is that I think I can actually make these too! Thanks for the great step by step directions! Christina ~
ReplyDeletewell I made some but used the mod podge as a sealer seeing as it did say sealer on the bottle. I gave them as a gift only to get a call that the glass stuck to the coaster and left a ring :(
ReplyDeleteIm not happy. It should say on the bottle that it is NOT an actual sealer DUH!
Hey - quick question about these. I made them recently when I saw them on another blog and have a MASSIVE problem with them sticking to each other when I stack them to store. Felt, magazines, everything seems to stick to the surface and it's driving me nuts! Do you have this problem?
ReplyDeleteThanks for any tips.
I have this problem as well. I just ruined 6 fall coasters b/c of they all stuck together. I'm wondering if resin would be the better choice over the spray clear coat.
DeleteI love these and am attempting to make them as a house warming gift for a girlfriend. Can't wait to see how they turn out! Also, I found ceramic tiles at Home Depot for $.13 per. VERY Great deal!
ReplyDeleteI have been making and selling Tile Coasters like this for the past year. I sold several at the first craft show I displayed them in, and again at a second craft market event. If it's okay to post here, you can view samples of my current and unedited list of items.
ReplyDeletehttp://www.pinkcowcreations.com
Have fun everyone. Crafting is good for the soul!!
hugs,
Pamela
I sold a ton at a recent craft fair. Got a call from a buyer a week later saying her tiles stuck, etc. I have a huge fear I will be getting more calls. Did you have this happen to you? If so, how did you handle it?
DeleteAnne
ReplyDeleteHave lots of gorgeous scrapbook paper, so these coasters are definitely a "goer".
I'd consider using a various sealer... yet There are simply no straightforward reply being how the issue hasn't regularly arisen in my situation. We are going to not just one from the "paid for" blogs exactly where businesses are purchasing our items, and we often haven't attempted every option mainly because we are going to simply typical crafters (on budgets) displaying exactly what worked for all of us. Italian design ideas
ReplyDeleteJust msde 4 sets last night. One big tip is to make sure you get the bubbles out! I hsd several that had some bubbles after I did the first modge on top. I took a pin and poked the bubble. then took a rolling pin and rolled it out (you could use a can or any round object). This morning I couldn't tell (well not too much) where the bubbles were. Question...does anyone have an idea where I could find something to put them in for storage on the coffee table. Some nice wooden or plastc open box that could be repurposed for these?
ReplyDeleteHas anyone used the Dupli Color Clear Engine Coating Spray, it's heat resistant instead of the acrylic spray? I read a prior comment that they used the engine coating spray so you use a hot cup like coffee and it wouldn't leave a wet mark.
ReplyDeleteJust wanted updates on what works best! Thanks :)
Bathroom Wall Tiles
ReplyDeleteI would love to know if when you stack them, do they stick to each other? I made several sets, but after putting them away for a year (since they are for holidays) I found that they stick. When I pried them apart, the paper tore right off where the felt was. :( Any tips?
ReplyDeleteI made these recently and though I let all of the coasters dry for a few days before stacking them to give away, the first batch I stacked had the sealant taken off by the cork "feet" of the coasters, now each corner on the top is ruined...have you had this issue before or noticed this happening with cork specifically? I'm afraid to stack up the rest as gifts in case this happens again, not sure what went wrong?
ReplyDeleteI bought drinking coaster last month. Some manufacturers offer custom printing of the image of your choice, although with higher end products such as glass, or sandstone, this will require a significant investment.
ReplyDeleteI made some slightly differently and haven't had any of the issues with sticking together or getting soggy that some people have mentioned. Check them out here: http://andrea-faison.com/diy-coasters/
ReplyDeleteInstead of cutting out felt or cork you could try craft foam alot of places cell it in pre cut forms and they also sell precut felt furniture circles that would work.
ReplyDeleteDo you think this would work on 12x 12 tiles on an outside table?
ReplyDeleteI love your project. It is very original. I note that in the USA people always mod podge as medium and here in Europe is not frequent to make decoupage with that product, we use other mediums. I'd like to know if mod podge has something different that others mediums. In addition, here it is quite expensive, about 9 euros (about $12). Best regards.
ReplyDeleteIm doing exactly this, although when I stack them, the felt pads stick the the tiles and that's causing the paper and mod podge to pull up. HELP!
ReplyDeleteThey're all so pretty, I especially like the yellow set!
ReplyDeleteWow, this is probably one of the coolest tutorials I’ve seen. Need to get into this ASAP!
ReplyDeletemarble exporters in india
Paper stuff on the picture looks very cool and awesome, i really enjoy this blog thanks for sharing this wonderful ideas about paper usage.
ReplyDeleteGreat article,The information you provided is very nice.
ReplyDeletespeech Podium
I was searching for many blogs site and now finally I have got this cool place with lots of information. click here now
ReplyDeleteI saw in another post to use a 2 part epoxy as your sealer. It is found in hardware stores and used on counter tops and bars. This would help with the cups sticking.
ReplyDeletethis good articles really helps me
ReplyDeleteYou have written amazing post on coasters. Looking forward to read more.
ReplyDeleteWholesale Coasters
This is a very powerful article, I really love it when I read it I just shocked this is super Amazing and I am sure that it is going to be very helpful
ReplyDeleteFor the people who have trouble with hot things sticking to the coasters go to Auto Zone ( or any auto store) and buy a can of engine sealant. Make sure you get the clear one and it stands up to 550* heat. The can costs about $8 but you can spray quite a few coasters with it. I give mine 2 coats. It takes 31 days to cure or put them in a 200* oven for 1 hour. Make sure you have an exhaust fan if you use the oven method. I tend to let them cure for the 31 days. I sell a lot of these and never had a complaint about sticking. I also do trivets. My husband is my tester! Lol Gope this helps.
ReplyDeletedLuxeLab
ReplyDeletehttps://www.dluxelab.com
Avail the most D Luxe rejuvenation experience in Toronto! Get the most outstanding non-surgical aesthetic solutions for the face, body, and skin from dluxelab.
Have You Gone Through the Best Cosmetic Treatment in Yorkville Torronto? For the Best Non Surgical Aesthetic Solutions I Must recommend D Luxe Lab Yokville. Book You Appointment Now
yeezy outlet
ReplyDeletebapesta shoes
bape
jordan retro
yeezy boost 350
golden goose sneaker
yeezy
golden goose shoes
gap yeezy
bape outlet
Traveling abroad is an exciting adventure that allows you to explore new cultures, cuisines, and landscapes. You will learned a few Tips of Traveling abroad along the way that can make your international journey smoother and more enjoyable.
ReplyDeletea bathing ape
ReplyDeletehermes outlet online
kyrie irving shoes
golden goose sneakers
kd13