Pages

And another heart garland...

Great minds think alike--so I'm following Sharon's awesome heart garland with one of my own.  I have another to share in a few days so I hope you're craving heart garlands in your home!


This simple garland is a result of lots of felt scraps--have I ever mentioned that I love felt?  It's a great fabric to work with because it's cheap, doesn't fray, is eco-friendly because it's made from recycled plastic bottles, and it's fun and bright!


I used a cookie cutter to trace hearts onto my felt scraps and then stitched them together using white embroidery floss and a blanket stitch.  Then I filled them with stuffing to make 'em nice and plump.  (Did you know that hearts were originally made to look like a woman's behind?  That being said, it's only logical, in my mind, to make the hearts nice and plump!) 

After I made 9 hearts (it took a lot less time than you'd imagine) I used a blunt needle to string the hearts onto some leftover yarn from Junebug's granny square sweater vest.  The open-ness in the felt left by the blanket stitch made it easy to slip in and out of the heart with the blunt needle.


I hung the garland on a shelf in our living room and little Junebug has been climbing the couch to try and reach it ever since.  Kiddos love holiday decor!  I think that these bright hearts may find a new home in Junebug's bedroom after Valentine's Day is over--she just loves it SO much!


Who says all Valentine's day decor has to be red and pink?
Tristin Signature

Heart Garland


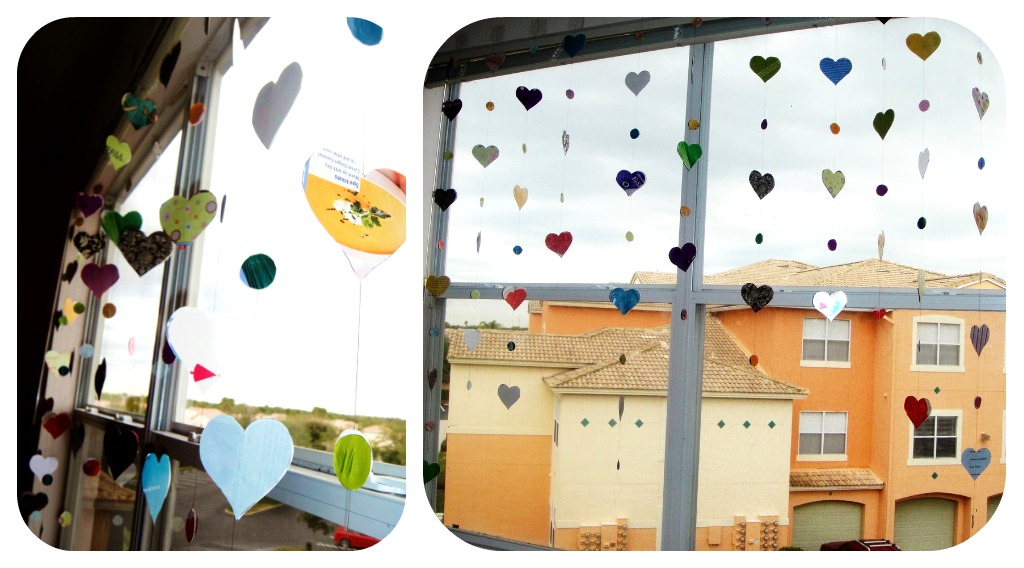
Our apartment looks a little emptier with all of our Christmas/winter decorations gone. So the solution? Start on Valentine's day decorations. I came across the blog Noodlehead, and wanted to do some rendition of her pom pom window garland. So I combined her window idea with Tristin's circle circle dot dot garland method to create this heart window garland.


The supplies are simple items that you probably already have lying around your house.

What You Need:
  • Scissors
  • Glue (you can whip out your hot glue gun, but I just used good ole Elmers glue)
  • Transparent thread, fishing line, or just any kind of thin thread - even if it's a colored thread
  • Lots of cardboard, cardstock, or chipboard. Whatever you have lying around.
  • Lots of magazines

Here's What You Do:
  1.  Use a sturdy piece of cardboard and cut out a heart and a circle to use as your template. You can also choose to do different size hearts.
  2. Flip through your magazines and look for pretty colors that you want to add to your hearts and circles. This will make your garland colorful and bright! It's definitely cheaper than scrapbook paper, and if you're like me, you already have tons of magazines lying around.Cut out hearts and circles in the colors you selected using your cardboard template.
  3. Using your templates, cut out hearts and circles from the cardstock or chipboard. This will serve as a sturdy backing to your hearts and circles.
  4. Now, taking a cardstock/chipboard heart backing, apply glue, add string on top of glue, and top it off with your colorful magazine heart. Alternate hearts and circles, and leave some space in between each heart and circle for a floating affect. I chose to alternate the lengths of my strands to add some interest and dimension. 

This craft is so easy to do, and it really brings out the Valentine's Day spirit with minimal effort and almost no money spent! You probably already have everything you need to make your own window heart garlands, so why not give it a shot?


Also, don't forget to cleanse your colon!
Enjoy! :)

Baby Love... I mean Linky Love

I don't know about you, but I feel like everyone around me is either getting married or pregnant. So much excitement in the air! We recently visited the church that my husband grew up in, and sitting around us were six pregnant ladies. Not all together - with their families, but six! Many of my friends are also pregnant. Two of which are due in the next couple of weeks! Anyways, needless to say - I've got babies and baby showers on my mind. (But not for myself!) So today, we're going to give you some linky love centered around baby showers/one year old birthday parties.

This precious ice cream bar could be used as a baby shower idea. I'm obsessed with vertical stripes.

If you're putting together a baby shower or party, you should always begin with a theme. There are so many adorable themes to choose from, and it will really help out with decoration ideas. Your theme could be a color pallet, a pattern, an animal... whatever you want it to be! Here are some popular ideas to jump start your theme selection.


Your theme could be a color pallet. Many people do pink and white, pink and brown, or hot pink and orange for girls. But check out this orange and blue color pallet for a girl. It stretches the original concept of pink for girls and blue for boys. And that orange offers such a refreshing pop of something different. I love it! Check out more color pallet ideas on Tiny Prints.


Some people choose to keep the gender of the baby undisclosed. In that case, Spearmint Baby's gender neutral baby shower color pallet is a great idea. Don't you love those chic circle mobiles above the table? I smell a quick and easy DIY project...

 
This woodland themed one year old birthday party is to die for! Woodland themes are very popular now, and this one found on My Sweet and Saucy is just the right amount of rustic elegance mixed with whimsical wonder. I love the grassy cameos and the random woodland scenes in the cloches on the table. You must go look at the full post- it's simply precious. And here's an idea that they incorporated that's becoming more and more popular with parties, weddings, and showers - The photo booth:

Complete with props. :)


The theme of this Katie Grace Designs baby shower was the letter "B" for "Baby Boy Bailey". How unique and adorable! Their simple and charming decorations as well as their foods centered around their "B" theme.
 

The next time you're planning a baby shower or birthday party - find a theme that will have your guests "aww-ing" and using the words "cute" and "adorable" all day long. Or just invite me to your party. I overuse those words like they're the only ones I know.

Happy Saturday! XO,

Crocheted ear warmer with flower

I have unintentionally kept up with the crochet theme we've got going on. But I am very nervous to have to follow Tristin's adorable granny square poncho for a toddler and her precious granny square sweater vest. I'll give it a try with my crocheted ear warmer.

I know, I know, we live in Florida where as I am typing this now, in January, we have the air conditioning running. Whaaat? Yeah, I know. But a lot of the normal part of the country is getting a lot of snow this year. While on a recent trip to D.C. I saw a lady wearing a cute ear warmer, and I thought to myself, "why haven't I made one of those already??" Probably because we currently have the air conditioning on. Whaaat? Yeah, I know.

The concept is extremely simple - crocheted head piece + crocheted flower.
There are a million ways to do this, but this is how I decided to give it a go...


I started off with yarn - Lion Brand's Wool Ease/Thick & Quick in the Oatmeal color
And my crochet hook - I9/5.50mm hook (but you can use any size hook with this project.)

PATTERN
For the actual ear warmer part I used the same method that I did in my "SCARVES!" post which utilized
Prudent Baby's chunky scarf pattern. Measure your head to gauge how big to make your ear warmer. I made mine four rows of double crochet stitches wide.


Next is the flower. I used the flower pattern on this Crochet Today beanie pattern. It gives the ear warmer great texture and a lot of added umph. In hindsight, this flower is probably too big for the ear warmer. Oh well, you live and learn. I'll definitely still wear it. Just not in Florida. Where you need air conditioning in January. Whaaat? Yeah, I know.


Happy crocheting!
XOXO,


Granny Square Sweater Vest

After yesterday's Granny Square Poncho tutorial, I feel the need to share yet another granny square project I just completed.  I ran across some simple instructions on how to make a granny square sweater vest over at Creative Jewish Mom.  What?! How awesome is that concept?

I LOVE sweater vests and granny squares (obviously) so I grabbed some yarn I had on hand and got to work making one for Junebug.  Less than 12 hours later (not consecutive hours, by the way, just stolen moments here and there) I had this finished product:
Granny Square Vest


Granny Square Vest Detail

Here's to hoping Junebug doesn't hate this one, too.

Tristin Signature

Granny Square Poncho for a Toddler

Hey crafty gals!   Believe it or not, this very post was a guest post on Prudent Baby today!  (We're stoked!) Sharon and I think that if you're not regularly checking out the Prudent Baby site, you are missing out--so go give it a whirl!


After working on the group granny square afghan, I swore off making granny squares for a while.  But I couldn't stay away, and only days after our group completed the afghan I started a new granny square project--a poncho for Junebug.

Junebug wearing toddler granny square poncho

Initially I wanted to crochet a poncho for Junebug to wear in cold weather because she strongly dislikes wearing long-sleeves (she's a Florida girl, through and through--if it were up to her, clothing and shoes would always be optional).  Anyhow, after looking all over the web for free toddler poncho patterns ('cause I'm cheap like that) with very depressing results, I decided I'd just have to come up with my own design.

I was inspired by running across this retro concept for an adult granny square poncho.


Sure, it's a pretty old pattern, and I'd never wear it--but putting the concept into a more modern design suited for a kiddo worked like a charm.

Granny Square Poncho Yarn
I used 4 colors of yarn for Junebug's poncho--all from the Caron Simply Soft collection.

Off White
Soft Pink
Pistachio
Camel

Round 1: Off White
Round 2: Soft Pink
Round 3: Pistachio
(Rows 1-3 are made using a basic granny square method.  For super-awesome instructions on granny square making, check out the Purl Bee's step-by-step tutorial.)
Round 4: One round of sc in each stitch using Off White
Round 5&6: 1 sc in each st using Camel

In total, you'll need 16 squares to make a toddler-sized poncho.  My squares were about 4" each when finished. 

Granny Square stack for poncho

I estimate that this would fit a toddler from 12 months to a 2T size--and obviously the pattern is totally adjustable based on the size you desire.  If it's for an older child, just add an extra row or two when creating your granny squares.   Junebug is a teeny toddler--she's 19 months old and still wearing 12 month sized clothing.  I'm sure this poncho will fit her next winter, too.


I used a version of the slipstitch method (using Caron Simply Soft in Camel) to join the squares in this layout:

Toddler Granny Square Poncho Layout

Once they're joined in the "seven" shape, use this schematic to join the poncho into its final shape.

*Corrected* Granny Square Poncho Schematic


Once the poncho has the structure in place, I crocheted one row of single crochet around the neck opening to make it stronger and more cohesive.


Toddler Granny Square Poncho 003I finished the bottom of the poncho by single crocheting two rows around (again, to make it stronger and more cohesive) and then used a basic shell stitch for some girly flair. 
The shell edging pattern I used goes a little something like this:
1 sc *skip 1 st, 5dc into next st, skip 1st, 1sc into next st; rep from * to end.

Toddler Granny Square Poncho 005

Then, of course, I tucked in all the loose strands.  That's never the fun part of the project, but alas, it's necessary for true "completion".

In hindsight I wish I had used different colors.  You know, something brighter and bolder, and a bit more fun.  I think the poncho came out very sweet and baby-like, and very un-toddlerish (don't you like my technical terms?).  Well, live and learn! 

Toddler granny square poncho

So, do you want to make a granny square poncho now?  Any thoughts, comments or questions?

And in case you were wondering, Junebug doesn't actually like to wear the poncho I made her.  In fact, she pretty much hates to wear anything I make for her.  Some of you may recall the ladybug costume I made her for Halloween and her, umm, less than grateful reaction.  The first dozen reactions to the poncho were pretty similar.

Ladybug Costume with Junebug

Persistance paid off and on one super-cold day, I finally got Junebug to leave the poncho on.  My will just had to be a little bit stonger than her will of iron. 

Granny square poncho top detail

Tristin Signature

Ain't she a hoot?

Ain't ain't a word so I ain't gonna say it.  Seriously though, I write it but never say it.  Weird, right?

Any-whoo (that's owl humor), Sharon and I have friends who are expecting, and they're calling the baby "little hoot" while it's tucked away in the safety of momma's womb.  To honor our friend, I made a "little hoot" brooch for the momma-to-be with this tutorial from Bugs and Fishes

Owl Brooch
Ain't she a hoot?

I used buttons instead of felt for the eyes because I'm a rebel and I like to mix up textures. 

Aren't there so many fun and simple crafts out there in the bloggy world?  I could surf craft blogs ALL DAY!
Tristin Signature
Related Posts Plugin for WordPress, Blogger...