Pages

Showing posts with label Felt. Show all posts

Fabric Dollhouse

Fabric House

Hey crafty pals!  I wanted to pop in to share my latest sewing project--a fabric dollhouse for my little gal!  What fun it was to create, too.  I don't sew as much as I'd like to (primarily because it's SO much easier to just grab a ball of yarn and a crochet hook and watch Downton Abbey mindlessly) but I enjoy it every time I pop up the ol' Singer.

This is a project from UK Lass in the US, and what a fun one it is.  UK Lass even has a fun flickr group to check out for fabric dollhouse inspiration.  You have the ability to make it super simple or get super-fancy--whatever you have the time/skill/energy/supplies for.  What fun!  (Warning, once you look at the Flickr group you WILL want to make one!)

Interior of Fabric House

I used stiff felt from my stash for all of the windows.  The little framed decorations you see on the inner walls are paper scrapbooking embellishments that I used a heavy duty no-sew iron-on adhesive to attach.  It worked like a charm--this little house is over a month old and has been played with a lot and they're still just as strong as the first day I attached them.

The outer woodgrain fabric was the only fabric I purchased specifically for this project.  Really, I could have just used scraps that I had on hand, but I wanted a certain "look" so I bought a small remnant of this fabric on Etsy. The fabric is a Joel Dewberry design called Aviary 2 Woodgrain in Bark and was purchased from Etsy seller HB Fabrics (I highly recommend the seller).


Fabric house collage

The rest of the fabric used was scraps leftover from other various projects.  I know I have already said it, but I had so much fun designing this little house.  It kind of made me feel like a kid again.

Messiest seamstress

Remember how I said that it's easier to grab a ball of yarn and a crochet hook than it is to pull out all the sewing stuff?  It's partly my own fault because I'm so very messy.  I just can't be a neat and organized crafter, no matter what I do.

April 2012 Crafts 005

I made some small errors (some fixable, some not) but overall, I'm not complaining because this project ended with a HAPPY child.  Seriously happy.

I'd estimate that this project took about 6 hours to complete (mistakes included).  So yeah, no plans for making another any time soon.   You've probably noticed that I'm way more into the hour-or-less category of projects.  A girl's gotta sleep sometime, you know?  

So, are you putting this project on your "to-make" list?

P.S. 9 weeks or so until baby Bennett is expected to arrive... The countdown begins!

Day 4: Felt Garland with Homemade Ginger

Happy Thanksgiving pals!  I hope your day is fun-filled, food-filled, and family-filled! Today, we have Homemade Ginger making a lovely and simple craft--one you'll probably still have the energy to make even after standing and cooking for the masses all day.  I hope you'll have a few moments to reflect and count your blessings amongst all of the holiday hulabaloo.  And why not sneak in a peek at the Macy's Day Parade?  Wishing you the best, however you may celebrate this day of thanks. -Tristin

Hello everyone! I'm so excited and honored to be posting today as part of the 12 Days of Christmas Series.  I blog over at Homemade Ginger and love doing easy and frugal projects like the one I'm going to talk about today!  Right now on my blog, I'm in the midst of a 30 Day project where I'm posting a different repurposing project every single day this month.   Come by and say hi!

Now, for today's project. This a simple garland that I whipped up using some supplies I already hand on hand. 


I decided to use up some of my felt scraps and create an easy and adorable Christmas tree garland this year.  I've seen some similar around and knew it would be super easy to make!

The most tedious part was cutting out all the circles.  I made them all about the size of a quarter, but you could do various sizes if you wanted.


Then, I simply sewed them together, stitching down the middle of each circle and leaving a space in between each one. I used gray thread to blend with all the colors.


I love how it adds color to our tree! I made 2 fairly long garlands with my scraps.


These felt garlands are also super cute hanging on your mantle!

You could mix things up with different shapes of felt, hang them from a wreath, make a monochromatic garland...the possibilities are endless!


Happy crafting!!

Little Hoot Costume

Ions ago, I shared a small brooch I made for a friend who lovingly called her baby "little hoot" while he lived in her uterus.  (What?!  That's where he used to live!)  Now that he's born, "little hoot" is named Jasper and we looove baby Jasper.  Especially Junebug.  She talks about him non-stop.

little hoot

Anyhow, Jasper's momma shared with me that she wasn't going to have time to make a costume for her little man like she'd wanted to.  Some lame excuse about having a newborn and lack of sleep and yadda yadda yadda... I say let the baby scream and craft away, but I guess that's just me.  (Umm, before you turn me in to the authorities, let me just say I'm kidding and I do not advocate neglecting your children so that you can craft.  Neglect your laundry and housework, yes, but never your children.) 

I took advantage of having my in-laws visiting and entertaining Junebug and here's the owl costume I made for "little hoot":


simple infant owl costume

The hat was made using the Owl Hat pattern from Maybe Matilda's Etsy shop.  Be sure to check out her shop because she has some cute patterns you can whip up in time for Christmas gifts!

crocheted owl hat

The body of the owl was made by cutting scallops into one side of strips of felt and sewing them onto a plain onesie.  Why not let your little one be super-comfy in a onesie rather than itchy in some polyester costume?

owl onesie

Little Jasper made the perfect owl.  Happy first Halloween, little man!

The Blue Shark!

If you read my often long-winded stories, then you'll probably remember the conversation I had with Junebug about her Halloween costume selection.

If you didn't read it, the conclusion was that my wee two year old had her heart set on being a blue shark for Halloween.  Why?   I'm still not really sure.  Kids sure are crazy amazing.  Seriously though, a blue shark?!

blue shark


So, here's what I came up with.  I know it looks like a total goofy shark, but playful and silly is what I was going for.  I mean, it is a blue shark after all.  When's the last time you saw a scary blue shark during Shark Week?  Any shark attacks from blue sharks?  I think not.  Goofy was clearly the way to go.

shark and brian

I had no pattern--just a few ideas stored in my mind grapes (ahh, 30 Rock, please come back soon!).  Surprisingly, the costume came out just as I had envisioned it.  That almost never happens!

my little blue shark

So, what did the shark's momma decide to dress up as?  Here's a small hint...


And another hint...

mp

The only word to describe my costume is "Supercalifragilisticexpialidocious".


Tristin Signature

And another heart garland...

Great minds think alike--so I'm following Sharon's awesome heart garland with one of my own.  I have another to share in a few days so I hope you're craving heart garlands in your home!


This simple garland is a result of lots of felt scraps--have I ever mentioned that I love felt?  It's a great fabric to work with because it's cheap, doesn't fray, is eco-friendly because it's made from recycled plastic bottles, and it's fun and bright!


I used a cookie cutter to trace hearts onto my felt scraps and then stitched them together using white embroidery floss and a blanket stitch.  Then I filled them with stuffing to make 'em nice and plump.  (Did you know that hearts were originally made to look like a woman's behind?  That being said, it's only logical, in my mind, to make the hearts nice and plump!) 

After I made 9 hearts (it took a lot less time than you'd imagine) I used a blunt needle to string the hearts onto some leftover yarn from Junebug's granny square sweater vest.  The open-ness in the felt left by the blanket stitch made it easy to slip in and out of the heart with the blunt needle.


I hung the garland on a shelf in our living room and little Junebug has been climbing the couch to try and reach it ever since.  Kiddos love holiday decor!  I think that these bright hearts may find a new home in Junebug's bedroom after Valentine's Day is over--she just loves it SO much!


Who says all Valentine's day decor has to be red and pink?
Tristin Signature

Ain't she a hoot?

Ain't ain't a word so I ain't gonna say it.  Seriously though, I write it but never say it.  Weird, right?

Any-whoo (that's owl humor), Sharon and I have friends who are expecting, and they're calling the baby "little hoot" while it's tucked away in the safety of momma's womb.  To honor our friend, I made a "little hoot" brooch for the momma-to-be with this tutorial from Bugs and Fishes

Owl Brooch
Ain't she a hoot?

I used buttons instead of felt for the eyes because I'm a rebel and I like to mix up textures. 

Aren't there so many fun and simple crafts out there in the bloggy world?  I could surf craft blogs ALL DAY!
Tristin Signature

Felt Flower Barrettes

I am addicted to making felt flowers these days.  Seriously, there needs to be rehab for this kind of addiction.  I stumbled upon this gorgeous wreath made by Megan of Homemade Ginger that features her felt flowers.

Felt Flower Yarn Wreath (Homemade Ginger)


Isn't it lovely?  And what a lovely door it rests on!  (Yeah, I noticed the door.  I'm a nerd.)

Megan also made adorable felt flower barrettes for her little gals, and I thought I'd give it a go, too!   You can find her simple felt flower tutorial here.

This is an inexpensive craft that does not require a bajillion special tools.  Just scissors, hot glue, felt and something to attach the flowers to.  You probably already have all the supplies needed to make these little embellishments.

Felt flower supplies

I used the flowers on bar barrettes because I already had them in my crafty arsenal.  Bags of barrettes are very inexpensive at craft stores.  I made different sized flowers and played around with the arrangement on the barrettes.

Felt Flower Barettes


My favorite was the red one with several small flowers across it.  I really liked how it turned out.


These barrettes are for my nieces, but I also made some for Junebug on a different type of hair clip.  I made the holly one specifically for Christmas (obviously!).


The holly is my favorite of the barrettes I made for Junebug.  I used teeny flowers (the starting felt circle size was a bit larger than a quarter, for reference) and free-cut a holly leaf shape and used embroidery floss to add some detail.


Felt is one of my favorite crafting mediums because it's colorful, inexpensive, doesn't fray, and can be used in an array of projects.  All of the felt I buy is made from recycled bottles and made in the good ol' USA.  Now that makes for some awesome crafting!

Thanks Megan for such a great felt-flower tutorial.  I can't wait to make more!

Tristin Signature

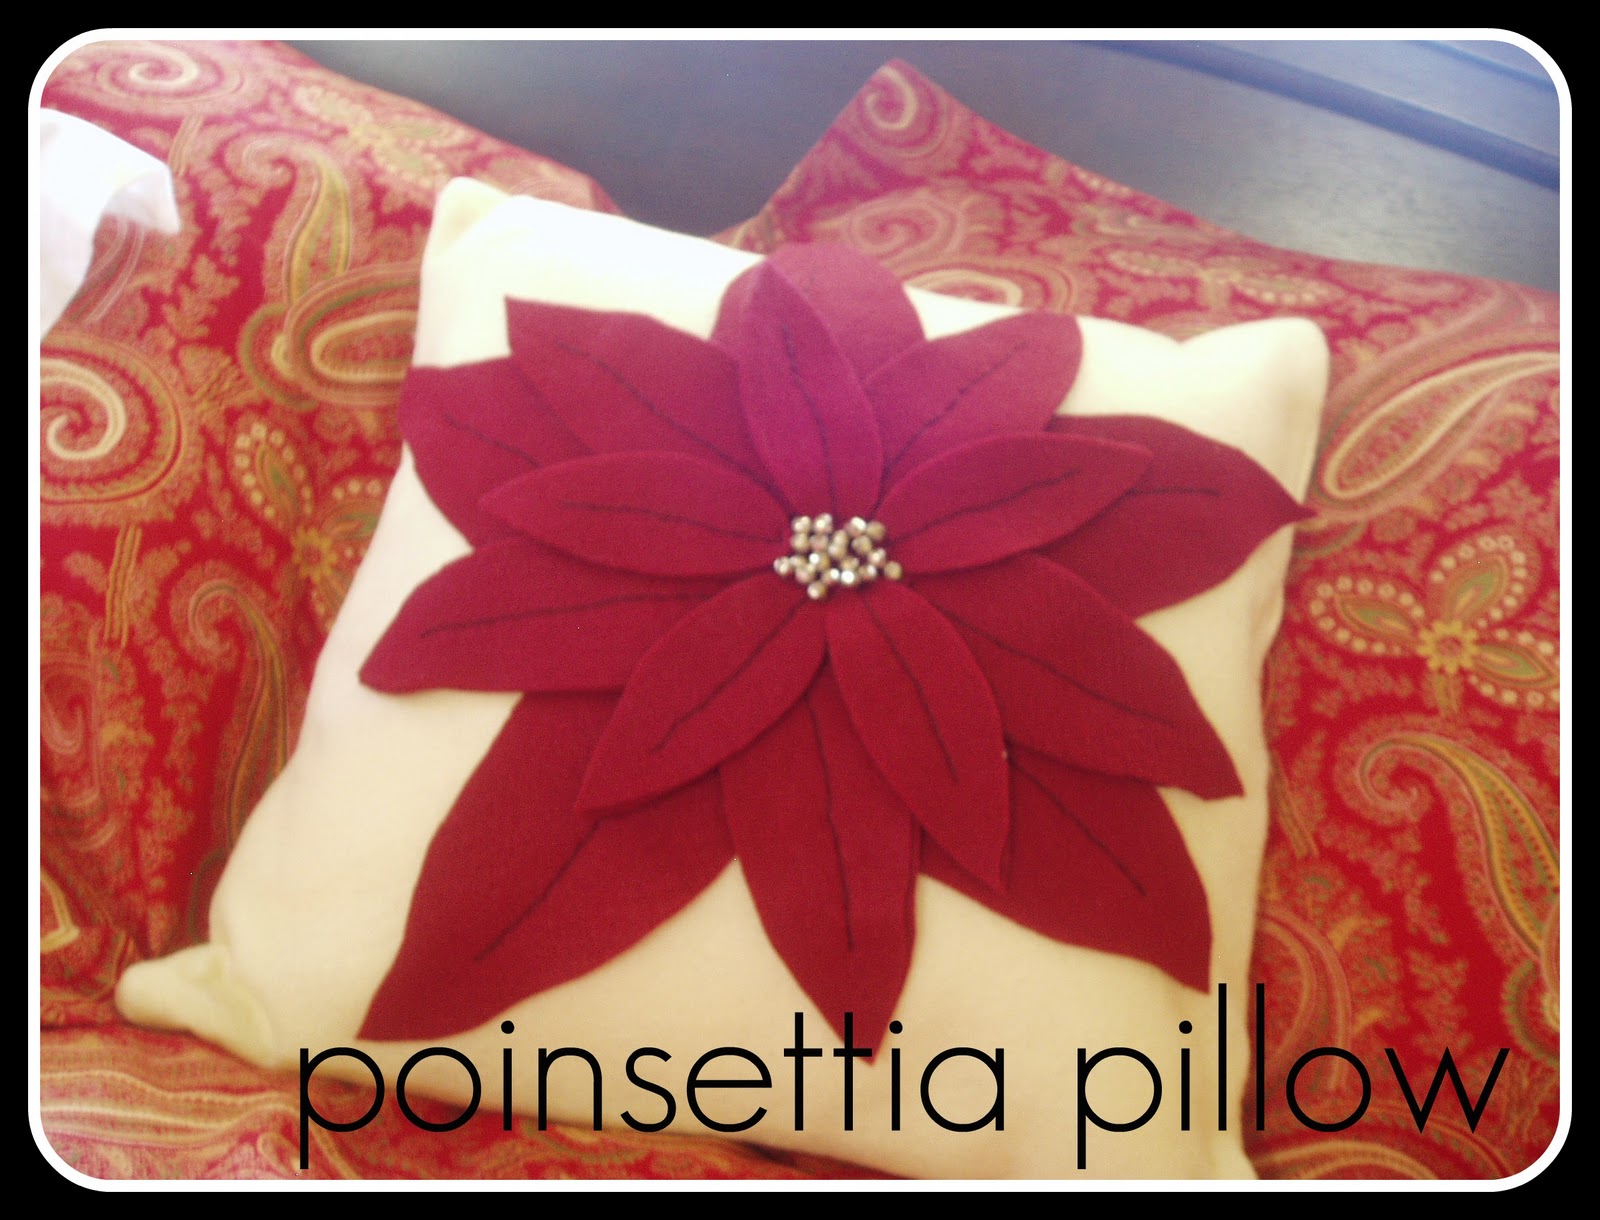
Poinsettia Pillow Tutorial


I LOVE Christmas.  The music, the tree, the ornaments, the music, the food, the cookies, the music...  Seriously, the music was worth mentioning three times.  I love it.  I am also excited for Christmas this year so I can finally display the Poinsettia Pillow I created for... $3.  Yep. 

The inspiration came from a Pottery Barn pillow in the most recent catalogue.  The PB pillow is $29, which in my opinion is expensive for something that can only be displayed for one month of the year. 

Want to make your own Poinsettia Pillow that blows Pottery Barn's away?  Here's how:

First of all, you'll need :
1/2 yard of ivory felt  (from this cut 2 16"x16" squares)
1/2 yard of ruby felt 
coordinating embroidery thread
5/8" hem tape (aka fabric tape, fabric fuse tape, etc.)
20 6mm bells
sewing machine (for sewing pillow)
pillow form or poly-fil

And before we get started, here are a few things I'd like to share.  First of all, I did not include my pillow form in the cost of the project because it can be reused year round with other pillow covers. It's a multi-tasker.  Second of all, I bought all items on sale at my fabric store or with coupons.  Stores like Jo-Ann offer 40% coupons frequently and even allow you to use competitor's coupons in the same transaction.  Lastly, the amount of fabric will be enough to complete two pillows, but in order to have enough height to cut the 16x16 pieces needed for the pillow "background" you have to buy at least 1/2 yard.  Got it?  Good.


You'll need 10 small petals, 10 medium petals and 5 large petals. 


Get a feel for how you want it to look--and appreciate how quickly the project is coming together!


Use Elmer's glue to adhere two small leaves to each other for some thickess.  Do this with all of the small leaves so that the 10 you cut out turn into 5 thicker leaves.  Do the same with the medium sized leaves.


Once the glued felt leaves are dry, use your embroidery floss to backstitch up the center of the petal for visual interest.  I think you'll agree that this is a worthwhile step.  It doesn't have to be perfectly straight--in fact it looks very charming with a little bit of veering off here and there.


Cut a 2" circle from your ruby felt and use a running stitch to affix it to the center of one of your 16x16 squares. 


Lay out the first round of petals and adjust them to your liking. 


When you're happy with the placement of your first later of petals, fuse the sides of the petals down with your hem tape.  Leave the center of the petal free of hem tape to make embroidery easier.  (It is next to impossible to stitch through the hem tape adhesive--I would avoid it at all cost!)


Now that you have fused the leaves to the ivory felt pillow front, use the same backstitch method that you used on the small and medium-sized petals to affix the petals to the pillow.


Next, use hem tape to affix second round of petals. Use a running stitch in the center to further affix the petals to the pillow front.  Repeat step for the small petals, too.  Then stitch bells into the center.

Sew pillow as you would any other pillow.  (If you're new to pillow-making, check out HGTV's Pillow Making 101.)


Wasn't too hard, was it?  Please let me know what you think!  As always, your constructive comments and questions are sincerely appreciated.
Tristin Signature
Related Posts Plugin for WordPress, Blogger...