

 |
| Pier 1's Lavender Rose Pillow, $34.95 |
Great minds truly do think alike. Except for the fact that Sharon really loves that purple color, and I really don't. I'm just not a purple-lover. Wanna make something of it? That's what I thought.
Back to the pillow--want to make one? Sure you do. Here's what you'll need:
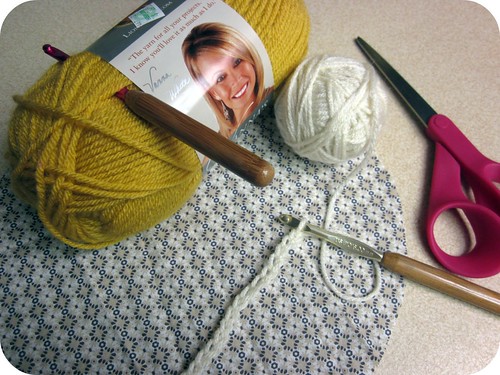
crochet hooks that correspond to the size of your yarn
2 balls of yarn (can be the same color)
scrap fabric for making the pillow
poly-fil
a good old-fashioned needle and thread
an embellishment for the center (maybe a pretty brooch or a big button)

Before you start crocheting, you'll want to determine the size of your pillow. I wanted a small accent pillow, so I traced a 10" dinner plate onto scrap fabric. In hindsight, I wish I'd used plain fabric, but I was trying to be thrifty and use what I had on hand. Be sure to cut two matching pieces of fabric--a front and back for your pillow.
Now it's time to get crocheting. I've been crocheting for about 6 months now, so I'm by no means qualified to make patterns or use the jargon--but here goes anyhow. Please note that I used two different colors of yarn to better show how I went about creating the pattern. With the base color (white) I made a chain--I probably started with about 20 stitches. Then I began to make a shell pattern using the yellow yarn, starting at the beginning of the chain. Here's the shell pattern I used:
1 sc *skip 1 st, 5dc into next st, skip 1st, 1sc into next st; rep from * to end.

I know it sounds kind of complicated, because you are basically running three processes at once--the chaining, the shelling, and stitching it all down on to the fabric. It's really not that complicated, though. The reason I did this little by little is so that I only made enough crocheted shells for the pillow and so I didn't waste my time and resources making a string of shells 20 feet too long. Make sense? It worked out pretty well, though I wish I'd sewn the strands of shell closer to each other so that the petals would appear fuller like the original Pier 1 pillow.
Live and learn, right? With the lessons I learned, your pillows are bound to be better than mine!

Anyway, follow the same process until you work your way into the middle of the pillow. Now it's time to add your embellishment. The Pier 1 pillow has a gorgeous rhinestone cluster in the center--this would be the perfect opportunity to use a brooch from a thrift store or from your own jewelry box. I chose a big blue button I picked up at Hobby Lobby for $2.50.
Sew or pin your embellishment in place and then finish your pillow as you normally would (taking care not to sew the petals into your seams).
Voila! A beautiful and unique accent pillow!

Yeah, Sharon and I are both a bit pillow-obsessed lately. But there are worse things to be obsessed about, right?
P.S. Please send us a link or a picture if you create this pillow or any of our other crafts. We love to see what you come up with and we'd like to share your successes with our readers!

This is fantastic! I am totally making this once I finish my 8000 other projects. How long did it take you?
ReplyDeleteI actually like your's better than the original. :) Once I learn how to crochet (I wish) I'll have to make one!
ReplyDeleteso pretty! i just started crocheting too, so i will have to see if i'm brave enough to try this one. haven't mastered the shell stitch yet, but no time like the present, right? thanks for sharing.
ReplyDeleteVery cute! You could also create this pillow with pure crochet (no sewing to fabric) by working out from the center, in the round, using your favorite crocheted flower pattern. You would just keep going bigger around until you reach the pillow size you want, then single crochet in the round, decreasing as you go in on the backside, and stuffing with polyfill as you get smaller. You would end up with a sort of ball-like rose pillow.
ReplyDeleteWow!.. This pillow is so cozy and inviting!.. and the colours are just awesome!.. I'm gonna have to make some of these for the basement!..
ReplyDeleteOh my sweet heavens! :o)
ReplyDeleteIt doesn't get any cuter than this!
Sincerely, Trish
That is adorable!
ReplyDeleteJust came across your blog today, and I must say...I actually like your pillow better than the inspiration! Great job!
ReplyDelete-Katie
http://thecolorhappy.blogspot.com/
This is so cute! and I have the same dinner plate:)
ReplyDeleteLOVE!
ReplyDeleteI just stumbled across this pillow and love it! I'm in the process of making pillows for my daughter's new quilt set I made. My mom is a fantastic crocheter and she's making me one of these pillows! Thanks for the idea!
ReplyDeleteYour pillow is WAY better! i love it, so beautiful!
ReplyDeleteI love it! The use of a patterned fabric is actually pretty cute - like a little secret the pillow is hiding from you!
ReplyDeleteThe other option for this pattern would be to make the chain of shells ahead of time out of wool, make it a little longer, and felt it.
Lovely!
LOVE it, also noticed that someone embellished the fabric behind the first Rose pillow pic. Hmmm, I wonder, anyone know where I can find the largest butterfly to use for the center? DGD's bedrooms is all pinks and purples and she is crazy about butterflies and there should be some PURPLE yarn (a purple lover) leftover from the afghan I have to make her parents.
ReplyDeleteThanks for the inspiration and the instructions!
Pattianne
I'm not sure what your code means. Would you please translate and email it to me?
ReplyDelete1 sc *skip 1 st, 5dc into next st, skip 1st, 1sc into next st; rep from * to end.
Katharine, katmeowrine@hotmail.com
Absolutely LOVE this! I'm visting from CRAFT....gorgeous!
ReplyDeletevery nice! I told my sister when we saw that pillow in Pier1 months ago that I would make her one, still haven't though...
ReplyDeleteI have got to try this one. Thanks so much for the tutorial. I will definitely send you a link if it works out. I am your latest follower. I would love for you to come and check out my blog and follow me back at www.diybydesign.blogspot.com. Thanks so much.
ReplyDeleteOk that is just to cute - I HAVE to make one - I am nutty about crocheting flowers so this will be a fun project Thanks for posting this I saw you featured
ReplyDeleteI saw you featured on..C.R.A.F.T
ReplyDelete:)
Thank you so much for sharing, I'm attempting to sew one right now, I'm going to try your pattern after that! :D
ReplyDeleteI like yours better! it looks more tailored and spaced out rather than crammed together...def would follow your version :)
ReplyDelete♥ sevensisters
I am almost done making mine. I have the same Vanna White yarn, color too. I ended up making mine a different color though. But I do love the pattern fabric on your pillow!
ReplyDeleteohhhhh, love this one! please do drop by and share it on Craft Schooling Sunday!
ReplyDeleteLOVE this!! off to crochet....
ReplyDeleteI fell in love with this pillow, so much that I came home and started making it tonight. I will have it finished by tomorrow and will be sure to send you a picture. It is sooooo adorable!
ReplyDeleteThis is so pretty! Linking up at Tangled Happy tomorrow. Thanks for sharing this fabulous idea! :)
ReplyDeleteBeautiful !!!!
ReplyDeleteI became a follower...
Marjo
Marjo's Cosy Corner
This comment has been removed by the author.
ReplyDeleteThis is very, very cute! I used a pattern from favecrafts.com http://www.favecrafts.com/Crochet/Flower-Petal-Pillow-Pattern-from-Caron-Yarn# It looks like that pillow too. It's crocheted in the round, even though they tied it to a large pillow.
ReplyDeleteMine is here http://www.flickr.com/photos/wildaboutcolor/4559698894/in/set-72157623072134251 :')
Super cute--I'll have to add it to my project list (But maybe I'll cheat and bump it to the top!)
ReplyDeleteI recently taught myself how to crochet via youtube videos. I'm a stronger knitter, but I love the little yarn projects you can design with crocheting techniques. I'm definitely going to make a pillow similar to this pattern. :) Thank you for the cute idea!!
ReplyDeletethatnk you...
ReplyDeleteThat is fantastik.....
I love it!!!hugs Conny
Love it, thanks for sharing :)
ReplyDeleteI saw this pillow on the Pier 1 site, started making it, then came across yours! It made me happy =) I will share my version if I can figure out where to send it!
ReplyDeleteWe liked this so much over at Copycat Crafts that we have decided to feature it today! You can view it here
ReplyDeletehttp://www.copycatcrafts.com/pier-1-inspired-crocheted-rose-pillow/
We'd love it if you'd like to display a featured button! You can grab your button on the right hand side of your post. Thanks!
I love your version so much more than the original! It is great, as are the detailed instructions. Thank you and great job!
ReplyDeleteThis pillow is so cute, and like Dopey said, better than the original! I hope to make one soon.
ReplyDeleteYour pillow is gorgeous! Beautiful job!!
ReplyDeleteI think your pillow is much cooler than the Pier 1 pillow. :)
ReplyDeleteReally cute pillow! How about adding a "Subscribe" button to your blog? Pretty please :) [Or, did I miss it?]
ReplyDeleteI like YOUR pillow better than the original. I also like getting little peeks at the fabric beneath. I'd say for someone who has been crocheting a short time you did an amazing job from seeing the original to making your own version, and so industrious of you to also create the pillow from scratch rather than trying to crochet one to size as a "slip cover" for a ready made pillow. Fantastic job, wonderful tutorial and I'm going to use it to make my own. Fantastic!!!
ReplyDeleteThank you for this tuto ! I crocheted one , the photo is on my blog ! I love it , and think to you !
ReplyDeleteSeverine56 from France
http://severine56.canalblog.com/
Hello! I came across this pattern just love it! I am the editor of AllFreeCrochet.com and would love to feature your tutorial on my site with full credit to you. I know my readers would love it as well, and in return would generate some nice traffic to your site. If you agree and would like us to feature your project, our readers will simply click the link to your blog to get your full tutorial. It's really that simple. Please let me know if this would be ok. I look forward to hearing from you!
ReplyDeleteJenny
Jbenoit@primecp.com
Plis send me the intruccions en spanish Any one have this? Send me hsanchez@sectur.gob.mx
ReplyDeleteHi, i have realized your pattern but with some modificatyons, you can see it here: http://elbuhocosturero.blogspot.com.es/2013/01/cojines-crochet.html
ReplyDeleteKisses.
I have to say that I like you pillow better.....I searched thru pinterest looking for a pattern like the pic of yours I had seen. I finally found this page with your actual pillow. I like seeing the contrasting fabric thru the petals.
ReplyDeleteAwesome the wonderful and very unique design of Pillow with Rose this type of pillow are good for the decoration of your bedroom bed, the pillow is the main part of your mattress topper where you put your head and take sleep, these type of hand made design decorated pillow are perfect for the best bed mattress.
ReplyDeleteoff white shoes
ReplyDeletejordan outlet
off white shoes
goyard bag
golden goose
palm angels outlet
yeezy outlet
golden goose outlet
yeezy 500
cheap jordans