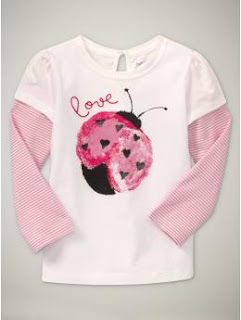
Here's the shirt we saw at Gap:
I had all of the supplies on hand from previous projects except for the t-shirt, which cost $3.
Here's what you'll need if you want to create this beauty:
- White t-shirt in your kiddo's size, washed, dried, and ironed
- Black, red and white t-shirt fabric paint (it's definitely better than regular fabric paint, I promise)
- Sponge brush
- Black puff fabric paint
- Red embroidery floss, needle, embroidery hoop (if ya wanna get all fancy)
- Water-soluble pen
Let me start by saying that perfection is not the key to this shirt. The original is funky-looking and I wanted to keep it that way, so don't go getting all freaked out about perfection--just let it go!
Make a ladybug-like shape and then let it dry. (Be sure to put a piece of cardboard inside the t-shirt so the paint doesn't bleed through. I normally use an old file folder for this.)
See how imperfect it is? No biggie--it's supposed to be that way! Once the red/white/pink streaks are dry, fill in the rest of the ladybug's body with the black t-shirt paint. Then use the black puff paint to make the antennae and the heart-shaped ladybug spots. So cuh-yoot!
If you're happy with it as is, then you can be done at this point. Personally, I liked how the word "love" was embroidered on the original Gap shirt, so I added it. I simply wrote the word "love" on the t-shirt with a water-soluble pen and then embroidered over it with red floss using a backstitch.
It's not a must, but I also fused a small piece of interfacing over the backside of the stitching so the back of the stitches would not be exposed on the inside of the shirt. Junebug is a picky gal, and I'm sure she'd be bothered by the exposed stitches against her skin. Man, she is one tough cookie!
So, here's the original next to my knock-off:
I'd say the savings and the crafty satisfaction were worth a little bit of effort! Whaddya think?


Cute!!! Another project destined for the hallowed halls of Craft Gossip!!!
ReplyDeleteVery cute im def going to try this..
ReplyDeleteSuper cute! I love it! :)
ReplyDeletethings I am going to make for my neice for her april birthday - this is the year of homemade presents !
ReplyDelete